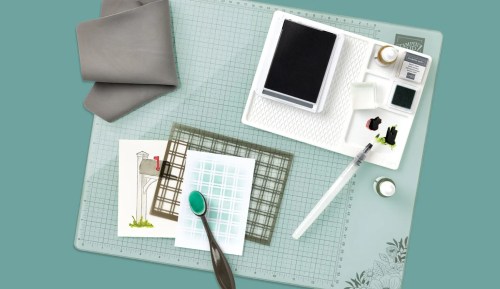
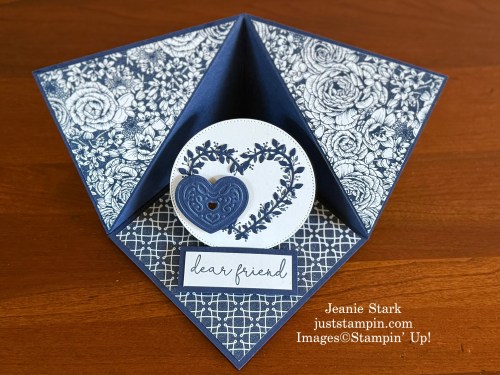
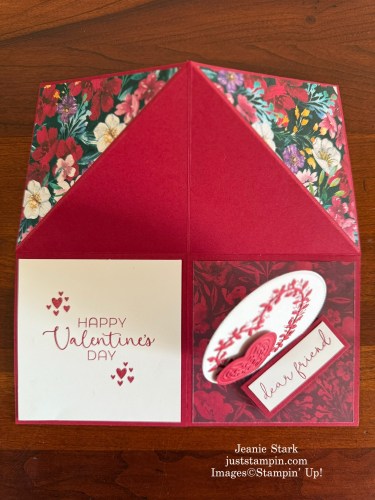
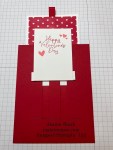
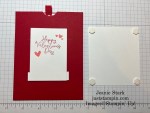
Today is Send A Card To A Friend Day! Send a Card to a Friend Day is celebrated on February 7th each year. How do you celebrate Send a Card to a Friend Day? You guessed it, by mailing a card to a friend. It’s that simple. Here’s a card I made to send to a friend.
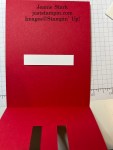
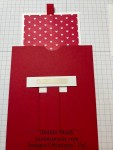
This pop up card folds to 4×4 for mailing.
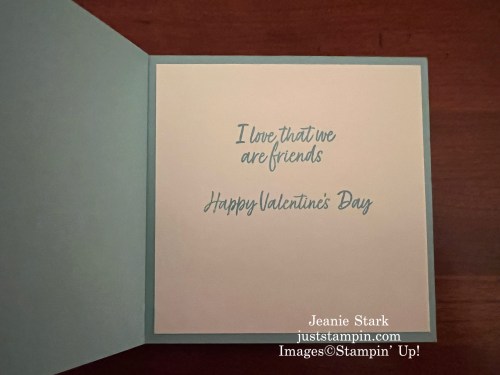
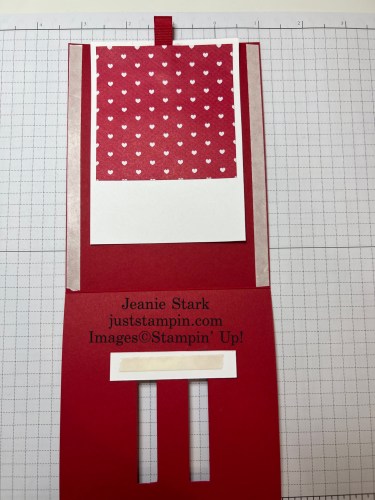
This is how it looks when you first open it.
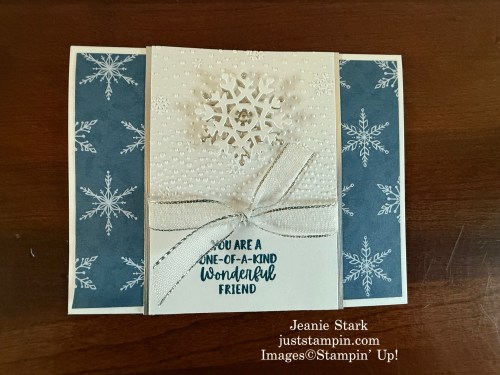
Navy is not your traditional color for Valentine’s Day; however, it’s my friends favorite color. What do you think? I used the gorgeous Serene Love Designer Series Paper. This paper was an online exclusive. It’s now on sale for $8.75 (Last Chance Product) and is only available while supplies last. Check it out!
Coordinating Colors: Lost Lagoon, Night of Navy, Old Olive
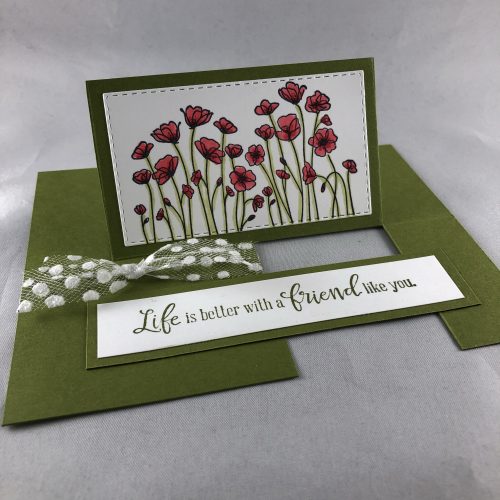
I can’t stop making these corner pop up cards! Yesterday I posted lots of friend card ideas including a different version of this pop up card. Click HERE if you missed that post and want to find out how you can get the PDF tutorial to make this fun fold card.
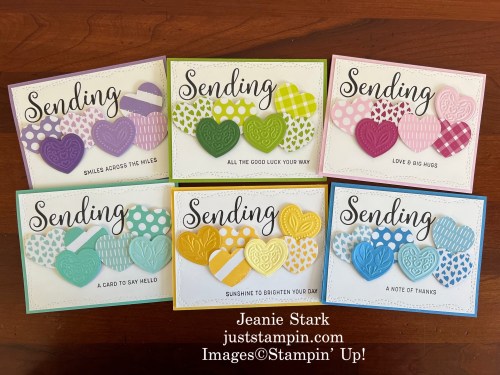
I have more inspiration for you today to celebrate the wonderful friends in your life! I love to send Valentine’s Day and other holiday cards to friends! *Click on the images to view the original post with all the details.
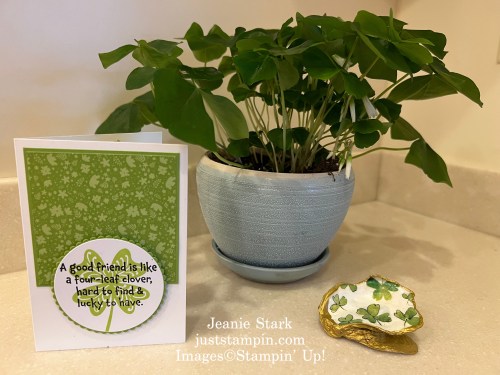
I have really enjoyed this trip down memory lane as I remembered who I created each of these cards for. The card below just made me LOL as I recalled the fun day spent with a friend! *Click on the image below to read the story behind the card.
Why Handmade Cards Make People Feel Extra Special
Meaningful connections with others can lead to a longer life, according to research cited by Stanford Medicine. They can also strengthen your immune system, lower levels of anxiety and depression, and lead to higher self-esteem. But you don’t need a scientific study to know that connecting with people just feels good.
Sending someone a card is a great way to reach out, and sending a handmade card makes the recipient feel extra special. A handmade card signals that you care about the person enough to spend time creating something just for them. It’s an added element that shows you care—especially when it comes with a sincere and personalized message from you written on the inside of the card.
Do you have a favorite card from today’s showcase? I’d love to hear from you! Leave a comment below. How will you celebrate Send a Card to a Friend Day?
Have a great day! Thanks for stopping by!
Just Stampin’
Jeanie
CLICK HERE (or on the Product List Below) TO SHOP my Stampin’ Up! store
*If your order is under $150 please add the current host code to your order. Host Code: JC4VYRP3 All orders receive a thank you card from me, free tutorials (sent via email) and/or card kits in the mail. I appreciate your order!
Product List *Click on image to View/Shop in my online store.
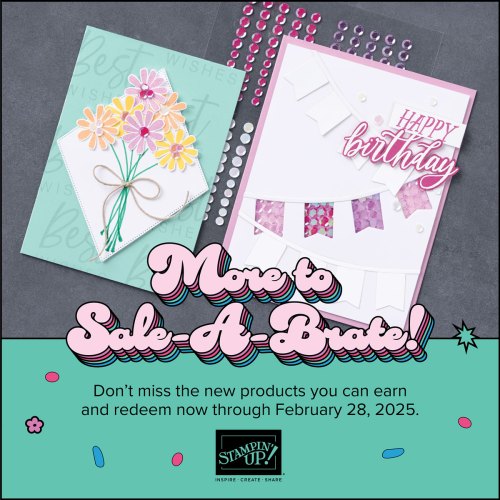
The Last Chance List has been updated with new discounts on some amazing products, but remember…everything is while supplies last! CLICK HERE TO SHOP Last Chance Products and see what’s on sale!
Send a Card to a Friend Day is celebrated on February 7th each year (That’s tomorrow!). It’s an opportunity to brighten a friend’s day during the winter months and spread smiles through the mail.
Send a Card to a Friend Day is a special occasion dedicated to reconnecting with friends through the simple act of sending a heartfelt card. It’s a day to express gratitude, share warm wishes, or simply let friends know they are cherished and remembered.
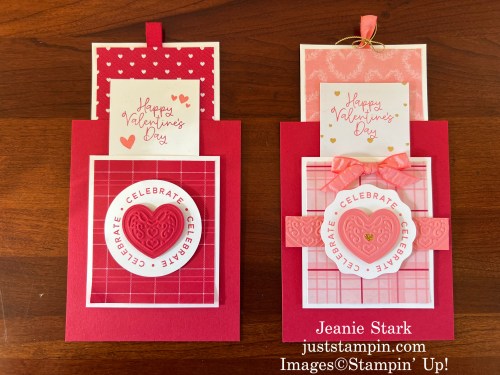
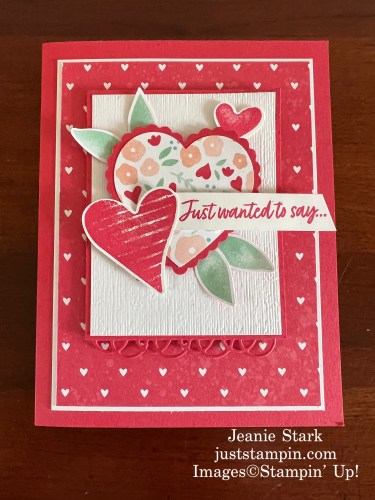
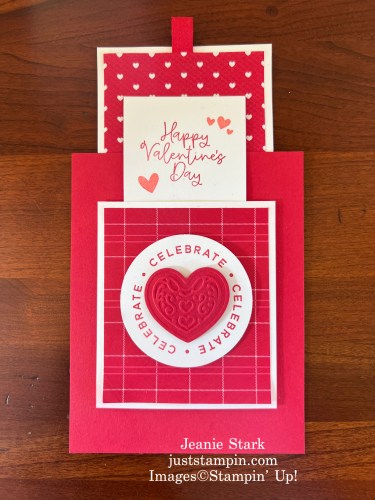
I have a lot of friend card ideas to share with you today! Here’s a card that was included in my Just Stampin’ Card Kit to Go last month. It’s a fun fold pop up card.
You could send this card any time of year or it would be a great Valentine card for a friend. I used the Sale-A-Bration Bundle, Heart Shaped (available this month for FREE with a qualifying order), on the front of this card as well as the Adoring Hearts Hybrid Embossing Folder. The sentiment from Sentimental Park is perfect any time of year!
Here’s a look at some inside sentiments you could stamp.
This card folds to 4 x 4 and fits in a medium envelope.
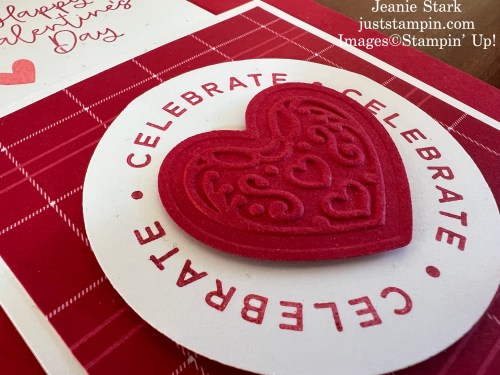
I used the Hearts of Elegance Bundle to die cut the heart then embossed it with the Starstruck Embossing Folder (another Sale-A-Bration freebie). You can view the complete list of products I used below.
The PDFtutorial to create this fun fold pop up card and more is FREE with a purchase of $50 or more this month! If you would like to purchase the tutorial for $3, email me, then send payment through Venmo (@jstark324) or PayPal (j.stark@goeaston.net). I will accept a check if you prefer.
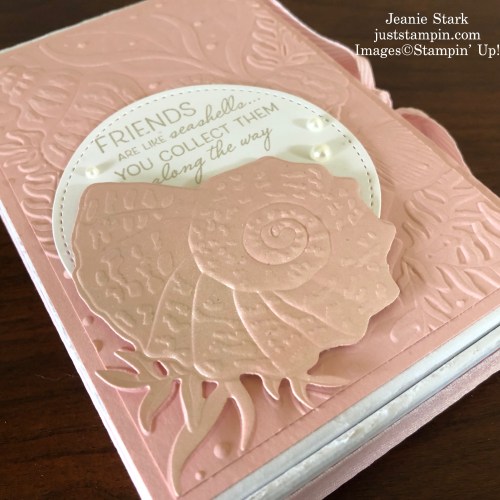
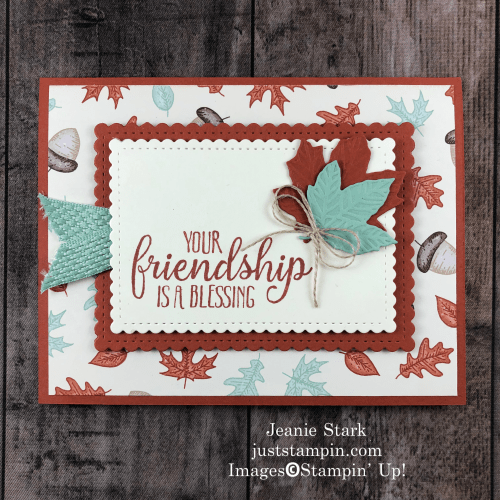
Here are some of my favorite friend cards I’ve shared previously. You can click on the image to view the original post with all the details.
Send a Card to a Friend Day is a beautiful reminder that friendship is worth celebrating and nurturing. Whether you’re sending a card to an old friend or a new one, the act of sending and receiving cards fosters connections and spreads happiness. I am so thankful for the friends in my life! Do you have a favorite card from today’s showcase? I’d love to hear from you. Leave a comment below. Who are you going to send a card to this week?
Have a great day! Thanks for stopping by!
Just Stampin’
Jeanie
CLICK HERE TO SHOP my Stampin’ Up! store 24/7
*If your order is under $150 please add the current host code to your order. Host Code: JC4VYRP3 All orders receive a thank you card from me, free tutorials (sent via email) and/or card kits in the mail. I appreciate your order!
Product List *Click on image to View/Shop in my online store.
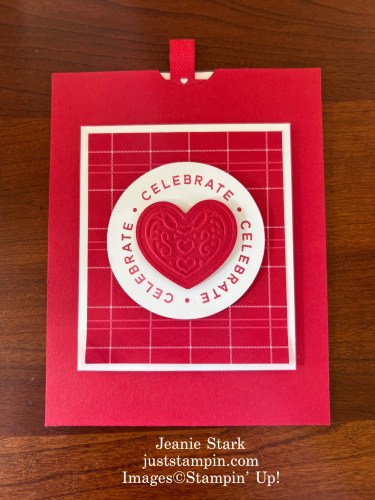
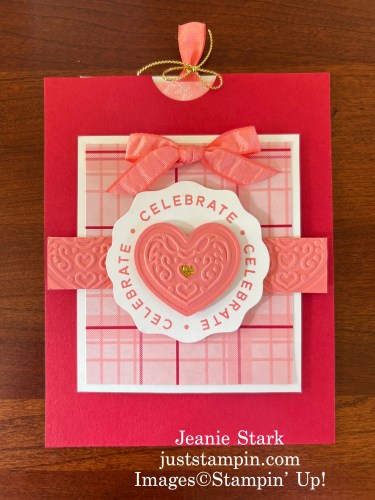
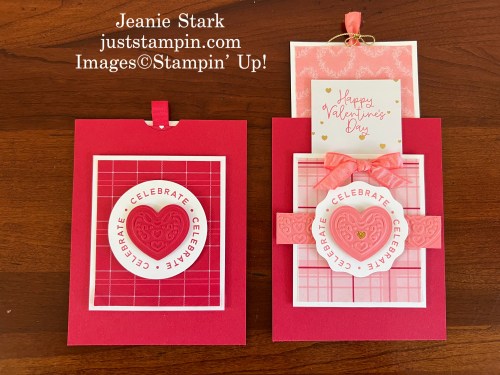
Welcome to my ABC Color Series! Stampin’ Up! offers so many great color choices! I love to combine different colors and patterns and hope to inspire you with some fun color combinations throughout this series. Today’s projects feature Real Red. I created two Double Slider Valentine cards; one could be considered masculine and the other very feminine.
I created these cards with the Most Adored 12 x 12 Specialty Designer Series Paper (A FREE Gift during Sale-A-Bration with a $50 order.)
Product colors: Flirty Flamingo, gold, Real Red
One side of this DSP features red & pink designs while the other side is gilded gold! I love that Stampin’ Up! DSP is double-sided. The only problem is deciding which side to use! I really like this color combination.
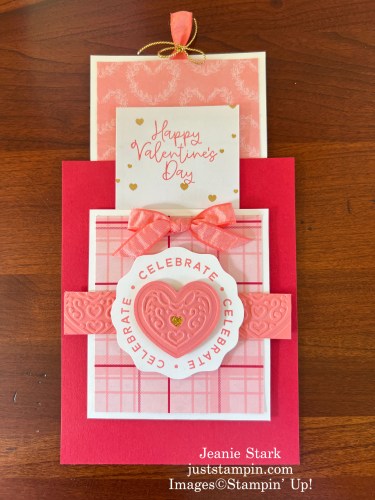
Here’s a closer look at each of today’s cards…
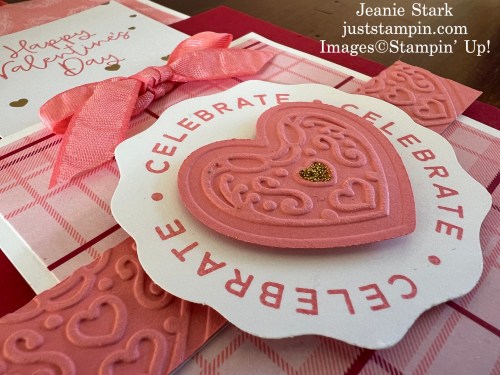
Here’s a close up of the heart from the Adoring Hearts Hybrid Embossing Folder.
I added a little Gold Glitz on the center heart and embossed a strip across with middle using the Adoring Hearts Hybrid Embossing Folder.
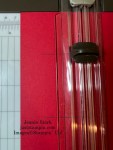
It’s been years since I made a double slider card and the punches I used previously (word window or classic label punch) are retired. I searched the web to see if anyone created an updated version but could not find anything. I figured out how to create the slider with just a couple measurements and a few cuts. Here are the details:
Measurements:
Card base (Real Red): 4 1/4 x 11, score @ 5 1/2
Basic White: 3 3/4 x 3 1/4 (front of card), 2 1/4 x 3 1/4 (middle slider piece), 4 1/2 x 3 1/4 (back layer), 3×3 to punch 2 3/8 Circle or Decorative Circle (front of card), 2 @ 1/2 x 2 1/2 (slider pieces)
DSP (Most Adored): 3 1/2 x 3 (front), 3 x 3 (back)
Cardstock (Real Red/Flirty Flamingo): scrap to die cut/emboss heart with Adoring Hearts Hybrid Embossing Folder, *optional 3/4 strip across front
Directions:
Fold & burnish card base. *Note- for this card the fold is at the bottom and the top of the card is open. *Cut a notch at the top of the front of the card using a 1″ circle punch/die. (I did not do this step until later; however, it would be helpful to mark the top front of your card to start for marking & cutting in the next few steps.)
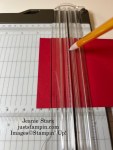
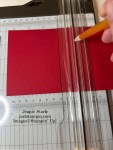
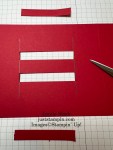
To create the opening for the slider on the front of the card: Place the top section of your cardstock in the Paper Trimmer at 1 3/4 and draw a line with a pencil. Move your cardstock over to 4 1/4 and draw another line.
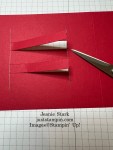
Next, you will turn the cardstock in the other direction (so the top is at the top) and put back in the trimmer. You will make 4 cuts between the pencil lines. Line your cardstock up at 1 1/2″ and cut from the top pencil line to the bottom line. Move your cardtock to 1 3/4″ and make another cut from the top pencil line to the bottom pencil line. Repeat at 2″ and 2 1/4″.
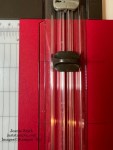
Use Paper Snips to cut the ends of each strip and remove completely.
To make the sliding piece, place one of the 1/2 x 2 1/2 white strips centered inside the card. Close the card and add dimensionals through the openings. Adhere the other 1/2 x 2 1/2 white strip on top to create a sandwich. This piece will now slide up and down. Move slider piece all the way to the bottom. Add a piece of Tear & Tape to both sides of this moveable piece. (*Notice the notch at the top in the photo.)
Add a folded piece of ribbon to the 4 1/2 x 3 1/4 piece of white cardstock and secure with Tear & Tape. Then adhere the 3 x 3 DSP to the top portion. *You will not see the lower portion once the slider is in place so you don’t need to waste DSP to cover the whole piece.
Open the card. Add Tear & Tape on the inside of the card along the sides. Center the back slider piece (layer with the ribbon pull) in the middle of the card and line it up at the top of the card. *Note the position of the white slider below the score line. Remove the Tear & tape from each side and the slider before closing the card to secure.
Stamp the middle piece (2 1/4 x 3 1/3).
Pull the back slider all the way up and center middle slider before removing Tear & Tape to secure to front of slider.
Adhere 3 1/2 x 3 DSP to 3 3/4 x 3 1/4 white piece for front layer. Stamp sentiment from Circle Sayings and punch with 2 3/8″ Circle Punch or Decorative Circle Punch. Adhere with Stampin’ Dimensionals.
Cut embossed heart using Adoring Hearts Hybrid Embossing folder. To die cut & emboss at the same time, place the dies inside the embossing folder with the cutting edge up. You will be able to feel them fit in place. Add your cardstock on top of the die and close the EF. You will run this through the Stampin’ Cut & Emboss Machine using just the platform base (#1) and the #4 plate. (*There’s visual reminders right on the base plate.) Adhere to circle piece with Stampin’ Dimensionals. *You can Click HERE for tips and more cards I created with this embossing folder.
Add Dimensionals on the back only on the 4 corners. Position the main image over the front slider. Make sure the slider won’t be stopped by one of the dimensionals.
Your card will now slide up and down. I added a few more elements to the feminine version with a ribbon bow and gold trim.
What do you think of these double-slider cards? Are you ready to give this fun fold a try? Like so many fun fold cards, they are much easier than they look!! Feel free to contact me if you have any questions.
Congratulations to….Stacy O’Dell! Stacy is the winner of the “color buddy kit” to create an adoring hearts card. *Email me (j.stark@goeaston.net) your address and I will put your kit in the mail. Many thanks to everyone who left comments! I am so glad you were inspired by the color buddy cards! *If you missed that post, Click HERE.
Have a great day! Thanks for stopping by!
Just Stampin’,
Jeanie
It’s Sale-A-Bration Time!!!!!
Get free items with each $50-$100 you purchase!
You can purchase any of the products used to make today’s project from my online store. CLICK HERE TO SHOP (or on the products listed below) and earn FREE Sale-A-Bration items!
Current Host Code: CFUENJND * If your order is under $150 be sure to add the host code to your order to receive a thank you gift from me. If your order is $150 or more, don’t use the host code. You will earn Stampin’ Rewards to spend as well as my thank you gift. All orders receive a handmade card in the mail from me.
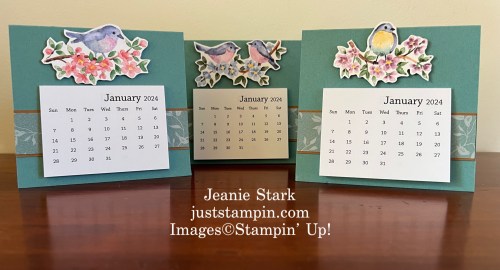
Today is the last day for January’s thank you gift…a calendar kit with your order of $50 or more! (Plus you will earn a FREE Sale-A-Bration product!!!) Product List (Click on image to shop my online store.)
Love being creative? Become a Stampin’ Up! demonstrator and start your own journey. I’d love to have you on my team! Stampin’ Up! is offering TWO options to join during Sale-a-Bration:
OPTION ONE – Your choice of $125 of FREE product for $99 with free shipping PLUS Stampin’ Up!’s Glass Mat Studio (a retail value of $60). The studio includes a 17″ x 14″ glass mat, an 8-3/8″ x 6″ silicone mat and an 8-1/4″ square cleaning cloth. Here’s a look at the Stampin’ Glass Mat Studio:
OPTION TWO – Your choice of an additional $30 in FREE products to add to your Starter Kit. That’s $155 of your choice of products for just $99. PLUS free shipping.
Both options include FREE SHIPPING, a FREE Paper Pumpkin Kit, and More!
If you have thought about joining and want to be a part of an amazing online community of stampers, feel free to email me (j.stark@goeaston.net). I’d love to answer your questions or set up a time to chat with you. *Team members receive my kit tutorials (and more) for FREE. Check out more details and how to Join HERE.


![Hearts Of Elegance Bundle (English) [ 164916 ]](https://assets1.tamsnetwork.com/images/EC042017NF/164916s.jpg "Hearts Of Elegance Bundle (English) [ 164916 ]")
![Hearts Of Elegance Photopolymer Stamp Set (English) [ 164909 ]](https://assets1.tamsnetwork.com/images/EC042017NF/164909s.jpg "Hearts Of Elegance Photopolymer Stamp Set (English) [ 164909 ]")
![Hearts Of Elegance Dies [ 164915 ]](https://assets1.tamsnetwork.com/images/EC042017NF/164915s.jpg "Hearts Of Elegance Dies [ 164915 ]")
![Stylish Shapes Dies [ 159183 ]](https://assets1.tamsnetwork.com/images/EC042017NF/159183s.jpg "Stylish Shapes Dies [ 159183 ]")
![Sentimental Park Photopolymer Stamp Set (English) [ 160561 ]](https://assets1.tamsnetwork.com/images/EC042017NF/160561s.jpg "Sentimental Park Photopolymer Stamp Set (English) [ 160561 ]")
![So Sincere Cling Stamp Set (English) [ 162283 ]](https://assets1.tamsnetwork.com/images/EC042017NF/162283s.jpg "So Sincere Cling Stamp Set (English) [ 162283 ]")
![Adoring Hearts Hybrid Embossing Folder [ 162569 ]](https://assets1.tamsnetwork.com/images/EC042017NF/162569s.jpg "Adoring Hearts Hybrid Embossing Folder [ 162569 ]")
![Heart Shaped Bundle (English) [ 164953 ]](https://assets1.tamsnetwork.com/images/EC042017NF/164953s.jpg "Heart Shaped Bundle (English) [ 164953 ]")
![Serene Love 12" X 12" (30.5 X 30.5 Cm) Designer Series Paper [ 166261 ]](https://assets1.tamsnetwork.com/images/EC042017NF/166261s.jpg "Serene Love 12\" X 12\" (30.5 X 30.5 Cm) Designer Series Paper [ 166261 ]")
![Night Of Navy 8-1/2" X 11" Cardstock [ 100867 ]](https://assets1.tamsnetwork.com/images/EC042017NF/100867s.jpg "Night Of Navy 8-1/2\" X 11\" Cardstock [ 100867 ]")
![Basic White 8 1/2" X 11" Cardstock [ 159276 ]](https://assets1.tamsnetwork.com/images/EC042017NF/159276s.jpg "Basic White 8 1/2\" X 11\" Cardstock [ 159276 ]")
![Basic White Medium Envelopes [ 159236 ]](https://assets1.tamsnetwork.com/images/EC042017NF/159236s.jpg "Basic White Medium Envelopes [ 159236 ]")
![Night Of Navy Classic Stampin' Pad [ 147110 ]](https://assets1.tamsnetwork.com/images/EC042017NF/147110s.jpg "Night Of Navy Classic Stampin' Pad [ 147110 ]")
![Night Of Navy & Gold 1/2" (1.3 Cm) Glittered Ribbon [ 162011 ]](https://assets1.tamsnetwork.com/images/EC042017NF/162011s.jpg "Night Of Navy & Gold 1/2\" (1.3 Cm) Glittered Ribbon [ 162011 ]")
![Stampin' Seal [ 152813 ]](https://assets1.tamsnetwork.com/images/EC042017NF/152813s.jpg "Stampin' Seal [ 152813 ]")
![Adhesive Backed Heart Sequins [ 164920 ]](https://assets1.tamsnetwork.com/images/EC042017NF/164920s.jpg "Adhesive Backed Heart Sequins [ 164920 ]")
![Multipurpose Liquid Glue [ 110755 ]](https://assets1.tamsnetwork.com/images/EC042017NF/110755s.jpg "Multipurpose Liquid Glue [ 110755 ]")
![Stampin' Dimensionals [ 104430 ]](https://assets1.tamsnetwork.com/images/EC042017NF/104430s.jpg "Stampin' Dimensionals [ 104430 ]")
![Foam Adhesive Strips [ 141825 ]](https://assets1.tamsnetwork.com/images/EC042017NF/141825s.jpg "Foam Adhesive Strips [ 141825 ]")
![Bone Folder [ 102300 ]](https://assets1.tamsnetwork.com/images/EC042017NF/102300s.jpg "Bone Folder [ 102300 ]")
![Paper Trimmer [ 152392 ]](https://assets1.tamsnetwork.com/images/EC042017NF/152392s.jpg "Paper Trimmer [ 152392 ]")
![Stampin' Cut & Emboss Machine [ 149653 ]](https://assets1.tamsnetwork.com/images/EC042017NF/149653s.jpg "Stampin' Cut & Emboss Machine [ 149653 ]")


![Regal Winter 12" X 12" (30.5 X 30.5 Cm) Designer Series Paper [ 164156 ]](https://assets1.tamsnetwork.com/images/EC042017NF/164156s.jpg "Regal Winter 12\" X 12\" (30.5 X 30.5 Cm) Designer Series Paper [ 164156 ]")
![Cherry Cobbler 8-1/2" X 11" Cardstock [ 119685 ]](https://assets1.tamsnetwork.com/images/EC042017NF/119685s.jpg "Cherry Cobbler 8-1/2\" X 11\" Cardstock [ 119685 ]")
![Cherry Cobbler Classic Stampin' Pad [ 147083 ]](https://assets1.tamsnetwork.com/images/EC042017NF/147083s.jpg "Cherry Cobbler Classic Stampin' Pad [ 147083 ]")


")
")
 Circle Punch")
")

 Specialty Designer Series Paper")