
 This week’s Challenge board is full of possibilities! Check it out!!
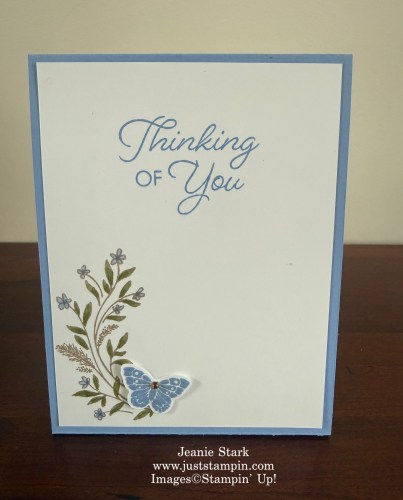
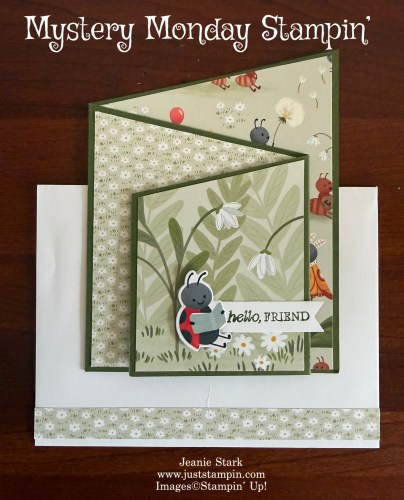
I thought about going across the middle with my favorite things: beach and fun fold; however, I ended up making a different card (though I did make a fun fold!! LOL). I created Tic Tac Toe 3 ways: across the top, down the right side, and on the diagonal (from top left to bottom right). Here’s my fun fold, butterfly card which I colored with markers, added some ribbon and twine, and a little sparkle with Wink of Stella and gemstones.
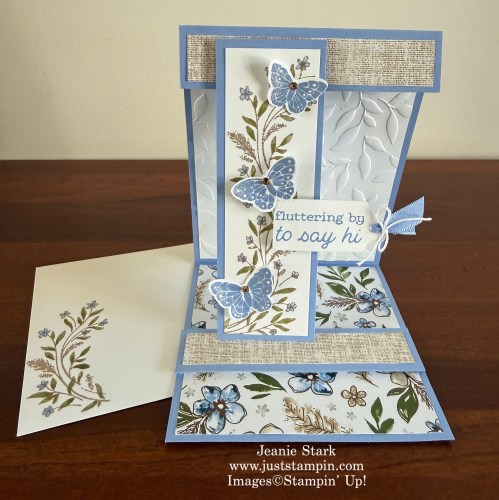
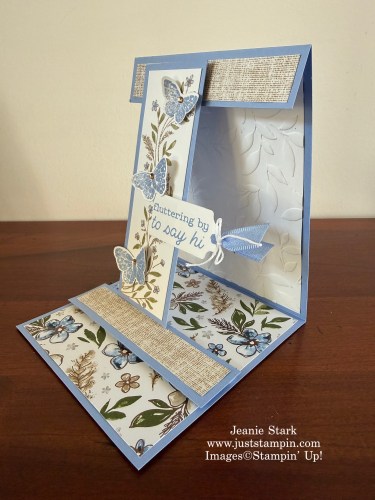
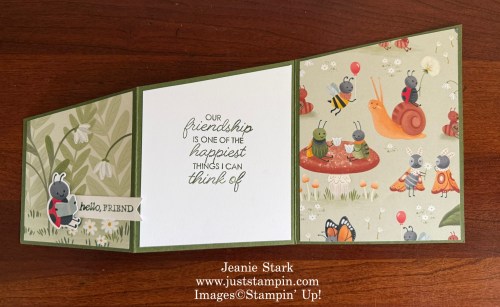
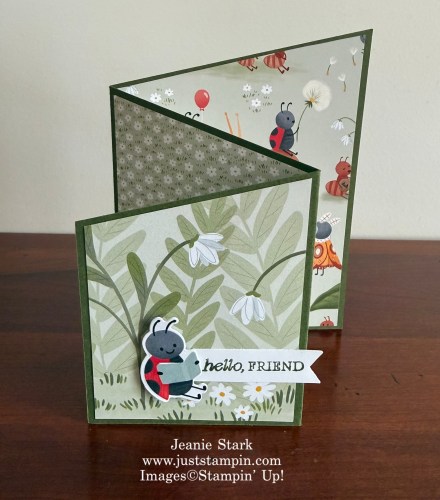
I love this fun fold card inspired by Sue Campfield! It is called a Triple Display Easel Card because it gives you three beautiful views to enjoy: the front when it’s closed, the middle section when it’s first opened, and finally the easel display (front and back) when it’s standing up. Let’s take a closer look.
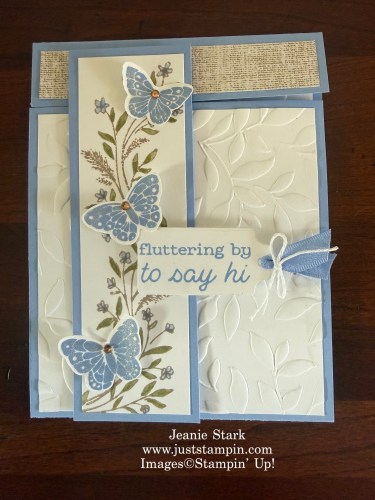
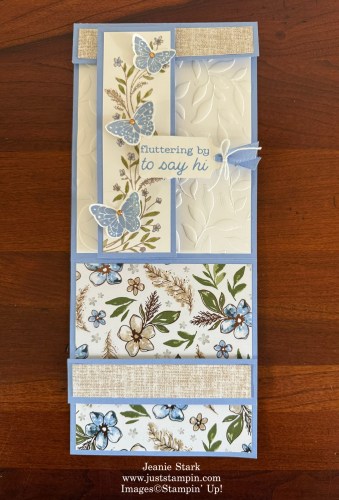
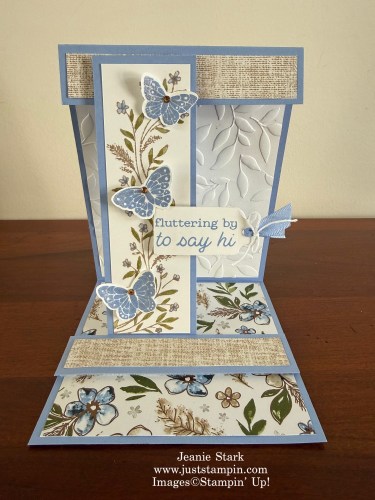
This fun fold card looks so pretty from every angle!
Look how the butterflies sparkle with Wink of Stella!

You get another view from the back.
Here’s the supplies I used to create this card:
Stamp Set/Bundle: All Aflutter, Delicate Whispers, Framed All Around
Ink: Hydrangea Hue, Crumb Cake, Mossy Meadow and Hydrangea Hue Stampin’ Blends
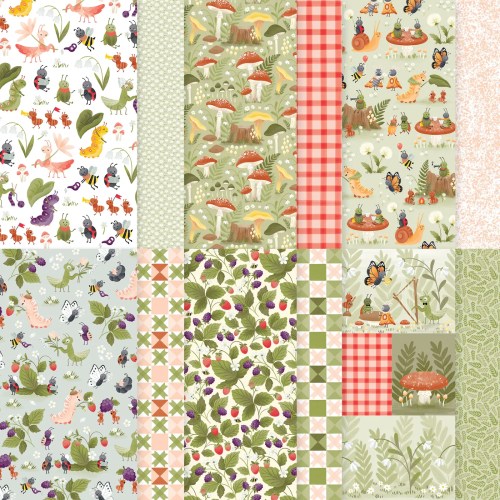
Paper: Delicate Dreams Specialty Designer Series Paper, Hydrangea Hue and Basic White Cardstock
Tools & Accessories: Scalloped Blooms Dies, All Aflutter Punch, Paradise Garden Hybrid Embossing Folder, Wink of Stella, Hydrangea Hue Ribbon, White Twine, Metallic Gems, Bone Folder, Paper Trimmer, Simply Scored, Cut & Emboss Machine
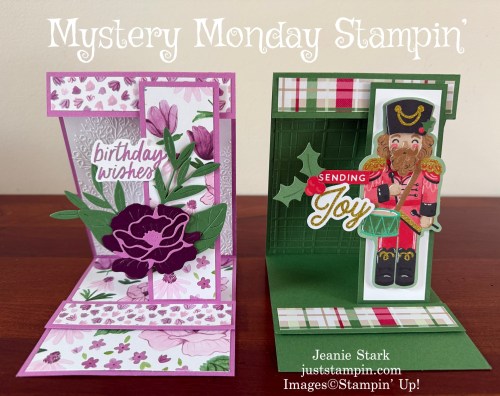
I made this fun fold style card before for my Mystery Monday Stampin’.
Click HERE or on the image above to visit my blog post with all the details to create this fun fold and download the FREE PDF Tutorial.
LAST CALL…Orders need to be placed by July 31st!
If you like the cards I create and share on my blog you will love my Just Stampin’ Card Kit to Go! Each month I create a card kit with fun fold cards, an optional 3D project, and more. Everything is included so all you have to do is add your own sentiment stamp, ink, and adhesive. I love to make it easy for you to create and send handmade cards to brighten someone’s day! CLICK HERE for all the details to order your kit today!
Have a great day! Thanks for stopping by!
Just Stampin’
Jeanie
You can view/shop the products I used by clicking on the image below.
Product List
|
|
|
|
|
|
||
|
|
||
|
|
|
|
|
|
||
|
|
||
|
|
|
|
|
|
|
|
|
|
|
|
![All Aflutter Bundle (English) [ 167570 ]](https://assets1.tamsnetwork.com/images/EC042017NF/167570s.jpg "All Aflutter Bundle (English) [ 167570 ]")
![All Aflutter Photopolymer Stamp Set (English) [ 167564 ]](https://assets1.tamsnetwork.com/images/EC042017NF/167564s.jpg "All Aflutter Photopolymer Stamp Set (English) [ 167564 ]")
![All Aflutter Punch [ 167569 ]](https://assets1.tamsnetwork.com/images/EC042017NF/167569s.jpg "All Aflutter Punch [ 167569 ]")
![Delicate Whispers Photopolymer Stamp Set (English) [ 167500 ]](https://assets1.tamsnetwork.com/images/EC042017NF/167500s.jpg "Delicate Whispers Photopolymer Stamp Set (English) [ 167500 ]")
![Framed All Around Photopolymer Stamp Set (English) [ 167221 ]](https://assets1.tamsnetwork.com/images/EC042017NF/167221s.jpg "Framed All Around Photopolymer Stamp Set (English) [ 167221 ]")
![Scalloped Blooms Dies [ 167646 ]](https://assets1.tamsnetwork.com/images/EC042017NF/167646s.jpg "Scalloped Blooms Dies [ 167646 ]")
![Delicate Dreams 12" X 12" (30.5 X 30.5 Cm) Specialty Designer Series Paper [ 167498 ]](https://assets1.tamsnetwork.com/images/EC042017NF/167498s.jpg "Delicate Dreams 12\" X 12\" (30.5 X 30.5 Cm) Specialty Designer Series Paper [ 167498 ]")
![Hydrangea Hue 8 1/2" X 11" Cardstock [ 167687 ]](https://assets1.tamsnetwork.com/images/EC042017NF/167687s.jpg "Hydrangea Hue 8 1/2\" X 11\" Cardstock [ 167687 ]")
![Basic White 8 1/2" X 11" Cardstock [ 166780 ]](https://assets1.tamsnetwork.com/images/EC042017NF/166780s.jpg "Basic White 8 1/2\" X 11\" Cardstock [ 166780 ]")
![Basic White Medium Envelopes [ 159236 ]](https://assets1.tamsnetwork.com/images/EC042017NF/159236s.jpg "Basic White Medium Envelopes [ 159236 ]")
![Hydrangea Hue Classic Stampin' Pad [ 167677 ]](https://assets1.tamsnetwork.com/images/EC042017NF/167677s.jpg "Hydrangea Hue Classic Stampin' Pad [ 167677 ]")
![Crumb Cake Classic Stampin' Pad [ 147116 ]](https://assets1.tamsnetwork.com/images/EC042017NF/147116s.jpg "Crumb Cake Classic Stampin' Pad [ 147116 ]")
![Mossy Meadow Stampin' Blends Combo Pack [ 154890 ]](https://assets1.tamsnetwork.com/images/EC042017NF/154890s.jpg "Mossy Meadow Stampin' Blends Combo Pack [ 154890 ]")
![Hydrangea Hue Stampin’ Blends Combo Pack [ 167666 ]](https://assets1.tamsnetwork.com/images/EC042017NF/167666s.jpg "Hydrangea Hue Stampin’ Blends Combo Pack [ 167666 ]")
![Clear Wink Of Stella Glitter Brush [ 141897 ]](https://assets1.tamsnetwork.com/images/EC042017NF/141897s.jpg "Clear Wink Of Stella Glitter Brush [ 141897 ]")
![Paradise Garden Hybrid Embossing Folder [ 167120 ]](https://assets1.tamsnetwork.com/images/EC042017NF/167120s.jpg "Paradise Garden Hybrid Embossing Folder [ 167120 ]")
![Hydrangea Hue 3/8" (1 Cm) Bordered Ribbon [ 167549 ]](https://assets1.tamsnetwork.com/images/EC042017NF/167549s.jpg "Hydrangea Hue 3/8\" (1 Cm) Bordered Ribbon [ 167549 ]")
![Baker's Twine Essentials Pack [ 155475 ]](https://assets1.tamsnetwork.com/images/EC042017NF/155475s.jpg "Baker's Twine Essentials Pack [ 155475 ]")
![Adhesive Backed Metallic Gems [ 163780 ]](https://assets1.tamsnetwork.com/images/EC042017NF/163780s.jpg "Adhesive Backed Metallic Gems [ 163780 ]")
![Multipurpose Liquid Glue [ 110755 ]](https://assets1.tamsnetwork.com/images/EC042017NF/110755s.jpg "Multipurpose Liquid Glue [ 110755 ]")
![Stampin' Seal [ 152813 ]](https://assets1.tamsnetwork.com/images/EC042017NF/152813s.jpg "Stampin' Seal [ 152813 ]")
![Mini Glue Dots [ 103683 ]](https://assets1.tamsnetwork.com/images/EC042017NF/103683s.jpg "Mini Glue Dots [ 103683 ]")
![Stampin' Dimensionals [ 104430 ]](https://assets1.tamsnetwork.com/images/EC042017NF/104430s.jpg "Stampin' Dimensionals [ 104430 ]")
![Bone Folder [ 102300 ]](https://assets1.tamsnetwork.com/images/EC042017NF/102300s.jpg "Bone Folder [ 102300 ]")
![Paper Trimmer [ 152392 ]](https://assets1.tamsnetwork.com/images/EC042017NF/152392s.jpg "Paper Trimmer [ 152392 ]")
![Simply Scored [ 122334 ]](https://assets1.tamsnetwork.com/images/EC042017NF/122334s.jpg "Simply Scored [ 122334 ]")
![Stampin' Cut & Emboss Machine [ 149653 ]](https://assets1.tamsnetwork.com/images/EC042017NF/149653s.jpg "Stampin' Cut & Emboss Machine [ 149653 ]")
CLICK HERE TO SHOP STAMPIN’ UP!

CLICK HERE TO SHOP NEW ONLINE EXCLUSIVES
CLICK HERE FOR PRODUCT OF THE MONTH
Click HERE TO SHOP KITS COLLECTION New Kits Added!
CLICK HERE to SHOP LAST CHANCE PRODUCTS

My Just Stampin’ Rewards:
I appreciate each and every order! Here are the things you can expect when you place an online order with me:
- Shop and earn 10% back in Stampin’ Rewards on orders of $20 or more. Use them on your next order or save them up to 1 year for something special!
- All orders will receive a handmade thank you card from me.
(*You can choose to remove the sticky note inside and reuse the card.) - With a $50 order you will receive the Fun Fold PDF’s from my Mystery Stampin’ cards. *You will receive that month’s PDF’s on the first of the following month.
- With an order of $75 (or more) I will send you the PDF’s and thank you card as well as a card kit or Stampin’ Up Product of my choosing – this varies monthly.
- Orders of $75 (or more) qualify for the Product of the Month! For just $5 you can add-on the July Product of the Month or any of the previous Products of the Month. AWSL
![Cute As A Bug Suite Collection (English) [ 167007 ]](https://assets1.tamsnetwork.com/images/EC042017NF/167007s.jpg "Cute As A Bug Suite Collection (English) [ 167007 ]")
![Sweet Bugs Dies [ 167001 ]](https://assets1.tamsnetwork.com/images/EC042017NF/167001s.jpg "Sweet Bugs Dies [ 167001 ]")
![Cute As A Bug 12" X 12" (30.5 X 30.5 Cm) Designer Series Paper [ 166994 ]](https://assets1.tamsnetwork.com/images/EC042017NF/166994s.jpg "Cute As A Bug 12\" X 12\" (30.5 X 30.5 Cm) Designer Series Paper [ 166994 ]")
![Mossy Meadow 8-1/2" X 11" Cardstock [ 133676 ]](https://assets1.tamsnetwork.com/images/EC042017NF/133676s.jpg "Mossy Meadow 8-1/2\" X 11\" Cardstock [ 133676 ]")
![Mossy Meadow Classic Stampin' Pad [ 147111 ]](https://assets1.tamsnetwork.com/images/EC042017NF/147111s.jpg "Mossy Meadow Classic Stampin' Pad [ 147111 ]")
![Three Banner Punch [ 167050 ]](https://assets1.tamsnetwork.com/images/EC042017NF/167050s.jpg "Three Banner Punch [ 167050 ]")
