
I can’t seem to stop playing with the Paper Pumpkin Box of Sunshine kit! I have made a bunch of sunshine boxes and one of the things I put in them was lip balm! I made fun holders for the tic tacs and hand sanitizers I put in the boxes (you can view those HERE) and decided to make something for the lip balm too! Here’s the one I made using the contents of the kit with some Poppy Parade cardstock and gingham ribbon.
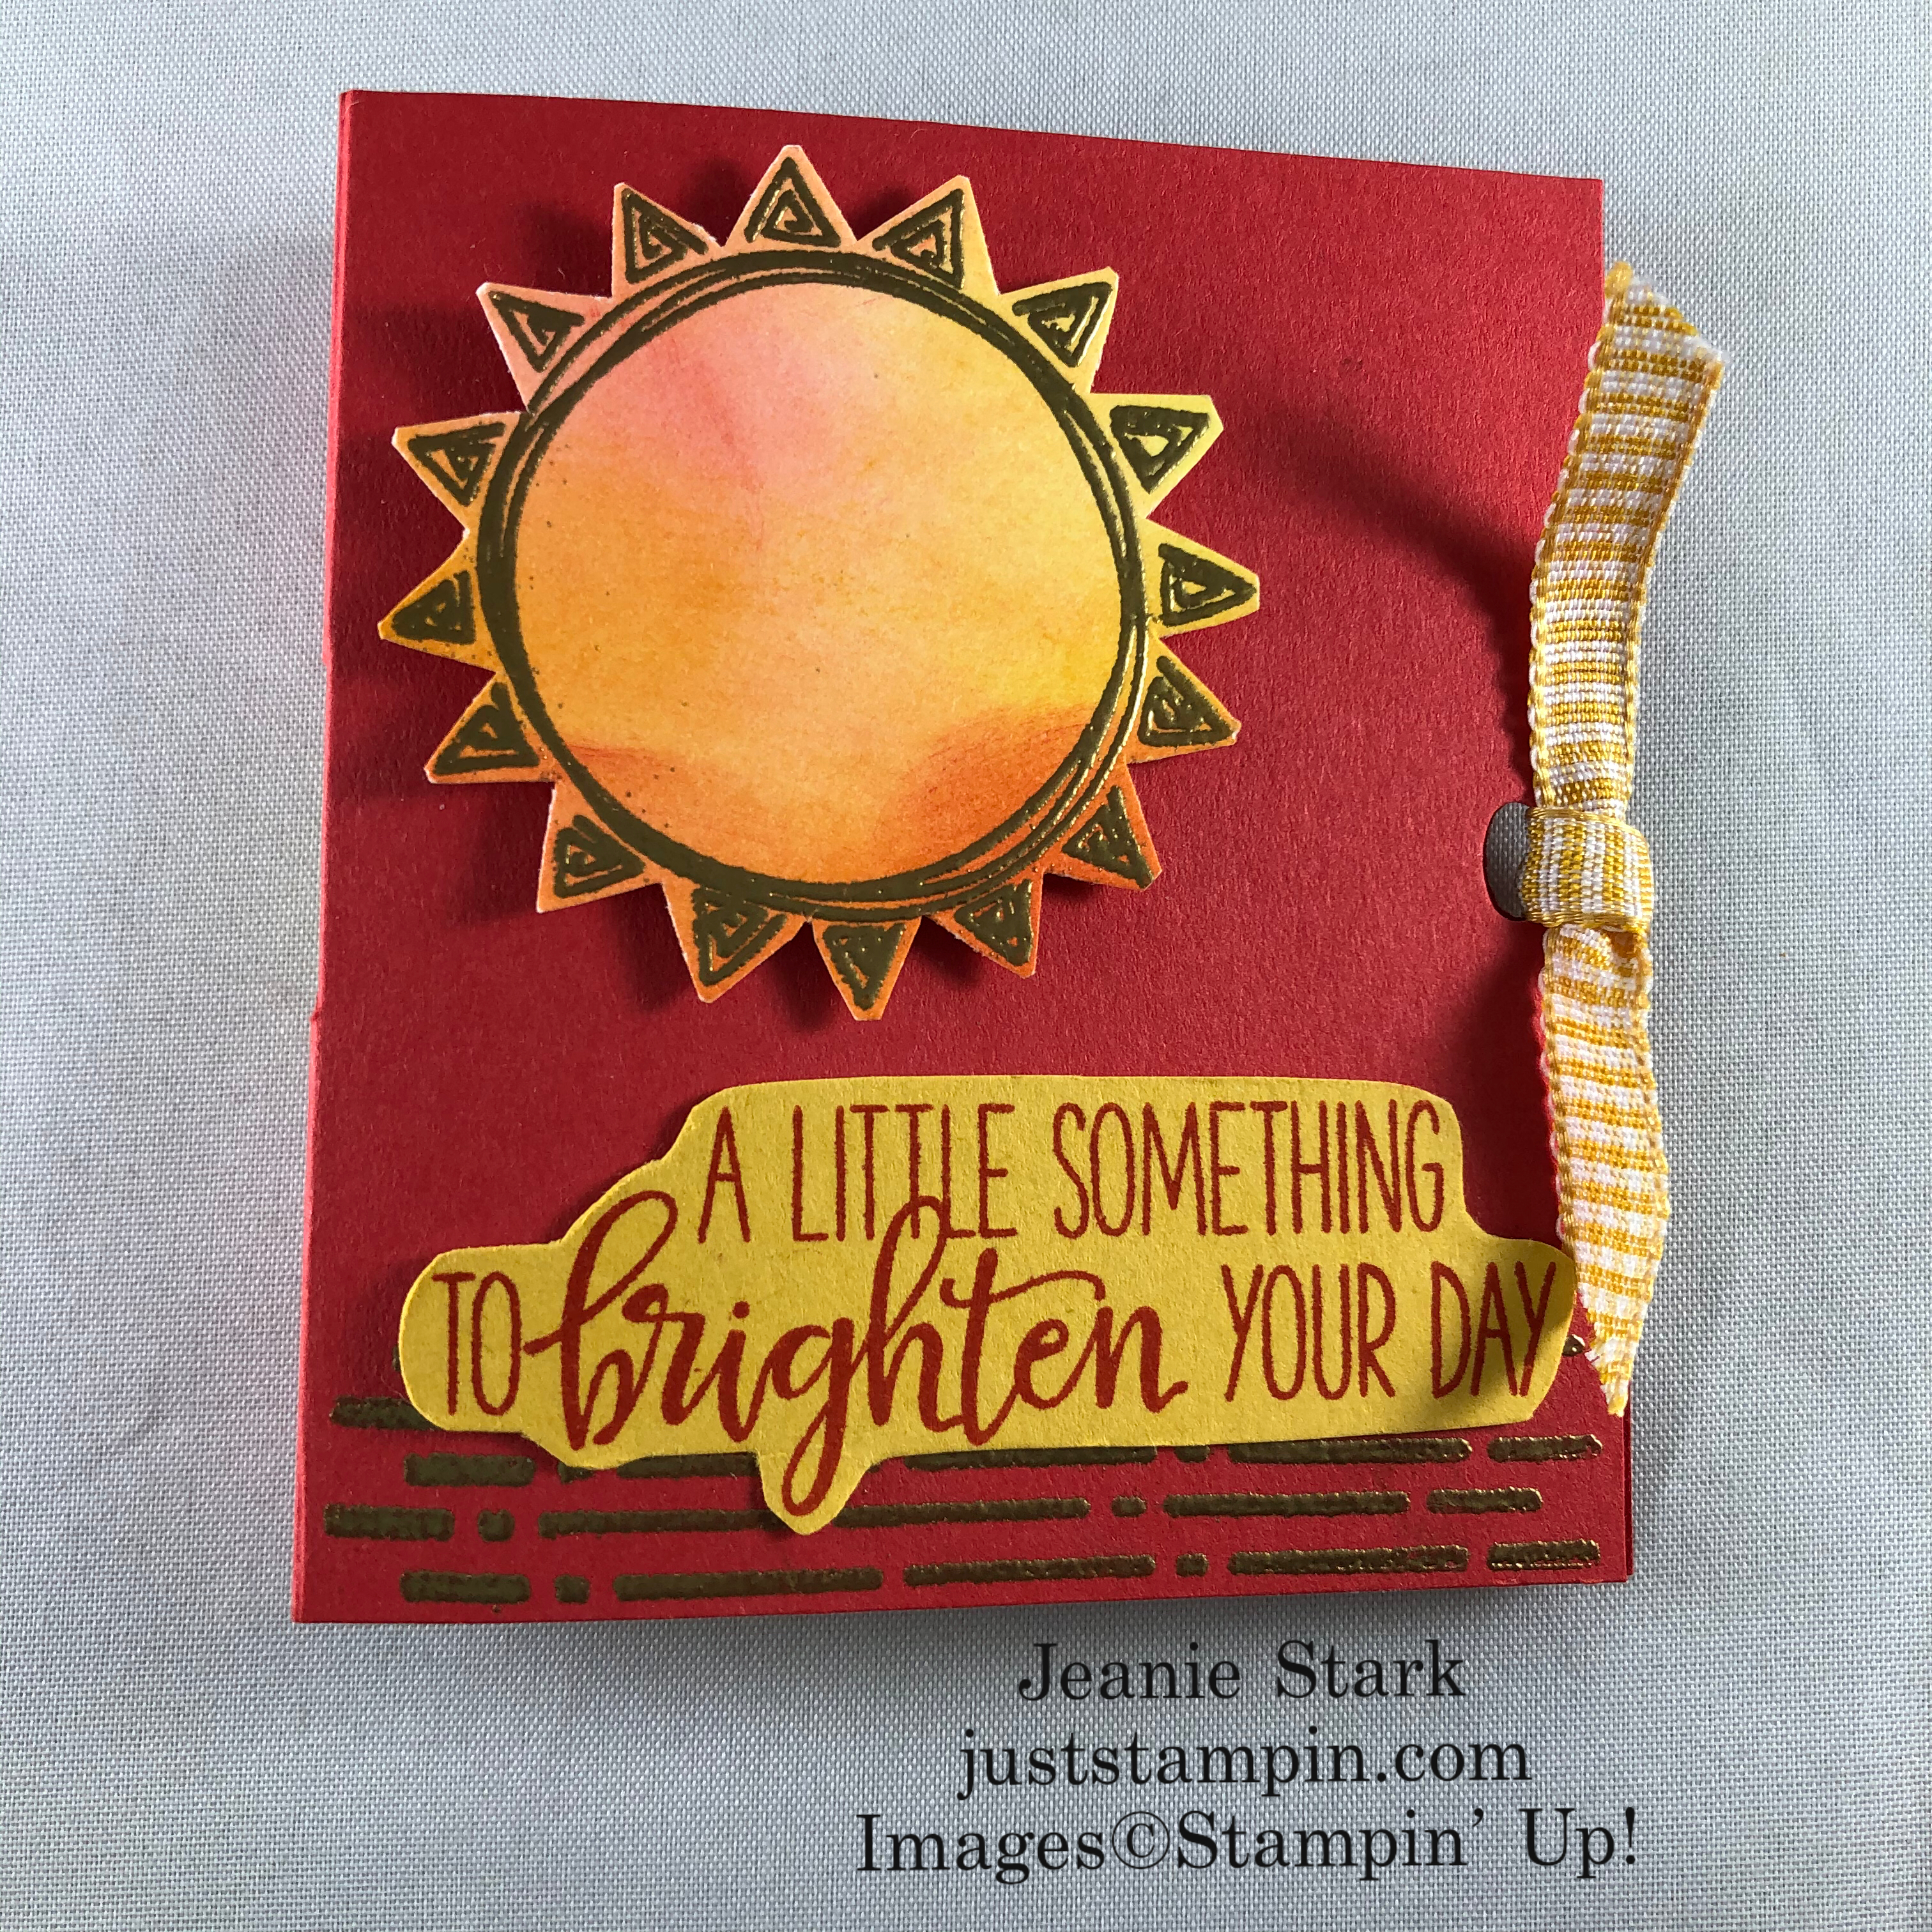

I cut up one of the card fronts for the sentiment piece on the inside. I was able to make four of these from one card front. One of the things I love about my Paper Pumpkin kits is once I’ve used all the contents I still have the stamp set (and ink spot) to use again and again. I love the sentiments and the sun image that was included in the June kit! I attempted to make the sun like the die cuts in the kit so I sponged crushed curry and poppy parade ink on whisper white card stock with my sponge daubers. Then I heat embossed the sun using Versamark and Gold Embossing Powder and fussy cut it out. *Here’s cool tip for fussy cutting the sun… Cut or punch a circle around the sun then use your scissors to snip around the rays. Quick & easy!


I love the collection of stamps from my Paper Pumpkin kits. I keep a 3 ring binder as a reference showing the stamps included in each kit. It’s easy to flip through when I’m looking for a sentiment or image. It makes it quick to find exactly what I need.
Normally I would punch or use a die to cut the sentiment out but I decided to go with fussy cutting around the words and I really like how it turned out! I think it adds a little more interest and highlights this wonderful sentiment. I hope it makes the recipient want to open it up to see what’s inside!
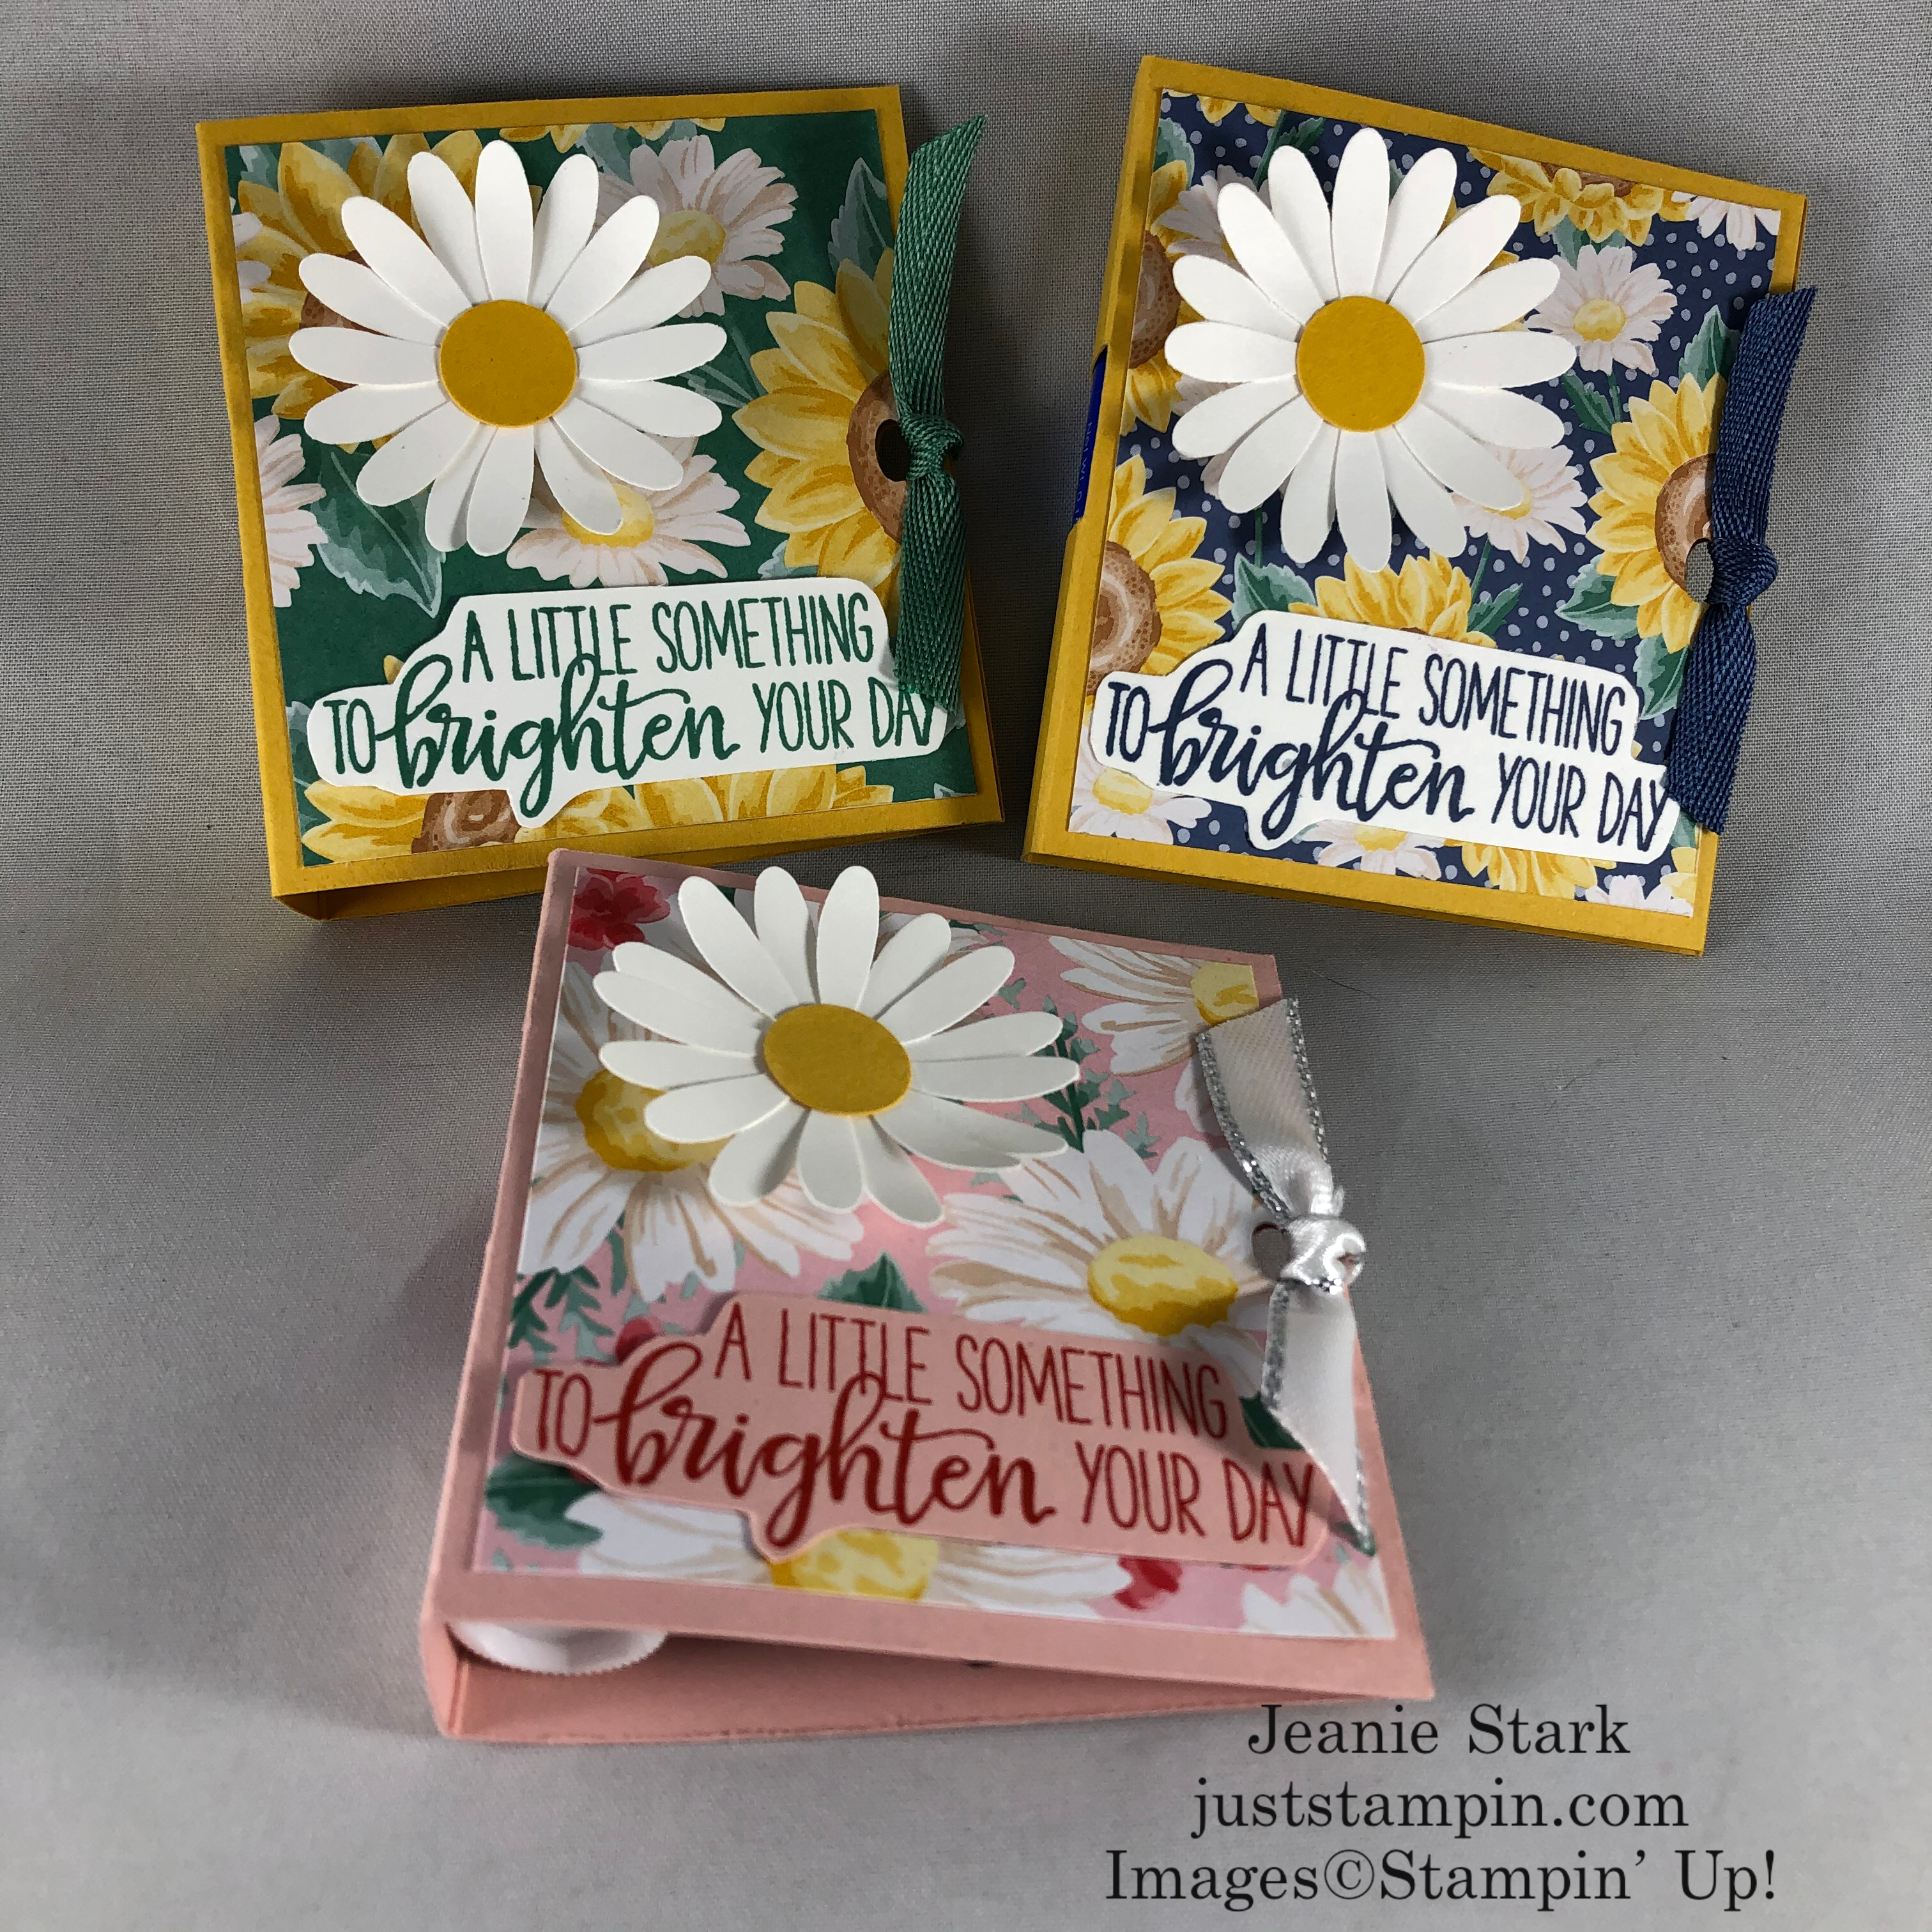
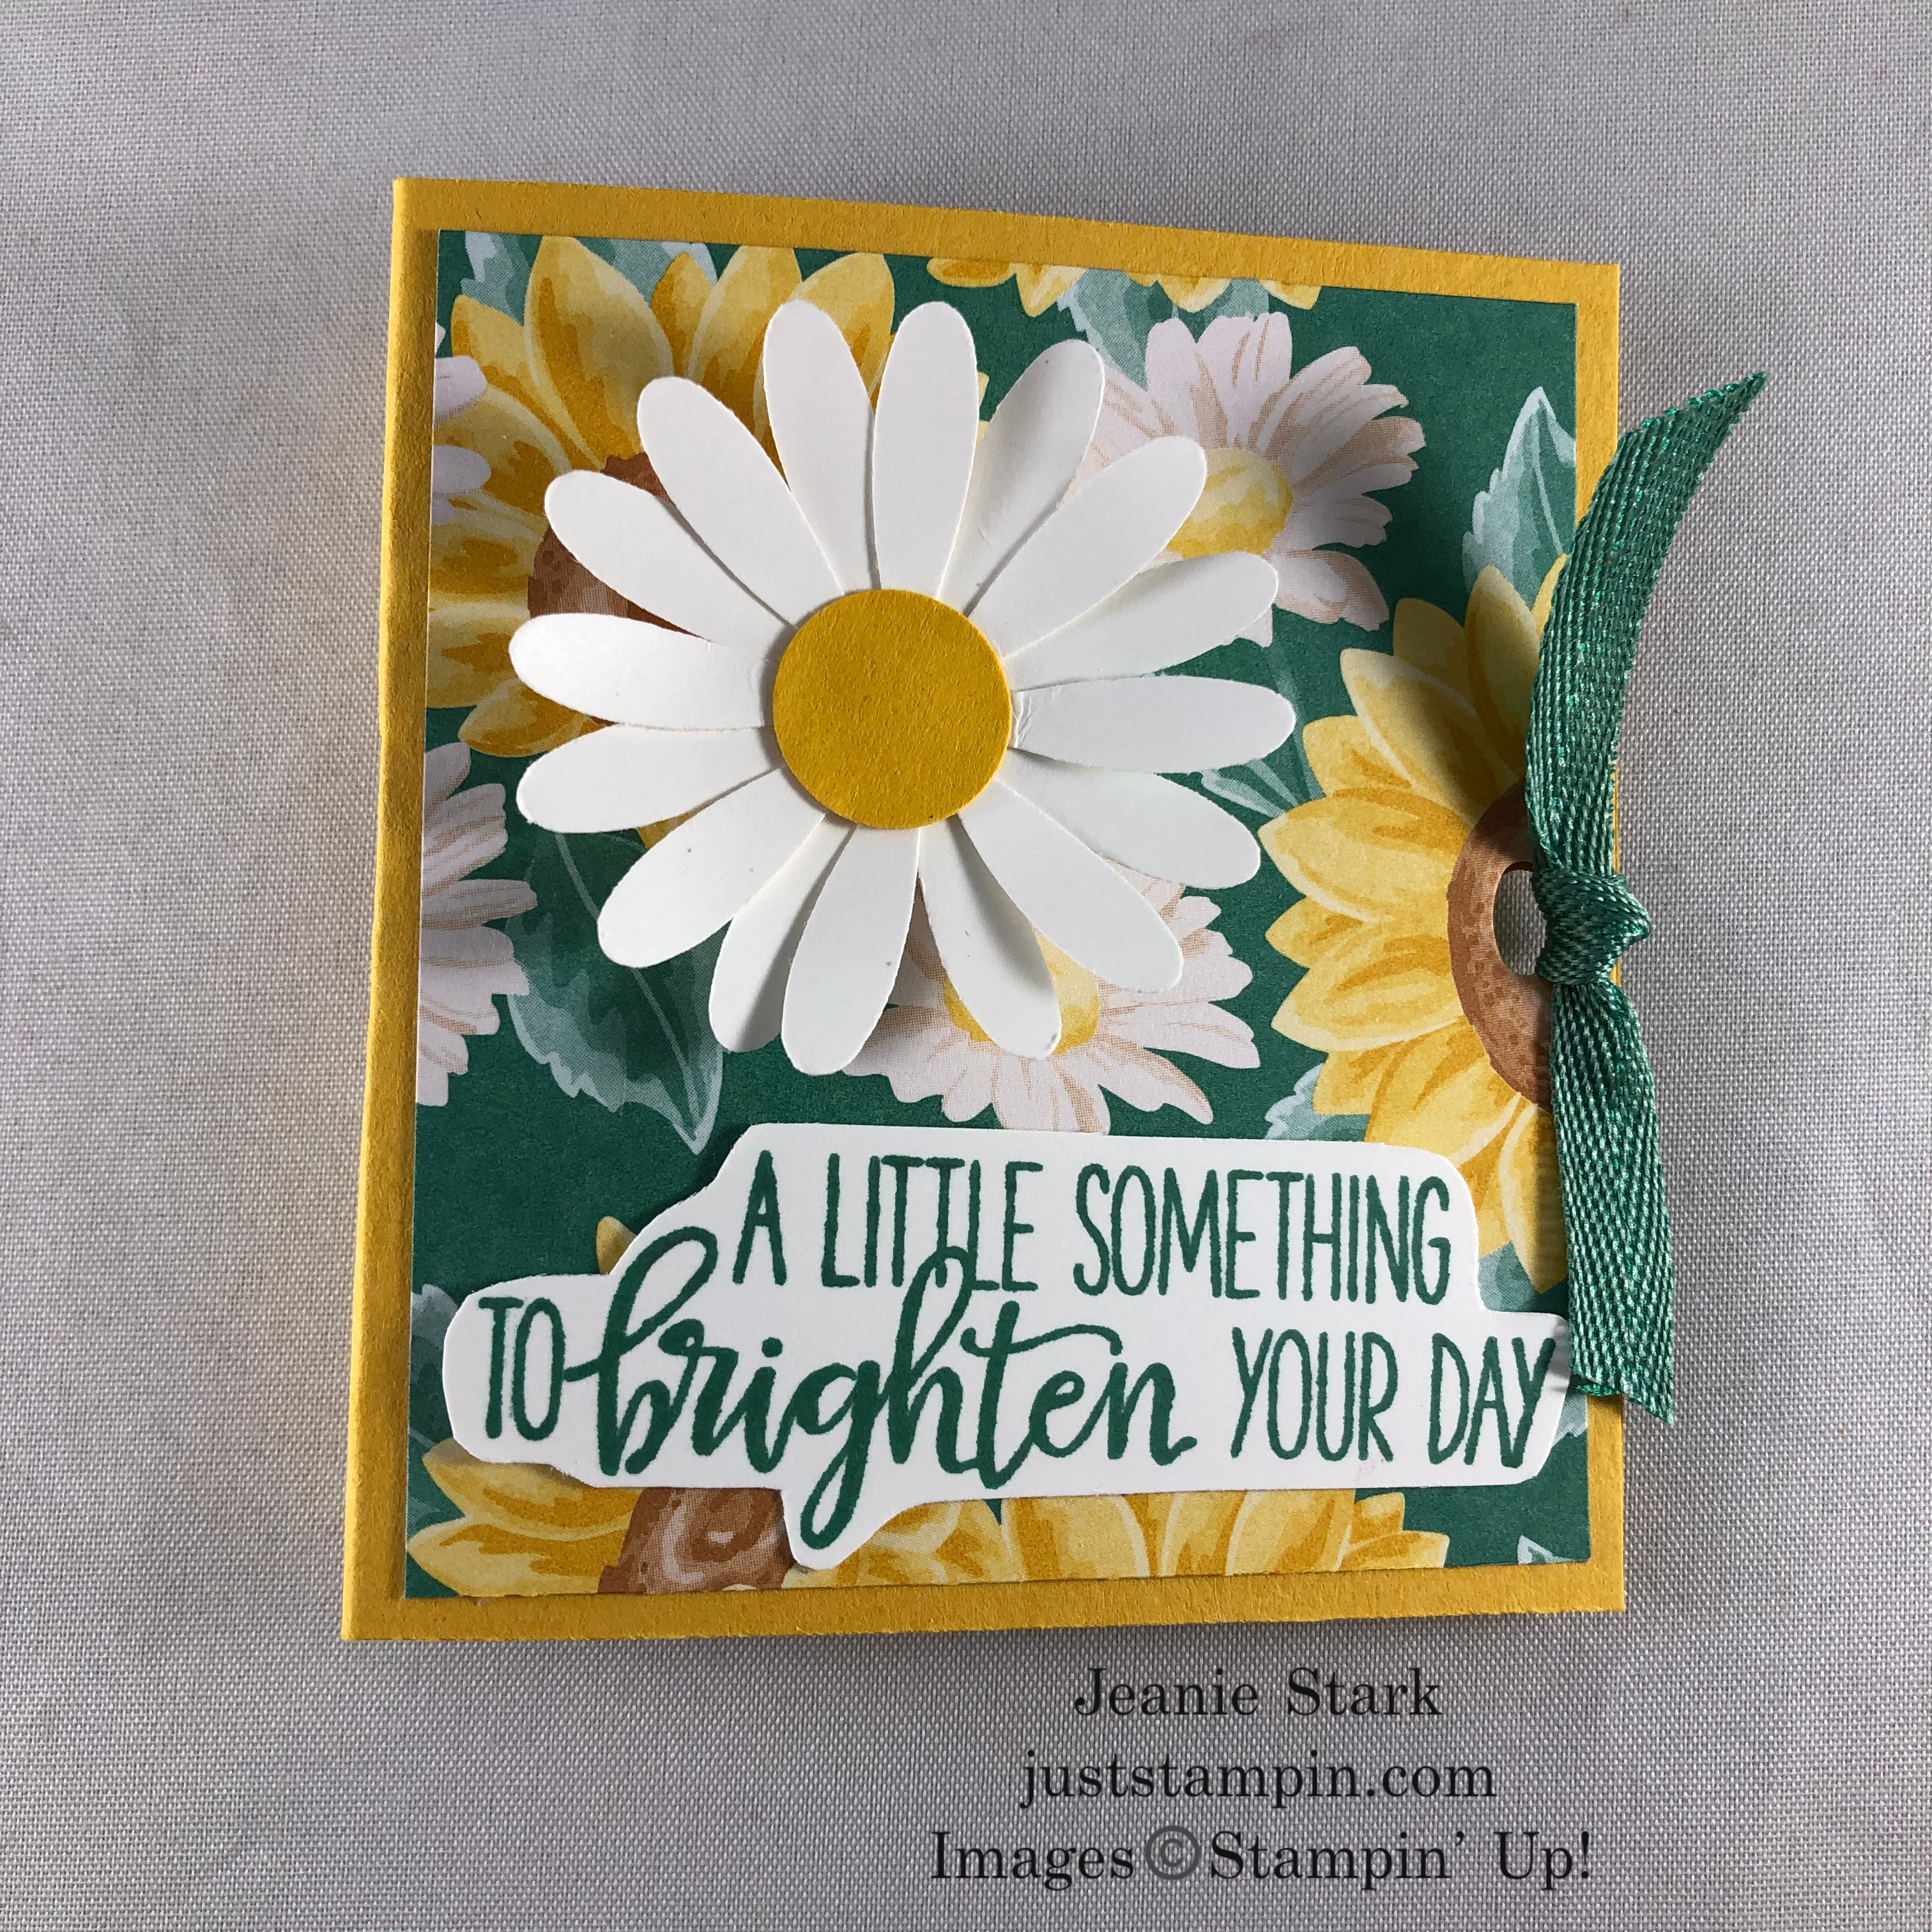
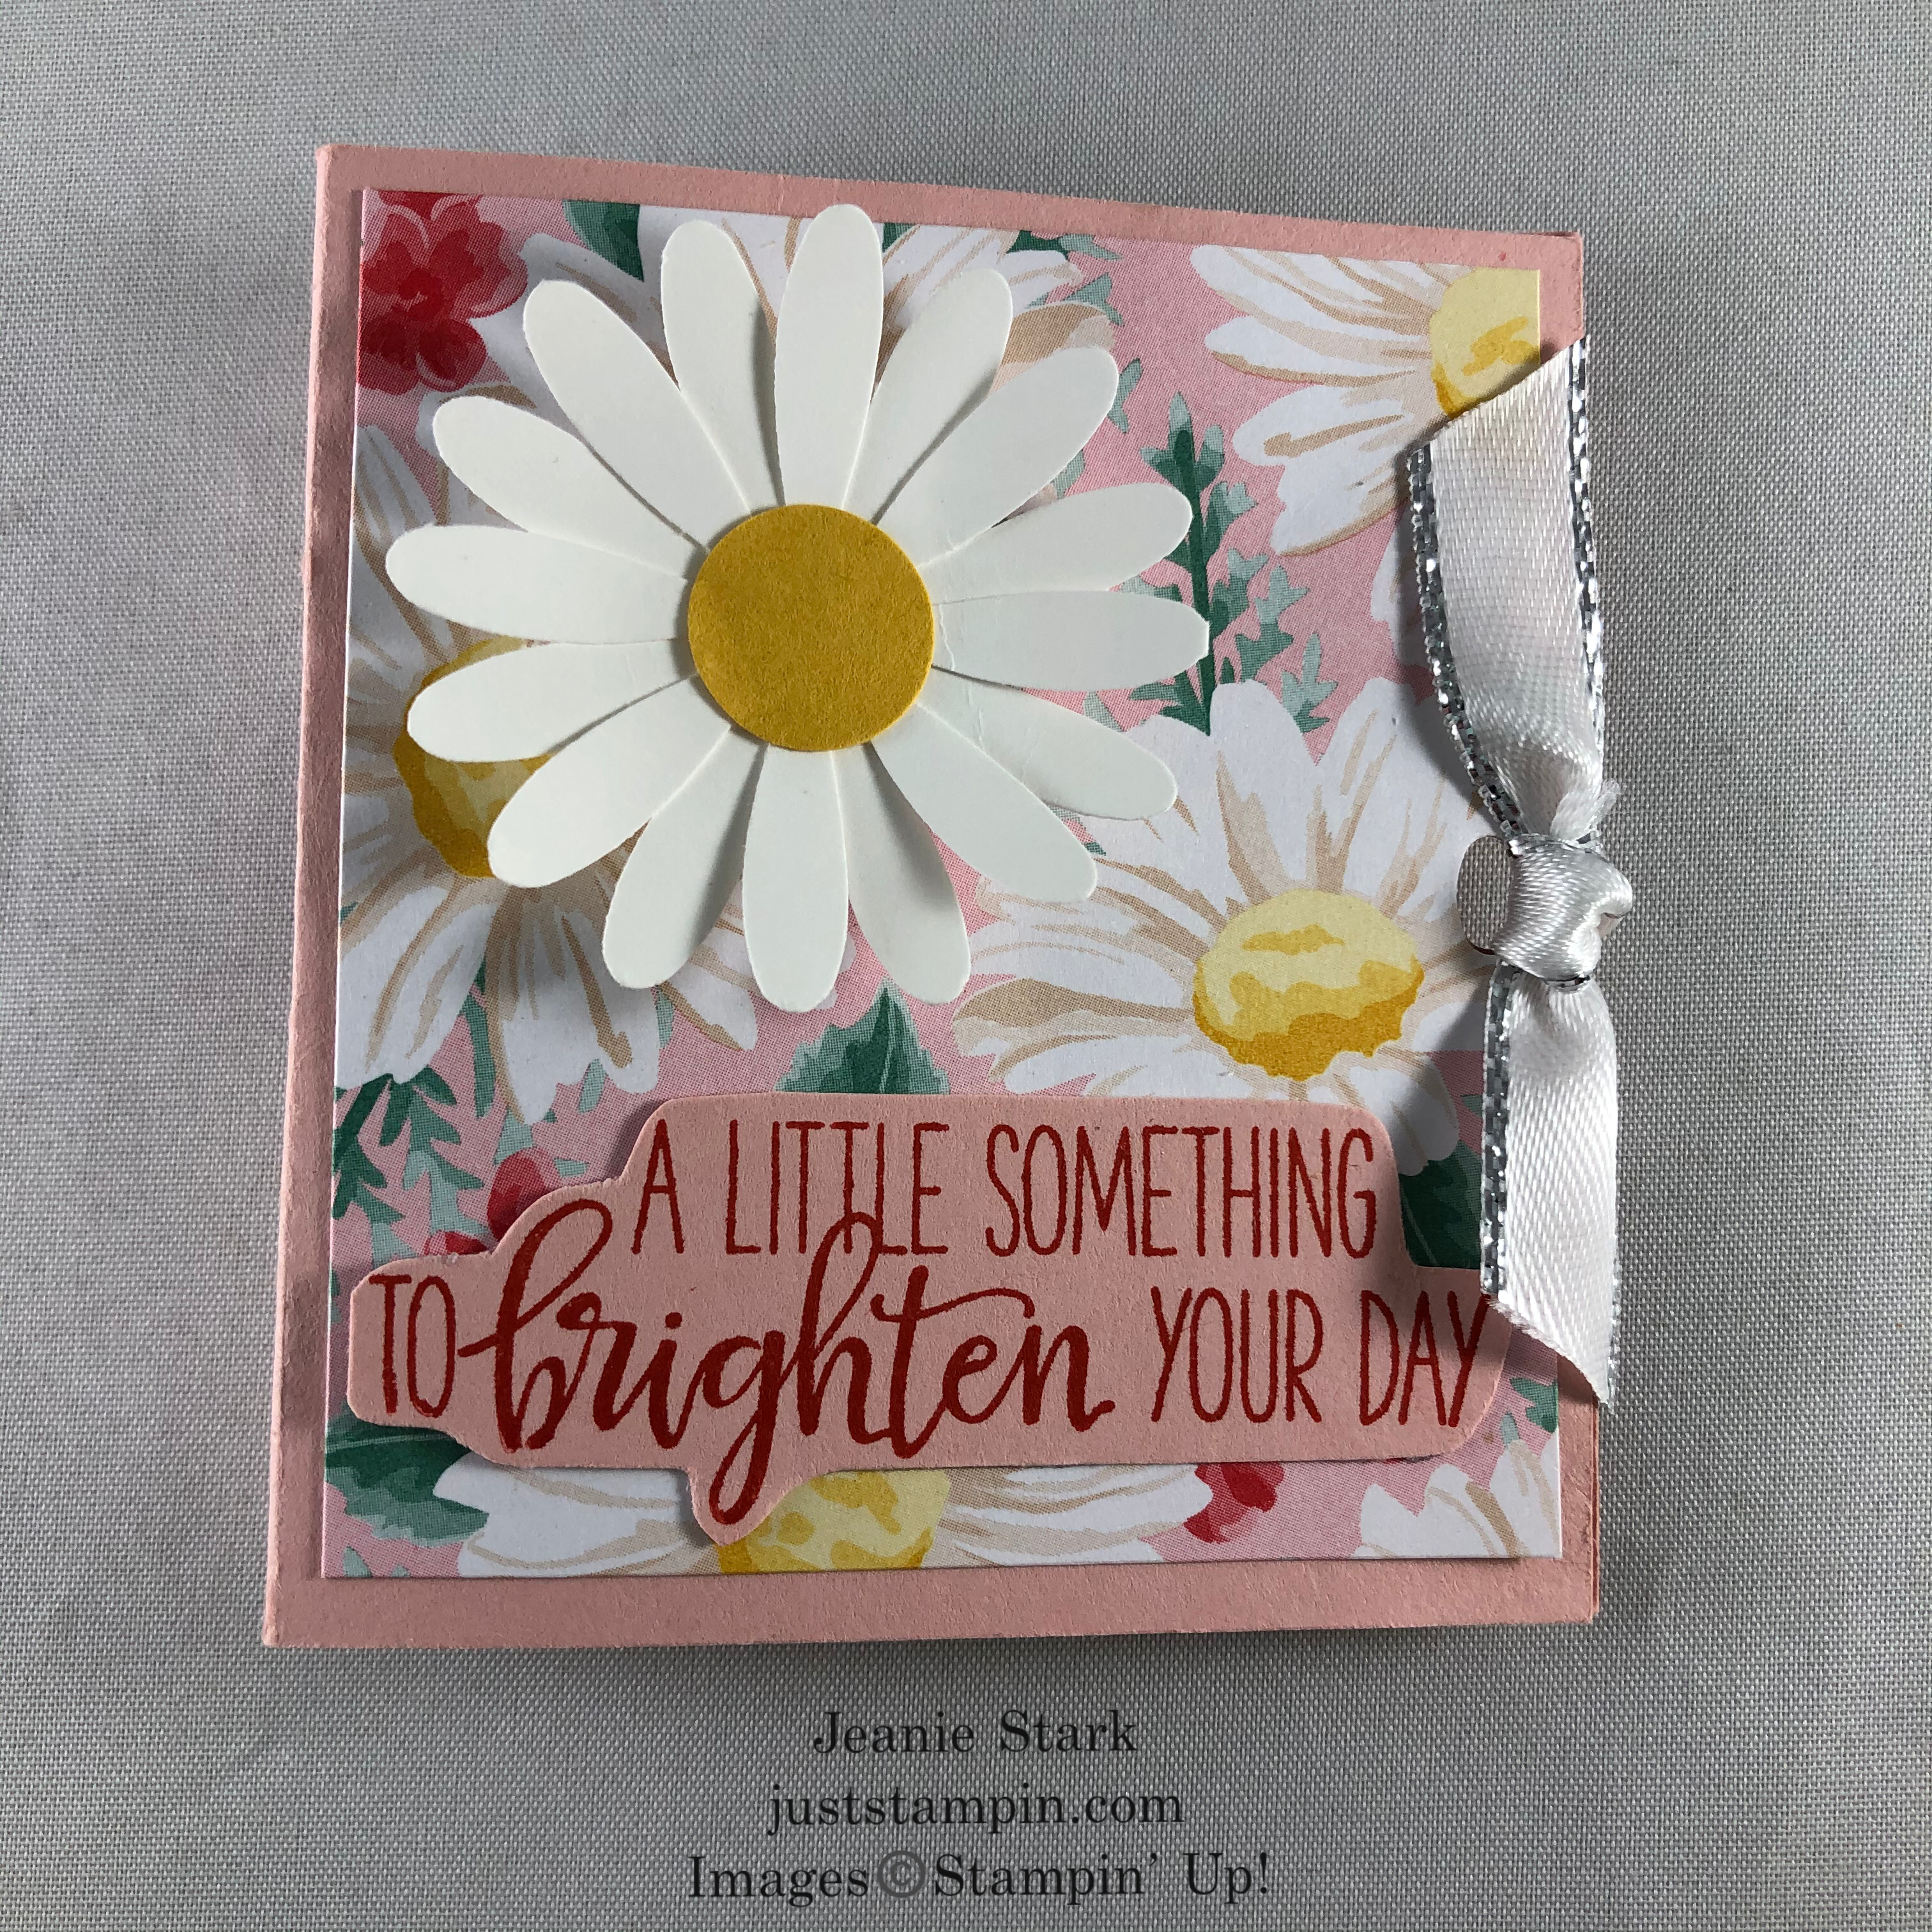
I had so much fun making these for my friends & family that I ordered a bunch more lip balm from Amazon to make these for the residents at our local nursing home. I wanted to do something special for them during this pandemic. I was concerned about giving them candy, etc. due to different allergies and knew that lip balm is something they can all use. I made different colors to coordinate with the lip balm. (It’s all about the presentation! LOL) Here’s a look at each of the different patterns I used from the Flowers For Every Season Designer Series Paper.
Bumblebee and Misty Moonlight


Bumblebee and Just Jade

Blushing Bride and Poppy Parade
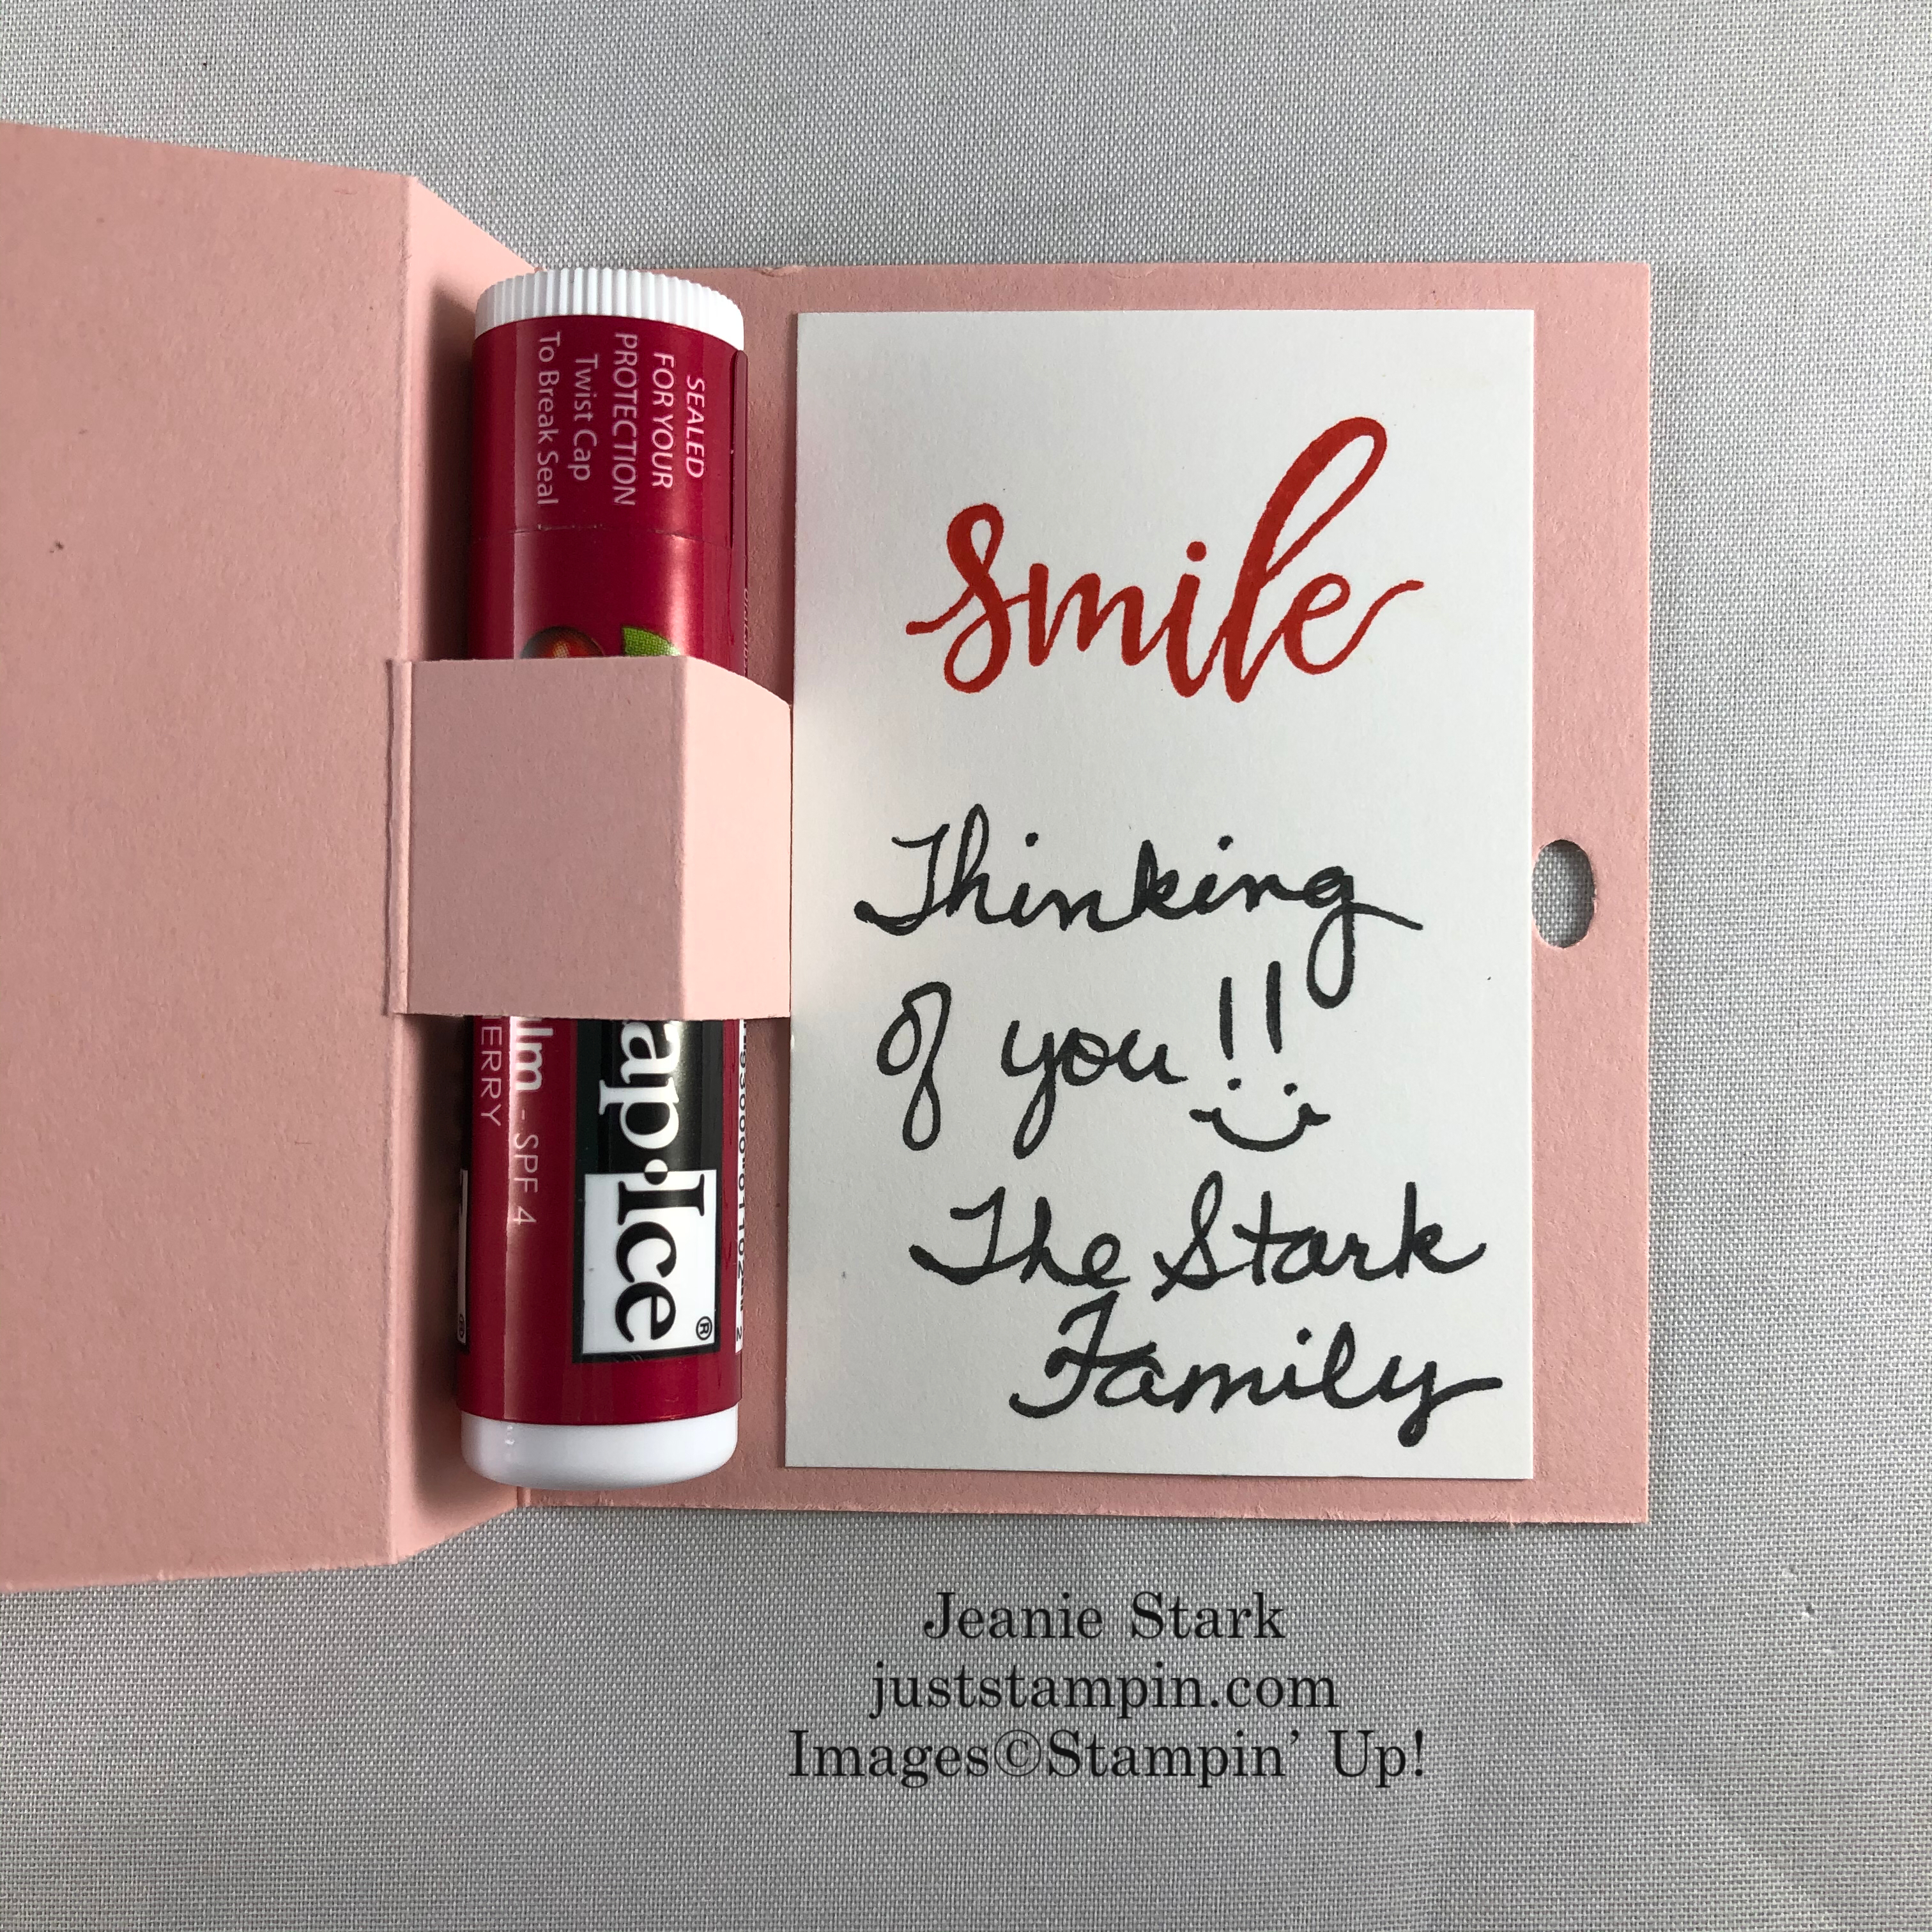
Here’s the details…*You can make 3 from each sheet of cardstock and 4 from each 6 x 6 piece of DSP!
Measurements
- Cardstock (Bumblebee or Blushing Bride): 3 x 6 scored at 1 mark before 2 3/4 and 1 mark before 3 3/8 (2 11/16 and 3 5/16), scrap to stamp and cut sentiment
- DSP (Flowers For Every Season): 2 1/2 x 2 3/4
- Whisper White: 1 3/4 x 2 3/4 (for inside), scrap to punch 2 daisies and sentiment
- Bumblebee: scrap to punch 1/2″ circle
- Ribbon : 4″
Directions
- Fold the cardstock on one of the score lines then make 2 cuts up to the second score line.
- Open and fold the cardstock like a book. The middle section pops forward like a step on the inside to hold the chapstick.


- Adhere the DSP to the front. Close the card and punch through all layers with the Detailed Trio Punch.


- Stamp sentiment in coordinating ink, fussy cut and adhere to the front.
- Punch 2 daisies using the medium daisy punch. Offset and adhere together. Punch 1/2 circle from Bumblebee cardstock and adhere to the center. Attach daisy to the card with Stampin’ Dimensional.
- Stamp sentiment on Whisper White cardstock and adhere inside. Add the chapstick.
- Thread ribbon through the hole and tie a simple knot.

I am really happy with how these turned out! Do you have a favorite? I’d love to hear from you. Leave a comment below.
Start your Paper Pumpkin stamp collection today! During July you can earn Bonus Days Coupons when you purchase a prepaid Paper Pumpkin subscription. *Details below. Don’t miss out on these fun kits. You can make them exactly as shown in the kit or have fun adding your own creativity using the contents. There’s plenty of ideas of the Paper Pumpkin FB page as well as Pinterest. It’s fun delivered right to your door each month! I am always here to to help and inspire you along the way!
Click HERE to subscribe to Paper Pumpkin or Click on the images below to order a prepaid subscription for yourself or as a gift.
Product List (Click on the image to order your prepaid Paper Pumpkin Subscription.)


Coming soon…I will be offering DSP Swatch books and Holiday Product Shares for all the new Designer Series Papers, ribbons, and select embellishments in the upcoming Holiday catalog! I received my holiday order and will be posting photos of the shares this week! Stay tuned!
Last call for my Just Stampin’ Card Kit and 3D Project Buffet! I have a few spots left. Email me by Wednesday, July 15th to get your kit to go! Click HERE for details.
Have a great day! Stay Safe! Stay well!
Just Stampin’
Jeanie
Host Code Exclusive Offer! All orders placed through my online store are eligible for my FREE monthly gifts (card kits, tutorials, treats, and more! * See Rewards below). Please use the current host code. *If your order is $150 or more, do not use this code as You become the hostess and get the Rewards! Click HERE to Shop.
July Host Code: MB9R99YU
Product List (Click on the image to purchase in my online store.)
|
|
|||
|
|
|||
|
|
|||
|
|
|
|
|
|
|
|
|
|
 Designer Series Paper")


 2020–2022 In Color Ribbon")
 2020–2022 In Color Ribbon")


EARN BONUS DAYS COUPONS IN JULY – For every $50 you spend July 1 – August 3, 2020 (before shipping and tax), you earn a $5 Bonus Days coupon code that can be redeemed August 4 – 31 2020.
- EARN July 1 – August 3, 2020
- For every $50 you spend (before shipping and tax), you’ll get a $5 Bonus Days coupon that you can use August 4-31, 2020.
- EARN BONUS DAYS COUPONS WITH YOUR 3, 6, or 12 month PAPER PUMPKIN PREPAID SUBSCRIPTION.
- There is no limit to how many coupons you can earn, so shop all month-long!
- An email address is required to receive Bonus Days coupon codes.
Just Stampin’ Rewards
I appreciate each and every order! Here are the things you can expect in addition to BONUS DAYS COUPONS when you place an online order with me in July:
- Handmade thank you card (featured HERE) in the mail with any order.
- 3 FREE Exclusive Tutorials featuring the stamp/bundle of the month when you order $40 or more (before tax & shipping). New tutorials every month! July tutorials feature the Celebrate Sunflowers Bundle. *Remember to add the current host code when you check out. Current Host Code: MB9R99Y
- Free card kit – Purchase the Celebrate Sunflowers Bundle and get a free card kit to make one of the cards featured in the tutorial. *Click on the image below to purchase.
")
FREE Tutorials with Purchase (Please remember to add the host code!)
- Jar of Flowers – Get 3 exclusive card tutorials with the purchase of the Jar of Flowers Bundle. (Click HERE to view one of the cards included in the tutorials.)
- Ornate Garden – Purchase the Ornate Styles Bundle or Ornate Thanks Bundle and receive 3 exclusive card tutorials. If you purchase both the Ornate Styles Bundle and Ornate Thanks Bundle I will send you all three kits to create each of the cards featured in the tutorials!
- Timeless Tulips – Get 3 Exclusive Card Tutorials PLUS my 3D Tulip Treats Tutorial (Click HERE to view tulip treats) with the purchase of the Timeless Tulips Bundle!
- So Sentimental – Get 3 exclusive tutorials with the purchase of the So Sentimental Bundle.
- Peaceful Poppies – Get 3 exclusive tutorials with the purchase of the Painted Poppies Bundle or the Peaceful Moments Bundle. If you purchase both the Painted Poppies Bundle and the Peaceful Moments Bundle I will send you all three kits to create each of the cards featured in the tutorials!
Product List (Click on the image to purchase in my online store.)
|
|
|
|
|
|
|
|
|


")
")
")
")


So cute ! Great directions too for making these cuties ….thank you !
So cute! Thanks for sharing your directions to make these. No favorite—they are all sure to bring a smile to every recipient’s face. You are the Queen of the 3-D projects and Generosity has to be your middle name.
OMG, these are the cutest things and so sure to bring a smile! I have to confess that I am partial to the holder made with the Box of Sunshine stamp. (That kit with it’s wonderful stamps is beyond fabulous!) What a thoughtful, generous gift for your local nursing home residents to let them know that they being remembered. Bravo, you!!!
These sweet little gifts are so adorable, thoughtful and CUTE!!! I’m so with you in matching the paper to the lip balm!! Good to know Burt’s Bees lip balm matches so well with the in-color bumblebee!! I will definitely be making some of these. Thanks for the inspiration!
So sweet and cute. They will love them at the nursing home. Not sure which is my favorite but the red one you made that sun sure is cool. Flowers – maybe the misty moonlight one or the just jade but then the pink is pretty nifty too. Duh, I know I am no help! Thanks for the directions!
Hi , Jennie , I love your beautiful project , what a nice idea ,
Also wanted to let you know that I received your card , thank you, I’m glad u loved your masks ,
Tfs your idea ,
Have a safe weekend,
Hugs Frenchie ♥️