Happy Mother’s Day!

I “just want to say” Happy Mother’s Day!
Here’s the card I made for my mom.
Stampin' Up! Art Gallery Dies fun fold Mother's Day card idea - Jeanie Stark StampinUp
I love word dies and this one from the Floral Gallery Dies has so many possibilities.  Pair it with the Art Gallery Stamp Set and you’ll not only save 10% on the bundle, you’ll also have a variety of sentiments to use for any occasion. Here’s a look at the Art Gallery Bundle.
Stampin' Up! Art Gallery Bundle - visit jsutstampin.com for inspiration and ordering information - Jeanie Stark StampinUp
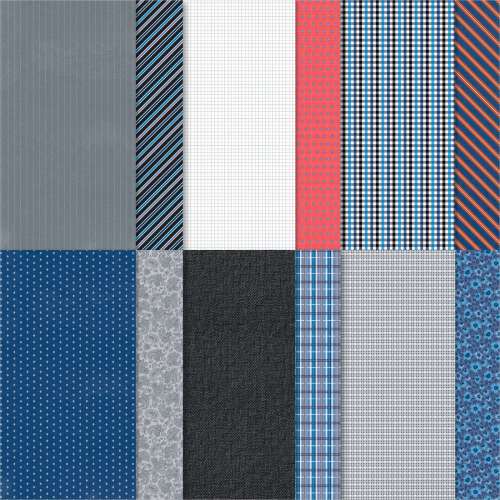
I used the Well Suited Designer Series Paper for this card. Many of the patterns are more masculine in nature but this navy floral is one of my  favorites. Here’s a look at all the different designs.
Stampin' Up! Well Suited Designer Series Paper - for inspiration and more visit juststampin.com - Jeanie Stark StampinUp
You only see a peek at this pretty floral until you open the card.
Stampin' Up! Peaceful Moments, All Dressed Up, and Art Gallery Dies fun fold Mother's Day card idea - Jeanie Stark StampinUp
I stamped sentiments from Peaceful Moments and Dressed To Impress in Night of Navy ink. I like the way this floral patterned paper coordinates with the Ornate Floral 3D embossing folder.  It’s hard to see in the photo but I added an embossed layer on the front of the card.
Stampin' Up! Ornate Floral 3D embossing folder and Floral Gallery Dies fun fold Mother's Day card idea - Jeanie Stark StampinUp
This card is a quick & easy fun fold to make. The card base is just 1 inch shorter than your basic card size so you can see the designer series paper that’s on the inside. Here’s the details:

Card Measurements:

Card base (Navy): 5 ½ x 7 ½  scored at 4 ¼
Night of Navy: 5 ¼ x 3 embossed with Ornate Floral 3D embossing folder,              4 ¼ x 3 ¼ , 3 x 3 ½  to die cut words & flower punch
Basic White: 2 pieces cut at 4 x 3
Designer Series Paper (Well Suited): 5 ½ x 2

Directions:

  1. Fold and burnish card base.
  2. Adhere DSP on the inside of the card along the bottom.
  3. Stamp sentiments in Night of Navy ink on and Basic White. Center and adhere inside. *The front flap should cover the sentiment layer.
  4. Layer embossed cardstock to front of card.
  5. Wrap ribbon around Basic White and tie a bow. Adhere Basic White to Navy and add to card with Stampin’ Dimensionals. *Do not add dimensionals along the bottom as it overlaps the DSP from the inside.
  6. Punch flower and add to bow with Mini Glue Dot. Add rhinestone jewel.
  7. Emboss envelope flap with Ornate Floral 3D Embossing Folder.

Supplies used:

  • Stamp Set: Peaceful Moments, Dressed To Impress
  • Paper: Well Suited Designer Series Paper, Night of Navy and Basic White Cardstock, Medium White envelope
  • Ink: Night of Navy
  • Tools & Accessories: Floral Gallery Dies, Confetti Flowers Border Punch, Ornate Floral 3D Embossing Folder, Seaside Spray Metallic Ribbon, Basic Rhinestone Jewels, Adhesive, Mini Glue Dot, Stampin’ Dimensionals

You can shop/view the list of products I used below.

How are you spending your day? I’d love to hear from you. Leave a comment below. I will be celebrating Mother’s Day with my adult children, mom, and sisters in a couple of weeks when we can all gather together safely. I can’t wait!

Have a great day!
Just Stampin’
Jeanie

Host Code Exclusive Offer! All orders placed through my online store are eligible for my FREE monthly gifts. Please use the current host code.  *If your order is $150 or more, do not use this code as You become the hostess and get the Rewards! Be sure to check out the Connect, Craft, and Collect $25 below. Click HERE to Shop!

Current Host Code: CT9NV3QC

Product List (Click on image to shop in my online store 24/7.)

 Just Stampin’ Rewards

I appreciate each and every order! Here are some of the things you can expect when you place an online order with me in May:

  • Handmade card in the mail with any order.
  • FREE Card Kit when you order $50 or more (before tax & shipping).
  • 3 FREE Exclusive Tutorials featuring the stamp/bundle of the month when you order $50 or more (before tax & shipping).  New tutorials every month! This month features one of my favorite new bundles, Pansy Patch. *Watch the video above to see everything in the suite!

    Do you have a long wish list? Here’s two ways to save this month!!Join Stampin' Up! visit juststampin.com for more details - Jeanie Stark StampinUp
    It’s a fabulous time to join Stampin’ Up! New team members get even MORE FREE products in their customizable Starter Kit. From May 4 – 31, new team members can get $125 USD   $155 worth of products for only $99 USD + free business supplies + free shipping + all the fun being a part of Stampin’ Up!

STARTER KIT DETAILS

  • You choose $155 in product and only pay $99 plus tax, shipping is free. (You get $56 in free product of your choice!)
  •  The Starter Kit also includes business resources like catalogs, brochures, order forms, and postcards.
  • The Starter Kit also includes a FREE past Paper Pumpkin kit.
  • In addition to the amazing added value to the Starter Kit, when you join Stampin’ Up! you get to be a part of our amazing community of crafters. Plus, you get to enjoy sharing simple and fun crafting experiences with others, early access to products, and exclusive access to training events.    Plus, you get 20% discount on all your orders after purchasing the starter kit.

As a member of my team you also get…

  •  Full access to exclusive Facebook groups for Stampin’ PALS only!
  • Monthly virtual meetings
  • Access to my exclusive monthly tutorials and more!

Email me (j.stark@myactv.net) if you would like more information or just to chat about this amazing opportunity. If you are ready to join my team, it’s just a few easy steps!

Click HERE to JOIN  (let me know if you need any help).

The other deal is placing an order of $250 or more and you’ll get $50 in free product (that’s an extra $25).

Stampin' Up! Host Promotion - visit juststampin.com for details - Jeanie Stark StampinUp
May 4–June 14 2021
It’s easier than ever to enjoy extra benefits by hosting a Stampin’ Up! party!
Connect with your friends and customers, make fun crafts, and collect the rewards! Submit a qualifying order or party during this promotion and you’ll get our generous Stampin’ Rewards PLUS additional rewards you can redeem! Hosts can earn Stampin’ Rewards based on order totals for an entire party. Outside of the party setting, Stampin’ Rewards are available to those who place individual orders that meet the order totals shown below.
(Starter Kit orders do not qualify for this promotion.)
Stampin' Up! Host Rewards - visit juststampin.com for details to host your virtual party! - Jeanie Stark StampinUp
Click on the link below to print all the details!
Connect, Craft, and Collect Host Promotion

Gather orders from your friends and family and place one big order and save!
I can set up your own online workshop! Contact me for more details!

Click HERE to view the 2021-2022 annual catalog online.

Tags, Tags, Tags & 12 Days of Giveaways Day 6

I love to make homemade tags. They are really quick & easy with the Tags, Tags, Tags stamp set and coordinating dies. You can stamp and cut 3 at a time! What a great time saver! This set is from the annual catalog and I have used it a lot!
Stampin' Up! Tags Tags Tags Bundle - For inspiration and ordering information visit juststampin.com - Jeanie Stark StampinUp
Here’s a sweet tag and gift I made for a former student who was in a recent theater performance of Elf.  This sentiment (and hand sanitizer) was perfect for the occasion! (*Thanks to Meg Loven for the Elf sanitizer idea!)
Stampin' Up! Tags, Tags, Tags, Elf tag and hand sanitizer gift idea - Jeanie Stark StampinUp
How stinkin’ cute is this?! It was so quick & easy to make! The little elf sanitizer wrap starts with a 5 x 1 1/2″ piece of DSP from ‘Tis the Season. The belt is a 1/4″ strip of Real Red Cardstock (snip a piece off one end for the middle of the buckle) and a 3/4″ square of Silver Foil. Cut a piece of Whisper White using the Warm Wrap Dies for the bottom. The buttons are punched from the Confetti Flowers Border Punch. Here’s what it looks like before I adhered it to the bottle.
Stampin"Up! Tis the Season Designer Series Paper, Warm Wrap Dies and Mini Flower Confetti Punch Elf Sanitizer Christmas gift idea - Jeanie Stark StampinUp
Use a bone folder to lightly curve the paper before adhering to the hand sanitizer bottle. So much fun to create and sure to bring a smile!

I stamped the elf tag in Shaded Spruce, colored with Stampin’ Blends, and cut out with the Trio of Tags Dies. I wrapped the elf sanitizer in a cellophane bag and added the tag with Mossy Meadow Diagonal Striped Ribbon (50% off) and gold cord from the Wonder of The Season Ribbon Combo Pack (also 50% off).
Stampin' Up! Tags, Tags, Tags, Elf tag and hand sanitizer gift set - Jeanie Stark StampinUp
You can view the complete product list below. *Several of these items (including the DSP) are retiring and on SALE!

You can see more tags I made with this set HERE and HERE.

I love punches and Stampin’ Up! currently has 3 different ones that are great for making tags. *Click on the image to view in my online store.

Simply punch one end of a 2 x 4 1/4 strip of cardstock with any one of these punches and have fun adding some DSP and using what you have to stamp and embellish! Here are some simple tag ideas I made. These are quick & easy to create.
Stampin' Up! Plaid Tidings Pine Tree punched tag ideas - Jeanie Stark StampinUp
The tags above were created with the Delightful Tag Topper Punch, Plaid Tidings Designer Series Paper, Pine Tree & 2″ Circle Punches, and the Perfectly Plaid & Banner Year Stamp Sets. Below is a little different version using the Scalloped Tag Topper Punch with some retired DSP and dies.
Stampin' Up! Scalloped Tag Topper Christmas Tag Ideas - Jeanie Stark Stampin' Up!
Even though some of these tags are from past years and include retired products, I hope they inspire you to use whatever dies, punches, and DSP you have to have fun creating handmade tags! It’s really all about a homemade holiday and a great way to use up those little scraps of paper you have leftover!

What’s your favorite item to use to create tags? Leave me a comment below and I will pick a random winner to receive some punched tags and ribbon!
Today’s winner in my 12 Days of Giveaways is…Lawanda Martin! Congratulations Lawanda! Email me your address and I will put your gift packaging kit in the mail.

Here’s the list of winners so far…
Day 1- Karen from Florida – calendar card
Day 2 –  Denise Wekwert – your choice of a set of tutorials *See below.
Day 3 – Linda – friendship card
Day 4 –  Nancy Farrell – Christmas card kit
Day 5 –  Pat V. – Gift card holder
Day 6 – Lawanda Martin – Gift package kit & tutorial
Day 7 – ??? Could be you! Leave a comment below – Tags & ribbon

The new 2021 Mini Catalog is coming!
Order your PRODUCT SHARES now! Click HERE for details.
Order your Product Shares now for the 2021 Mini Catalog! Visit juststampin.com for details. Jeanie Stark StampinUp
Have a great day! Stay safe! Stay well!

Just Stampin’

Jeanie

Host Code Exclusive Offer! All orders placed through my online store are eligible for my FREE monthly gifts. Please use the current host code.  *If your order is $150 or more, do not use this code as You become the hostess and get the Rewards! Click HERE to Shop!

Current Host Code: 6XYUCY23
Product List (Click on image to shop my online store.)

Just Stampin’ Rewards
I appreciate each and every order! Here are some of the things you can expect when you place an online order with me in December:

  • A 2021 Calendar card in the mail with any order as my thanks to you. *Cardstock colors and DSP may vary.
    Stampin' Up! Celebration Label Dies and Daisy Punch calendar card idea - Jeanie Stark StampinUp
  • 3 FREE Exclusive Tutorials PLUS 3D Project Tutorial  featuring the stamp/bundle of the month when you order $40 or more (before tax & shipping).  New tutorials every month! December tutorials feature the Snowflake Wishes Bundle. *The stamps and dies are not retiring; however, the bundle (10% savings) is only available through January 4th.
  • Snowflake Wishes card kit –  Purchase the Snowflake Wishes Bundle and get a free card kit to make one of the cards featured in the tutorial. *Click on the image below to purchase.

Exclusive Tutorials FREE with Purchase (or as member of my team)

  • Poinsettia Petals  –  Purchase the Poinsettia Petals Bundle and get 3 exclusive tutorials Plus an extra Bonus tutorial featuring a 3D project (shown HERE). *The stamps and dies are not retiring; however, the bundle (10% savings) is only available through January 3rd.
  • Celebration Tidings –  *Retiring – AWSL Purchase the Celebration Tidings Stamp Set and Celebration Labels Dies and get 3 exclusive tutorials Plus an extra Bonus tutorial! Click HERE to see one of the cards included in the tutorials. *Note – It is cheaper to purchase the dies and stamp set separately (rather than the bundle) during the YEAR-END Closeout SALE going on now! (The dies are 50% off!!!)
  • Arrange A Wreath– Get 3 exclusive tutorials with the purchase of the Arrange A Wreath Bundle. (Click HERE to view one of the cards included in the tutorials.)
  • Celebrate Sunflowers – Get 3 exclusive tutorials with the purchase of the Celebrate Sunflowers Bundle. (Click HERE to view one of the cards included in the tutorials.)
  • Jar of Flowers – Get 3 exclusive card tutorials with the purchase of the Jar of Flowers Bundle. (Click HERE to view one of the cards included in the tutorials.)
  • Ornate Garden – Purchase the Ornate Styles Bundle or Ornate Thanks Bundle and receive 3 exclusive card tutorials. If you purchase both the Ornate Styles Bundle and Ornate Thanks Bundle I will send you all three kits to create each of the cards featured in the tutorials!
  • Timeless Tulips – Get 3 Exclusive Card Tutorials PLUS my 3D Tulip Treats Tutorial (Click HERE to view tulip treats) with the purchase of the Timeless Tulips Bundle!
  • So Sentimental – Get 3 exclusive tutorials with the purchase of the So Sentimental Bundle.
  • Peaceful Poppies –  Get 3 exclusive tutorials with the purchase of the Painted Poppies Bundle or the Peaceful Moments Bundle. If you purchase both the Painted Poppies Bundle and the Peaceful Moments Bundle I will send you all three kits to create each of the cards featured in the tutorials!

FYI…All Current Whisper White products are Available While Supplies Last! Read all about the changes and the new “Basic White” HERE.

Clearance Rack Refresh & Year-End Closeouts On Sale NOW!

Save up to 50% on select retiring items and up to 60% on Clearance Rack. Items are available while supplies last! Click HERE to Shop.

Holiday Catalog Year-End Closeout


So Much Happy for Ariane’s Birthday!

Today is my daughter’s birthday! I wish we could be together to celebrate! Here’s the birthday “cake” card and little gift I sent her. Stampin' Up! So Much Happy birthday card and acetate gift box idea - Jeanie Stark StampinUp
Can you guess her favorite color? I always make purple cards for her! I love this birthday cake card idea from Brenda Quintana.  It is real easy to make with the Happy Dies. I used both the dies and stamp set from the So Much Happy Bundle to create this gift set. Stampin' Up! So Much Happy bundle - visit juststampin.com for inspiration and ordering information - Jeanie Stark StampinUp
The So Much Happy Bundle includes the So Much Happy Stamp Set and the Happy Dies. Make birthday cards, graduation gifts, and other papercrafting projects with the So Much Happy Stamp Set. Decorate your projects with fun die-cut elements—balloons, streamers, and more with the coordinating Happy Dies! You can create so many fun projects and cards with this bundle! Here’s the details to make the card:

Measurements:

  • Purple Posy (Card Base): 4 1/4 x 11 scored at 5 1/2, scraps to punch flowers
  • DSP (Playing With Patterns): 4 1/4 x 4 3/8, 1/2 x 4 (inside)
  • Whisper White (icing): 2 pieces 4 1/4 x 1, 4 x 4  (inside)

Directions:

  1. Fold and burnish card base.
  2. Line the top of the letters on the Happy Die with the fold of the card base and run it through the die cut machine.
  3. Adhere the DSP to the card front.
  4. Use the Scalloped edge die to cut 2 pieces for icing. *Run each piece through with different parts of the die to get a different look for each.
  5. Adhere icing strips to the front of the card.
  6. Punch flowers using the Small Bloom Punch and Confetti Flowers Border Punch. Adhere to card with Mini Glue Dots. Add Pearl Basic Jewels to flower centers.
  7. Adhere Whisper White layer inside.  Stamp sentiment in Highland Heather and adhere DSP strip along the bottom.

Stampin' Up! So Much Happy birthday cake card idea - Jeanie Stark StampinUpStampin' Up! Happy Dies fun fold birthday cake card idea - Jeanie Stark StampinUp
I have been making a lot of these acetate gift boxes lately.  I enjoy making cards and gifts to coordinate!
Stampin' Up! Clear Acetate Gift Box idea with So Much Happy stamp set - Jeanie Stark StampinUp
I enjoyed reading your comments and ideas for what to put in these 3 1/8 x 3 1/8 acetate boxes! Here’s what I put in this one.

A year ago I never would have thought that I’d be looking for a necklace to attach a mask. It’s a useful and practical gift for this year.  I also added some chocolate (of course)! The acetate box holds 6 wrapped Hershey nuggets as well as the necklace. I used a piece of coordinating cardstock in the front of the box and cut 6 1x 3 in. strips to wrap the nuggets.  I added a small pearl and flowers punched with the Small Bloom Punch and Confetti Flowers Border Punch to each one. Usually we like to give a birthday “experience” every year but there’s certainly nothing usual about this year!  This year has provided enough new “experiences” and she wants/needs a desk for her apartment.  I’m hoping this birthday is better than last year! If you follow my blog you may remember she had to take her graduate exam on her birthday last year and the Uber van she was in was involved in an accident. She spent most of her birthday in the hospital.
She’s not planning to go anywhere today!!!

Today’s the day I promised to announce the blog candy winner of the kit to make the poinsettia acetate box. And the winner is…Bernice P! Congratulations Bernice!
Stampin' Up! Poinsettia Petals acetate gift box idea - Jeanie Stark StampinUp
Thanks to all who left comments sharing ideas! I’d love it if you could leave a comment wishing my daughter a Happy Birthday today! She’s doing research and working hard to help during this pandemic and stop the spread of the coronavirus!

You can purchase any of the products I used to create today’s projects from my online store.  Click HERE or on the images below to shop! *Orders of $40 or more receive EXCLUSIVE monthly tutorials (via email) featuring the Poinsettia Petals Bundle.

I have had an enormous response to my Special Edition Holiday Kit to go! I can only make so many each month and I am positive this one will sell out soon! If you haven’t ordered yours yet, don’t wait! Click HERE for details.

Have a great day! Stay safe! Stay well!
Just Stampin’
Jeanie

Host Code Exclusive Offer! All orders placed through my online store are eligible for my FREE monthly gifts. Please use the current host code.  *If your order is $150 or more, do not use this code as You become the hostess and get the Rewards! Click HERE to Shop!

Current Host Code: BWGSSKXZ
Product List (Click on any image to view)

Stampin' Up! Quite Curvy Variety Bundle - visit juststampin.com for ordering and inspiration - Jeanie Stark StampiUp
Be sure to check out the Quite Curvy Variety Bundle! The Quite Curvy Bundle will be available in the January-June 2021 Mini Catalog but you can get it now during the Stampin’ Up! early release. However, The Curvy Christmas stamp set and Classic Christmas 6″ x 6″ Designer Series Paper will only be available during the Early Release period – November 3 through January 4!

Click HERE to view/print the flyer with all the details or Click HERE to view my previous post for project inspiration!

Just Stampin’ Rewards

I appreciate each and every order! Here are the things you can expect when you place an online order with me in November:

  • Handmade thank you card in the mail with any order.
  • 3 FREE Exclusive Tutorials PLUS 3D Project Tutorial (shown HERE) featuring the stamp/bundle of the month when you order $40 or more (before tax & shipping).  New tutorials every month! November tutorials  feature the Poinsettia Petals Bundle.
  • Poinsettia Petals card kit –  Purchase the Poinsettia Petals Bundle and get a free card kit to make one of the cards featured in the tutorial. *Click on the image below to purchase.