
Welcome to my 12 Days of Christmas-Day 3! I am so excited to bring you 12 days of fun Christmas projects that will hopefully inspire you to create! Today I am sharing the festive designs from the Take A Bow Designer Series Paper with the Hang An Ornament Dies for a bright & fun Christmas card!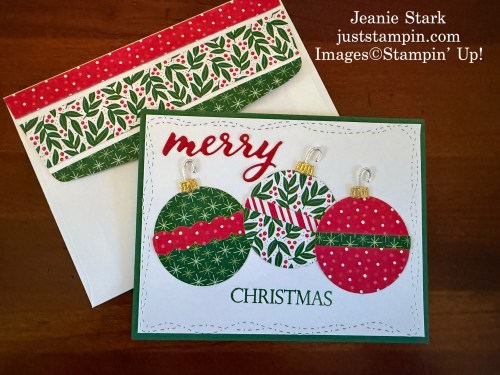
I’ve had so much fun creating with the Hang An Ornament Bundle! This set offers a variety of creative options that you’ll love!!!!! You can make beautiful paper ornament cutouts and more!

This set features a combination of sentiments and ornament images that you can pair to personalize your crafts. The sentiments fit within the ornament shape. Cut out berry leaf, label, and ornament images and dress up your crafts this season! Add layers to your projects or make pop-out interactive cards by combining stamped images and die cuts so when removing the die-cut element, you surprise your recipient with warm Christmas wishes! So many possibilities! (*This stamp set and dies are on the newly released LAST CHANCE PRODUCTS LIST and are ON SALE!!! Available While Supplies Last!)
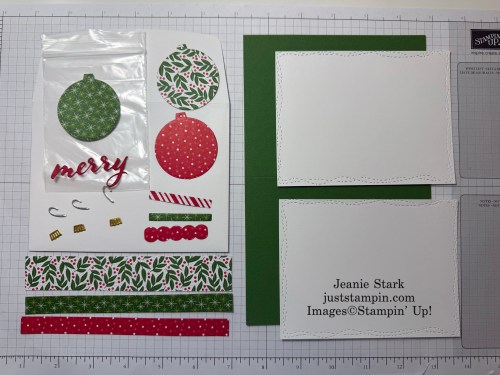
If you ordered my 12 Days of Christmas Kit to Go you received everything you need to craft along with me. Here’s a look at what was included in the kit for today’s project.
To Create this Project
- Card Base (Garden Green): 5 1⁄2” x 8 1⁄2” score at 4 1⁄4′′
- DSP(Take A Bow): 3 different 6×6 patterns -die cut 3 ornaments and decorative strips, (Hang An Ornament Dies), cut envelope strips @ 1x 6 and 2 @ 1⁄2 x 6
- Basic White cardstock: 2 @ 4 x 5 1⁄4 die cut with Stitched With Whimsy Dies
- Brushed Gold & Silver Foil: die cut ornament tops
- Real Red cardstock: scrap to die cut “merry” from Paper Pumpkin Dies
- Basic White Medium Envelope
Directions:
- Fold and burnish card base.
- Stamp sentiment along bottom of white layer in Garden Green ink. Adhere layer to card base.
- Adhere merry die along top left.
- Place silver hooks on top of ornaments and add a dab of Liquid Glue and put gold foil layer on top.
- Adhere strips across center of ornaments and adhere ornaments to card.
- Stamp sentiment inside or leave blank to add personal message or photo.
- Adhere strips to envelope flap and trim to fit.
What do you think of today’s craft along project? I’d love to hear from you! Leave a comment below. Check back again tomorrow to see what I created to go with this card!
Have a great day!!! Thanks for stopping by!
Just Stampin’
Jeanie
Host Code: YHMBWKAW
Here is your shopping list:
|
|
|
|
|
|
||
|
|
|
|
|
|
|
|
![Hang An Ornament Dies [ 164089 ]](https://assets1.tamsnetwork.com/images/EC042017NF/164089s.jpg "Hang An Ornament Dies [ 164089 ]")
![Hang An Ornament Photopolymer Stamp Set (English) [ 164282 ]](https://assets1.tamsnetwork.com/images/EC042017NF/164282s.jpg "Hang An Ornament Photopolymer Stamp Set (English) [ 164282 ]")
![Merry Tags & More Dies [ 165639 ]](https://assets1.tamsnetwork.com/images/EC042017NF/165639s.jpg "Merry Tags & More Dies [ 165639 ]")
![Take A Bow 6" X 6" (15.2 X 15.2 Cm) Designer Series Paper [ 164309 ]](https://assets1.tamsnetwork.com/images/EC042017NF/164309s.jpg "Take A Bow 6\" X 6\" (15.2 X 15.2 Cm) Designer Series Paper [ 164309 ]")
![Garden Green 8-1/2" X 11" Cardstock [ 102584 ]](https://assets1.tamsnetwork.com/images/EC042017NF/102584s.jpg "Garden Green 8-1/2\" X 11\" Cardstock [ 102584 ]")
![Real Red 8-1/2" X 11" Cardstock [ 102482 ]](https://assets1.tamsnetwork.com/images/EC042017NF/102482s.jpg "Real Red 8-1/2\" X 11\" Cardstock [ 102482 ]")
![Basic White 8 1/2" X 11" Cardstock [ 159276 ]](https://assets1.tamsnetwork.com/images/EC042017NF/159276s.jpg "Basic White 8 1/2\" X 11\" Cardstock [ 159276 ]")
![Basic White Medium Envelopes [ 159236 ]](https://assets1.tamsnetwork.com/images/EC042017NF/159236s.jpg "Basic White Medium Envelopes [ 159236 ]")
![Brushed Silver And Gold Foil 12" X 12" (30.5 X 30.5 Cm) Specialty Paper [ 164861 ]](https://assets1.tamsnetwork.com/images/EC042017NF/164861s.jpg "Brushed Silver And Gold Foil 12\" X 12\" (30.5 X 30.5 Cm) Specialty Paper [ 164861 ]")
![Multipurpose Liquid Glue [ 110755 ]](https://assets1.tamsnetwork.com/images/EC042017NF/110755s.jpg "Multipurpose Liquid Glue [ 110755 ]")
![Stampin' Seal [ 152813 ]](https://assets1.tamsnetwork.com/images/EC042017NF/152813s.jpg "Stampin' Seal [ 152813 ]")
![Stampin' Cut & Emboss Machine [ 149653 ]](https://assets1.tamsnetwork.com/images/EC042017NF/149653s.jpg "Stampin' Cut & Emboss Machine [ 149653 ]")
NEW from Stampin’ Up!
- Two New Kits released today.
- Designer Series Paper Special Release!

DSP Special Release Flyer - Last Chance Products! CLICK HERE TO SHOP


Very nice card. I think I’ll make a few of these.
Thanks Nancy! Create away!!!
Thanks, Jeanie. I’m enjoying your 12 Days of Christmas cards. Have a great day!
Thanks Hilda! I;m so glad you are enjoying this series. It was so much fun to put together!
Fun, fun, fun! Loving these designs. You know I’m the queen of CASE, right?! So happy I got this kit🥰
Thanks Linda! I’m so glad you’re happy with the kit!