Sweet Strawberry Slider Treat Box Tutorial

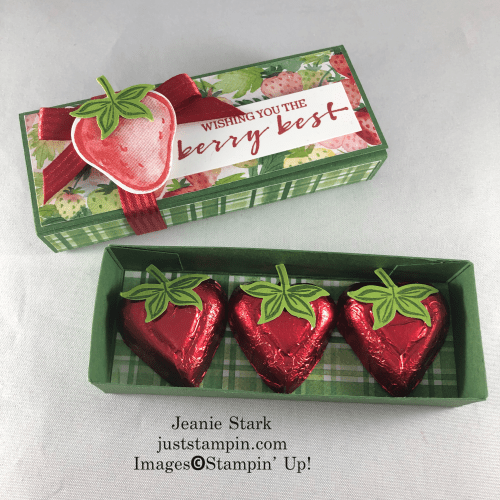
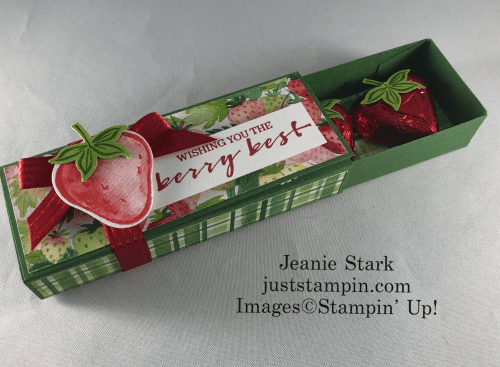
Yesterday I shared two versions of a sweet slider treat box for some foil covered chocolate hearts turned in to strawberries.
Stampin' Up! Sweet Strawberry and Berry Delightful handmade treat boxes - Jeanie Stark StampinUp
I had several people ask where I found the foil wrapped “strawberries”.  I purchased the chocolate hearts from Amazon. You can click HERE for the link. Thanks to the Strawberry Builder Punch the transformation was quick and easy! I stamped the strawberry stem from the Sweet Strawberry Stamp set on Granny Apple Green cardstock with Garden Green Ink. I punched it out and added it to the top of the chocolate heart with Mini Glue Dots. Voila!
Here’s a tip when using the Strawberry Builder Punch (or any builder punch): Cut cardstock in strips to stamp and punch. That way you don’t waste cardstock punching the other pieces each time.
Stampin' Up Strawberry Builder Punch Tip - visit juststampin.com for stamping tips, project inspiration, and more! - Jeanie Stark StampinUp
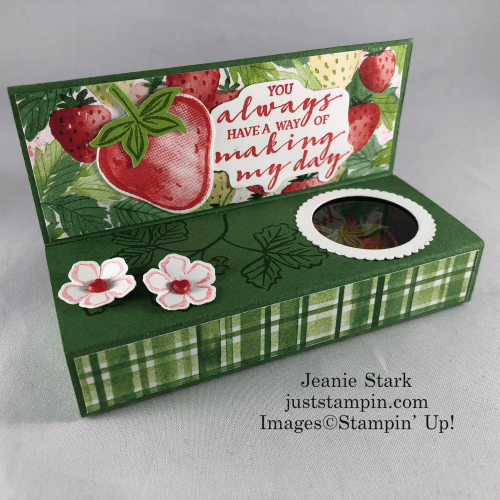
Today I have all the details to make these slider treat boxes. The box is made the same for both projects.
Stampin' Up! Sweet Strawberry and Berry Delightful handmade treat boxes - Jeanie Stark StampinUp
To make the box: Cut cardstock (Garden Green) 3 x 5 1/2 and score at 3/4″ on all four sides. Cut along the horizontal side up to the score line to form the tabs. Cut notches as shown and add adhesive to the tabs to adhere box together.
Stampin' Up! slider box treat holder - visit juststampin.com for inspiration and complete tutorial - Jeanie Stark StampinUp
*Optional – I added a DSP layer (1 1/4 x 4) inside the bottom of the box.

To make the fold over belly band:

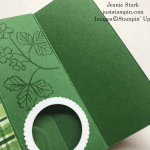
  • Cut cardstock (Garden Green) 7 1/4 x 4 1/8. Score @ 3/4, 2 3/8, 3 1/8, 4 3/4, 5 1/2.
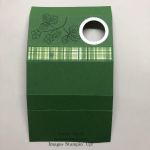
  • With the Layering Circles Dies, cut a 1 1/8 circle from the cardstock (*see photo below).
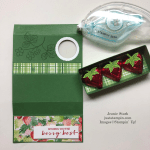
  • Stamp the strawberry vine in Garden Green Ink.
  • Add a 5/8 x 4 strip of DSP between the score lines below the stamped image.
  • Layer the Circle Dies and cut both at once. Adhere to the circle on top.
  • On the backside of the circle add a 1 1/2 x 2 piece of Window Sheet with glue dots.
  • Adhere a 1 1/2 x 4 piece of DSP along the bottom of the box. Stamp sentiment in Real Red on 3/4 x 2 1/2 piece of Whisper White. Adhere with Stampin’ Dimensionals.
  • Apply a strong adhesive (Stampin’ Seal or Tear & Tape) to the top of the box. Fold this piece over and adhere below the first score line.
  • Adhere another 1 1/2 x 4 piece of DSP on the inside. Stamp sentiment in Real Red Ink on a scrap of Whisper White and fussy cut out. Adhere to DSP layer.
  • Stamp two strawberry outlines in Poppy Parade ink on Whisper White. Stamp filler image in Poppy Parade stamping off first. Punch with Strawberry Builder Punch. Add stamped stem with glue dot and adhere one beside the sentiment on the inside.
  • Stamp flowers with Flirty Flamingo and punch.  Adhere to stamped vine with Mini Glue Dots. Add Heart Resin Dots to the centers.
    Stampin' Up! Sweet Strawberry and Berry Delightful handmade treat boxes - Jeanie Stark StampinUp
  • Slide in the box with candy and wrap Real Red ribbon around the box and tie a bow. Adhere stamped and punched strawberry to ribbon with a Stampin’ Dimensional. *The ribbon will slide on and off the box to open.
    Stampin' Up! Sweet Strawberry and Berry Delightful handmade treat boxes - Jeanie Stark StampinUp
    Here’s a look at the open and closed view side by side.

It’s easy to just slide the candy box out from either side of the treat holder.
Stampin' Up! Sweet Strawberry and Berry Delightful handmade treat boxes - Jeanie Stark StampinUp
The only difference between this “fold over” version and the stand up version (below) is the size of the cardstock for the belly band. It has one less score line and it a little taller.
Stampin' Up! Sweet Strawberry and Berry Delightful handmade treat boxes - Jeanie Stark StampinUp
The slider box, flowers, and circle window are made the same.
Here’s the measurements for the belly band and DSP:

Garden Green Cardstock: 7 1/2 x 4 1/8 scored at 3/4, 2 3/8, 4 3/4
Berry Delightful DSP: 5/8 x 4, 1 7/8 x 4

All the supplies to make this project are listed below. When you purchase $100 or more this month you can choose to receive the Berry Delightful Designer Series Paper for FREE! It comes in a bundle with the Berry Blessings stamp set. Here’s a look at the set.
Stampin' Up! Berry Blessings Bundle - FREE with a $100 purchase during Sale-A-Bration - Visit juststampin.com for inspiration and ordering information - Jeanie Stark StampinUp
This set coordinates with another stamp bundle in the new Mini Catalog, the Sweet Strawberry Bundle. This bundle includes the Strawberry Builder Punch!
Stampin' Up! Sweet Strawberry Bundle - For projects and more inspiration visit juststampin.com - Jeanie Stark StampinUp
If you like detailed photo tutorials to make cards and 3D projects order my Just Stampin’ Card Kit and 3D Project Buffet To Go! Click HERE for details.

How would you like to receive the Punch Party Stamp Set, exclusive tutorials, and more for FREE?
Stampin' Up! Punch Party Host StampSet- visit juststampin.com t find out how you can qualify to get this stamp set for FREE - Jeanie Stark StampinUp
Here’s how you can receive the Punch Party Stamp Set for FREE..

  1.  Contact your crafting friends and family and place an online order of $300. I can set up a hostess code for you and they can go online and have their order shipped directly to them and you will get the hostess rewards. Or you can take their orders and place the order yourself. I can help you with whichever way you prefer. You will not only earn the stamp set for FREE, you will also receive hostess $ towards anything else you want from either the annual catalog or new Mini Catalog. Plus everyone who orders at least $50 will get a FREE Sale-A-Bration item with their order!
  2. Simply place an online order with me this month (use the host code) and I will enter your name in a drawing to win this stamp set. I will post the lucky winner on February 1st. I love to reward my customers and this is just one of my “Just Stampin’ Rewards” this month! (*See below)

Have a great day! Stay Safe! Stay well!

Just Stampin’

Jeanie

Host Code Exclusive Offer! All orders placed through my online store are eligible for my FREE monthly gifts (*See Rewards below). Please use the current host code.  *If your order is $150 or more, do not use this code as You become the hostess and get the Rewards! Click HERE to Shop!

Current Host Code: GDYVVWVW
Product List (Click on image to shop my online store.)

Paper Snips

$10.00

Just Stampin’ Rewards
I appreciate each and every order! Here are some of the things you can expect when you place an online order with me in January:

  • Handmade thank you card in the mail with any order.
  • Chance to win the Punch Party Stamp Set. Anyone who orders this month will have their name entered in a drawing to win the Host only stamp set. Winner will be posted February 1st.
  • Lots of Heart treat holder kit –  Purchase $50 or more (before tax & shipping) and get a free kit to make the treat holder featured HERE.
  • 3 FREE Exclusive Tutorials PLUS 3D Project Tutorial featuring the stamp/bundle of the month when you order $50 or more (before tax & shipping).  New tutorials every month! January tutorials feature the Lots of Heart Bundle. *Click on the image below to view in my online store.
  • FREE Sale-A-Bration items of your choice with every $50 (or $100) order!

JOIN MY TEAM!!!  (*Perks include access to my exclusive tutorials and more!)

Sale-A-Bration is a great time to JOIN the fun and get the best deal of all!!!

  • Choose $125 in Stampin’ Up! products (anything you want!) and pay only $99.
  • FREE Shipping (10% savings!)
  • FREE Paper Pumpkin Kit ($21 value)
  • Save 20% or more off all future orders. 
  • Plus, you get five FREE packs of paper during Sale-A-Bration.…that’s over 200 sheets and a 67.00 value! 
It’s only a few easy steps!

Click HERE to fill out the Starter Kit order form (let me know if you need any help). Then create another wish list of anything you want to buy at a 20% discount and get ready to place that first order!

Email me (j.stark@myactv.net) or call if you have questions or just want more information.
Click on the images below to view the catalogs online.
Stampin' Up! January - June Mini Catalog - visit juststampin.com to place your order! Jeanie Stark StampinUp Stampin' Up! 2021 Sale-a-bration brochure - visit juststampin.com for inspiration and ordering information - Jeanie Stark StampinUp


Snowflake Wishes & 12 Days of Giveaways Day 2

Each month I offer exclusive tutorials to anyone who places a minimum order from my online store. (*See my “Just Stampin’ Rewards” below.) This month’s tutorials will feature the Snowflake Wishes Bundle. You’ll be stamping a creative storm with the snowflakes in the Snowflake Wishes Stamp Set! This set also includes an assortment of greetings for Christmas, friendship, and more. The So Many Snowflakes Dies include snowflakes in a variety of sizes along with a wintry label for flurries of fun!
Stampin' Up! Snowflake Wishes Bundle - for inspiration, exclusive tutorials, and more, visit juststampin.com - Jeanie Stark StampinUp
The Snowflake Wishes Bundle is retiring; however, the the Snowflake Wishes Stamp Set and the So Many Snowflakes Dies will still be available to purchase separately.  If you want to take advantage of the extra 10% savings you will need to purchase it by January 4th. (*If you purchase the bundle in December you will also get my exclusive tutorials, a 2021 calendar card, and a card kit to create one of the cards featured in the tutorials.) Here’s one of the cards I created for this month’s tutorials.
Stampin' Up! Snowflake Wishes card idea for a friend - Jeanie Stark StampinUp
I made this card for a friend I’ve known since high school! We met the day she transferred under let’s say “unusual” circumstances. We became fast friends when she took the rap for my popcorn in Chemistry. We still joke about it to this day! She loves winter but now that she lives in Florida she doesn’t see much snow. I thought I’d send her a little sparkle with this reminder of how much I treasure our friendship!
Stampin' Up! Snowflake Wishes card and popcorn box idea for a friend - Jeanie Stark StampinUp
I wrapped some microwave popcorn with the gorgeous Snowflake Splendor Designer Series Paper and put it in an acetate card box with some twinkle lights. The card goes inside the box on the other side and hides the little battery pack for the lights. I wrapped it with the Snowflake Splendor Ribbon for a nice presentation.

Here’s a close up of the Winter Snow Embossed panel with the layered snowflakes, Balmy Blue Glimmer Paper and one of the Blue Adhesive Backed Gems to accent the center.
Stampin' Up! Snowflake Wishes card idea for a friend - Jeanie Stark StampinUp
The Snowflake Splendor Designer Series Paper, Winter Snow Embossing Folder, Blue Glimmer Paper, and ribbon I used on today’s projects are retiring and available while supplies last. I love this DSP and it’s on SALE WSL!Stampin' Up! Snowflake Splendor Designer Series Paper - visit juststampin.com for project inspiration and ordering information - Jeanie Stark StampinUp
Today is Day 2 of my 12 Days of Giveaways! I enjoyed reading your comments about your favorite retiring items yesterday. I used to get so disappointed when some of my favorites were retiring; however, just because they are retiring doesn’t mean I have to stop using them. And I know that Stampin’ Up! will continue to come out with new products I will love just as much! *I usually don’t post projects I make with retired products because I wouldn’t want to disappoint anyone if they want to make it and it’s no longer available. If you have retired product and are looking for inspiration you can always type in the product name in the search button on my blog and see past projects I’ve created. Let’s get to today’s winner…..Congratulations to Denise Wekwert ! You get to choose a set of my exclusive tutorials from the list below. Let me know which one you want and I will email them to you! Thanks to all who left comments! I appreciate you stopping by and taking the time to share. There’s still 10 days left in my 12 Days of Giveaways and you could be the next winner! Do you have a one-of-a-kind-friend you could send this card to? Leave me a comment sharing how you met your best friend. I look forward to hearing from you! *Tomorrow is the Pals Blog Hop so I won’t be posting my 12 Days of Giveaways. I’ll post the Day 3 winner on Thursday.  Be sure to check back tomorrow to see lots of inspiration from the PALS as we share our favorite things!

FYI…
Clearance Rack Refresh & Year-End Closeouts On Sale NOW!
Today’s the day you can shop from the YEAR-END CLOSEOUT and Save up to 50% on select retiring items.  Items are available while supplies last! Shop early to avoid missing out!

New items have been added to Clearance Rack! Supplies are limited, and with discounts up to 60%, products will go quickly. Click HERE to Shop.

Have a great day! Stay safe! Stay well!

Just Stampin’

Jeanie

Host Code Exclusive Offer! All orders placed through my online store are eligible for my FREE monthly gifts. Please use the current host code.  *If your order is $150 or more, do not use this code as You become the hostess and get the Rewards! Click HERE to Shop!

Current Host Code: TQMZQH6C
Product List  (Click on any image to view in my online store.)

Just Stampin’ Rewards

I appreciate each and every order! Here are some of the things you can expect when you place an online order with me in December:

  • A 2021 Calendar card in the mail with any order as my thanks to you.
    Stampin' Up! Celebration Label Dies and Daisy Punch calendar card idea - Jeanie Stark StampinUp
  • 3 FREE Exclusive Tutorials PLUS 3D Project Tutorial  featuring the stamp/bundle of the month when you order $40 or more (before tax & shipping).  New tutorials every month! December tutorials feature the Snowflake Wishes Bundle.
  • Snowflake Wishes card kit –  Purchase the Snowflake Wishes Bundle and get a free card kit to make one of the cards featured in the tutorial. *Click on the image below to purchase.

Exclusive Tutorials FREE with Purchase (or as member of my team)

  • Poinsettia Petals  –  Purchase the Poinsettia Petals Bundle and get 3 exclusive tutorials Plus an extra Bonus tutorial featuring a 3D project (shown HERE).
  • Celebration Tidings –  Purchase the Celebration Tidings Bundle (*Retiring) and get 3 exclusive tutorials Plus an extra Bonus tutorial! Click HERE to see one of the cards included in the tutorials.
  • Arrange A Wreath– Get 3 exclusive tutorials with the purchase of the Arrange A Wreath Bundle. (Click HERE to view one of the cards included in the tutorials.)
  • Celebrate Sunflowers – Get 3 exclusive tutorials with the purchase of the Celebrate Sunflowers Bundle. (Click HERE to view one of the cards included in the tutorials.)
  • Jar of Flowers – Get 3 exclusive card tutorials with the purchase of the Jar of Flowers Bundle. (Click HERE to view one of the cards included in the tutorials.)
  • Ornate Garden – Purchase the Ornate Styles Bundle or Ornate Thanks Bundle and receive 3 exclusive card tutorials. If you purchase both the Ornate Styles Bundle and Ornate Thanks Bundle I will send you all three kits to create each of the cards featured in the tutorials!
  • Timeless Tulips – Get 3 Exclusive Card Tutorials PLUS my 3D Tulip Treats Tutorial (Click HERE to view tulip treats) with the purchase of the Timeless Tulips Bundle!
  • So Sentimental – Get 3 exclusive tutorials with the purchase of the So Sentimental Bundle.
  • Peaceful Poppies –  Get 3 exclusive tutorials with the purchase of the Painted Poppies Bundle or the Peaceful Moments Bundle. If you purchase both the Painted Poppies Bundle and the Peaceful Moments Bundle I will send you all three kits to create each of the cards featured in the tutorials!

Click HERE to shop my retired Stampin’ Up! SALE.