
Welcome to the ABC’s with DSP! This month I am featuring projects showcasing Stampin’ Up! Designer Series Paper. Today I am using the Festive Birthday Designer Series Paper to make 5 cards and envelopes from just one sheet of 12 x 12 DSP.

I love working with one sheet of 12 x 12 paper and seeing what I can make. I wanted some quick cards so I cut my 12 x 12 sheet of Designer Series Paper into 6 4×6 inch pieces. The Festive Birthday DSP coordinates with Emerald Envy, Crushed Curry, Melon Mambo, Pumpkin Pie, Tempting Turquoise, and Whisper White cardstock so I pulled out a sheet of each to play with. Here’s how I put the cards together.
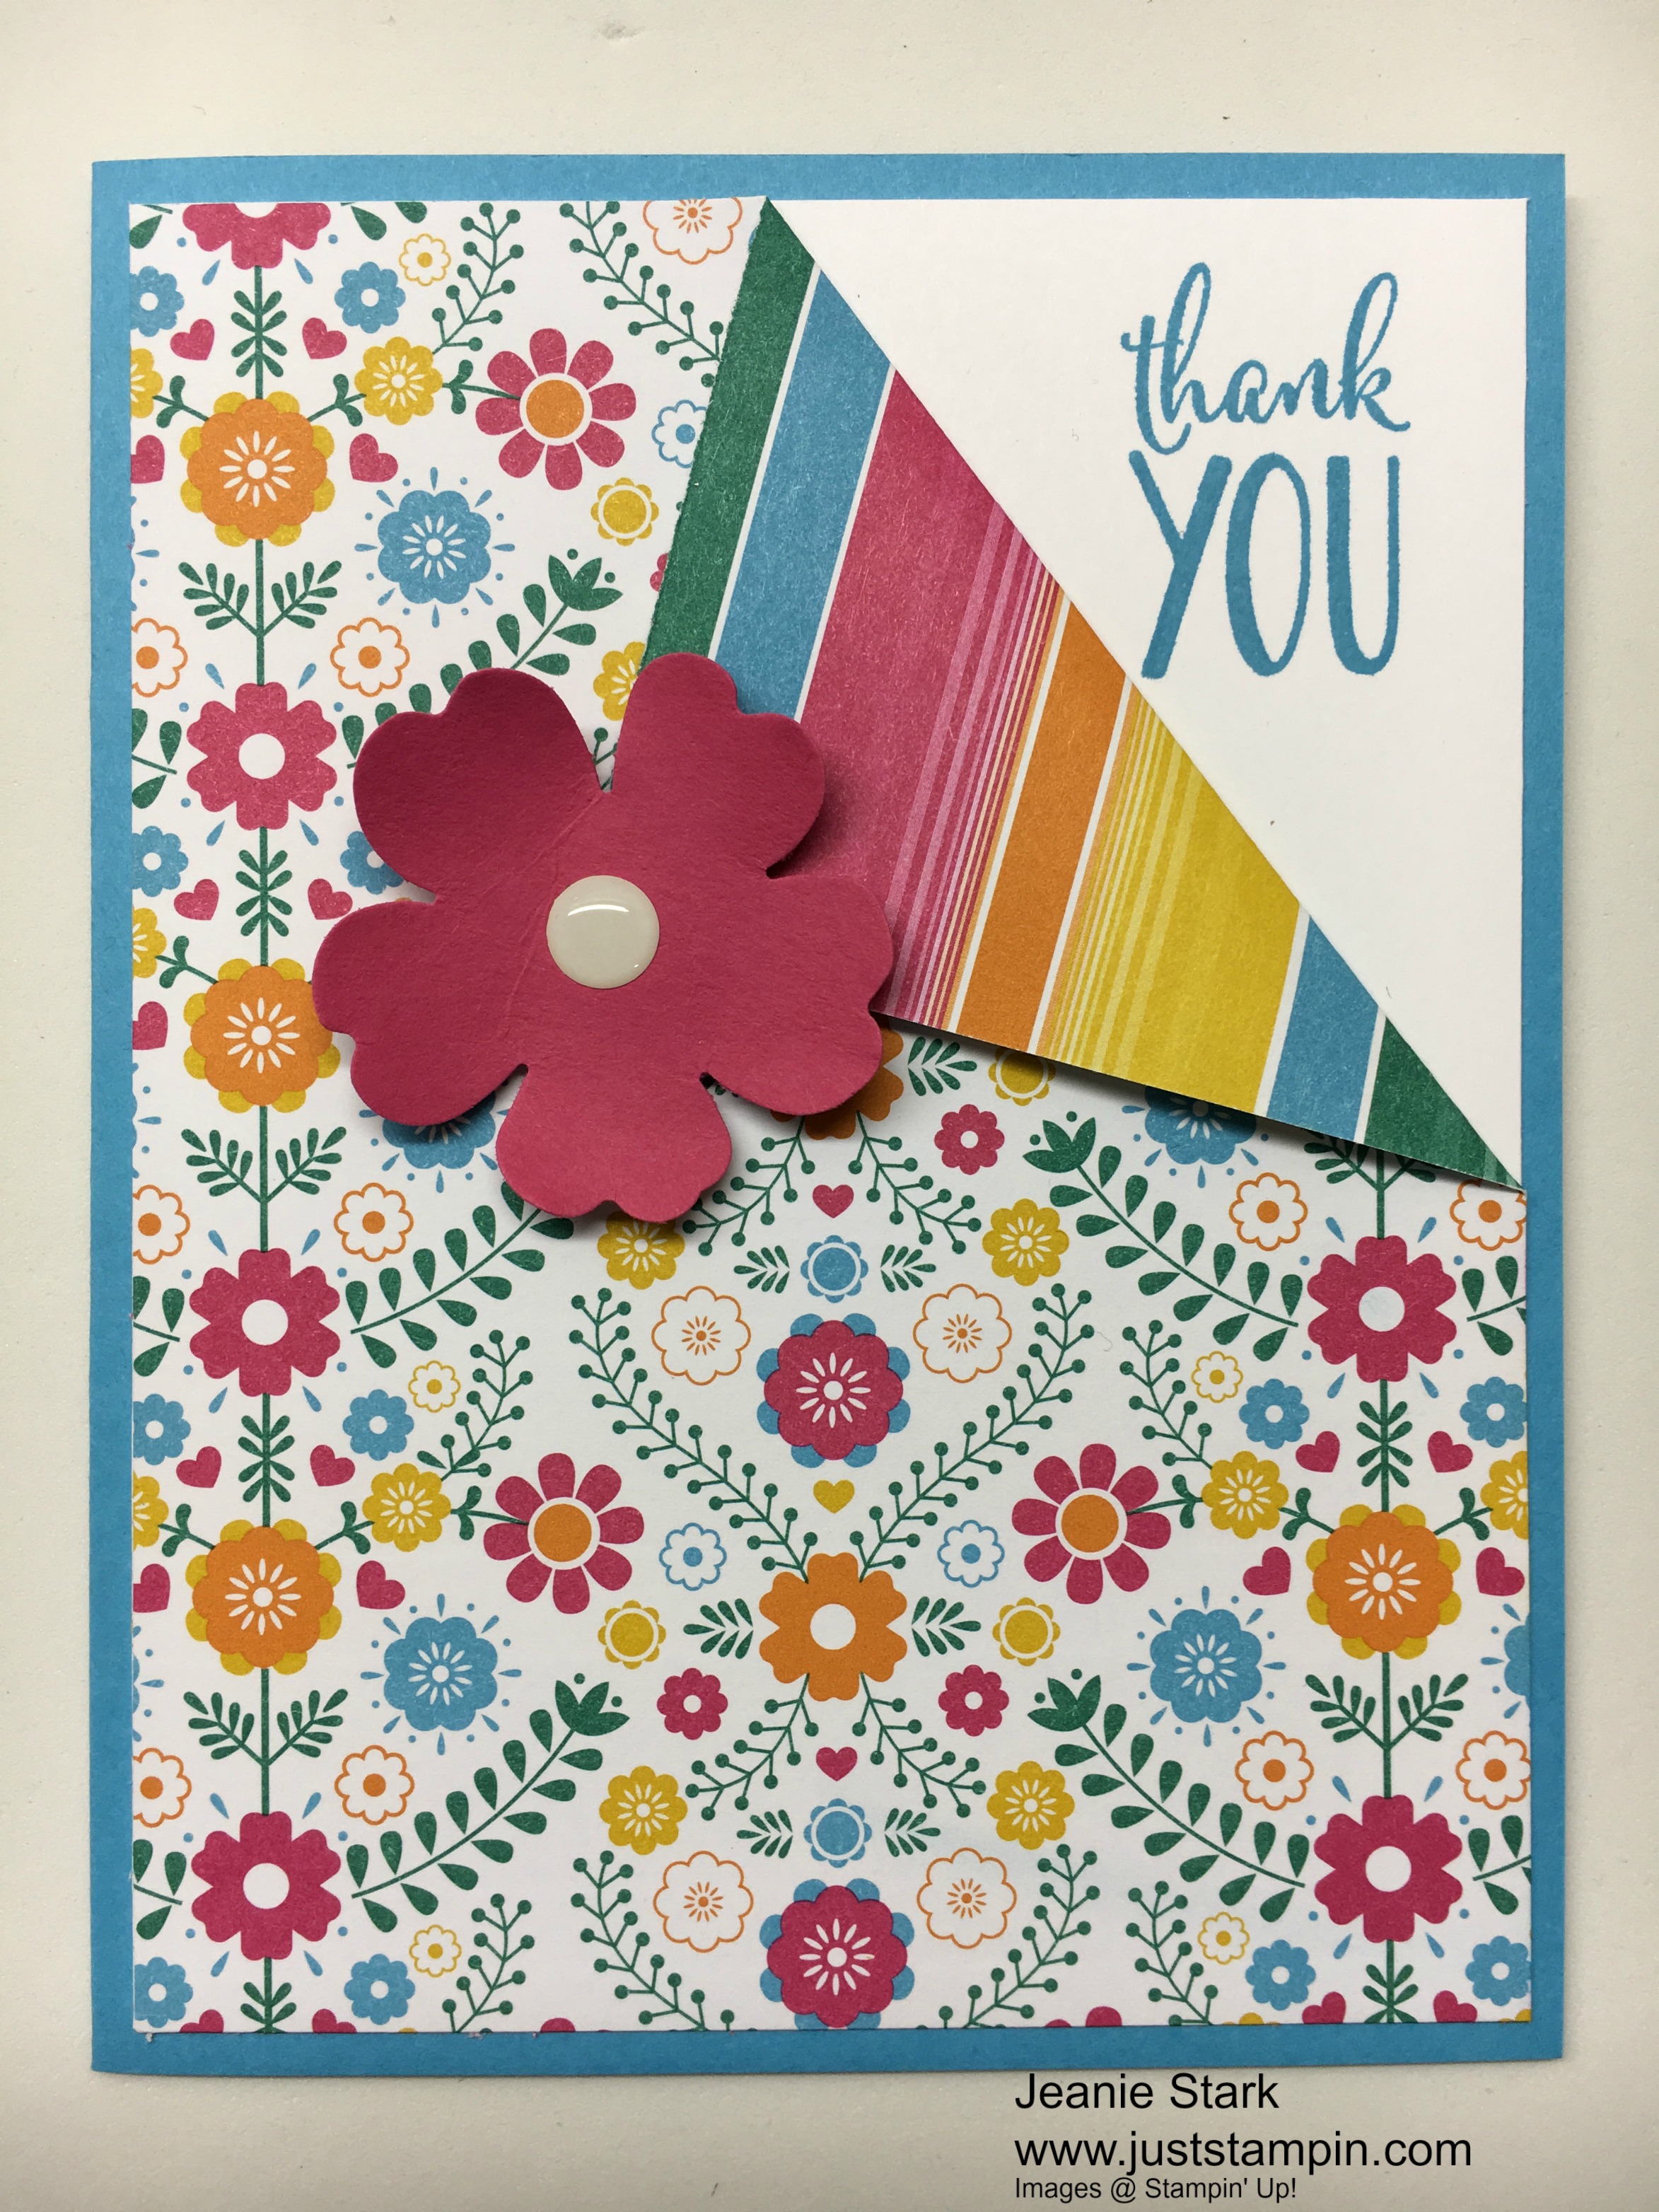
I trimmed a piece of precut 4 x 6 DSP to 4 x 5 1/4 and then just folded down one corner and adhered it to a piece of 4 x 5 1/4 Whisper White. I stamped the sentiment from the Happy Happenings Stamp Set in Tempting Turquoise ink to match my card base. I punched the flower from a scrap piece of melon mambo using the pansy punch. I added a white perfect accent to the center and adhered it to my card with a Stampin’ Dimensional. I used the 3/4 x 4 inch leftover piece of DSP inside the card. (I just adhered it to the bottom of a piece of Whisper White measuring 4 x 5 1/4. I forgot to take a photo. Sorry!)
I cut 2 pieces of 4 x 6 DSP in half to make 4 2×6 pieces to decorate the envelopes. I cut a 1/4 inch strip from each color of cardstock used for the card bases to put on the envelopes with the DSP.

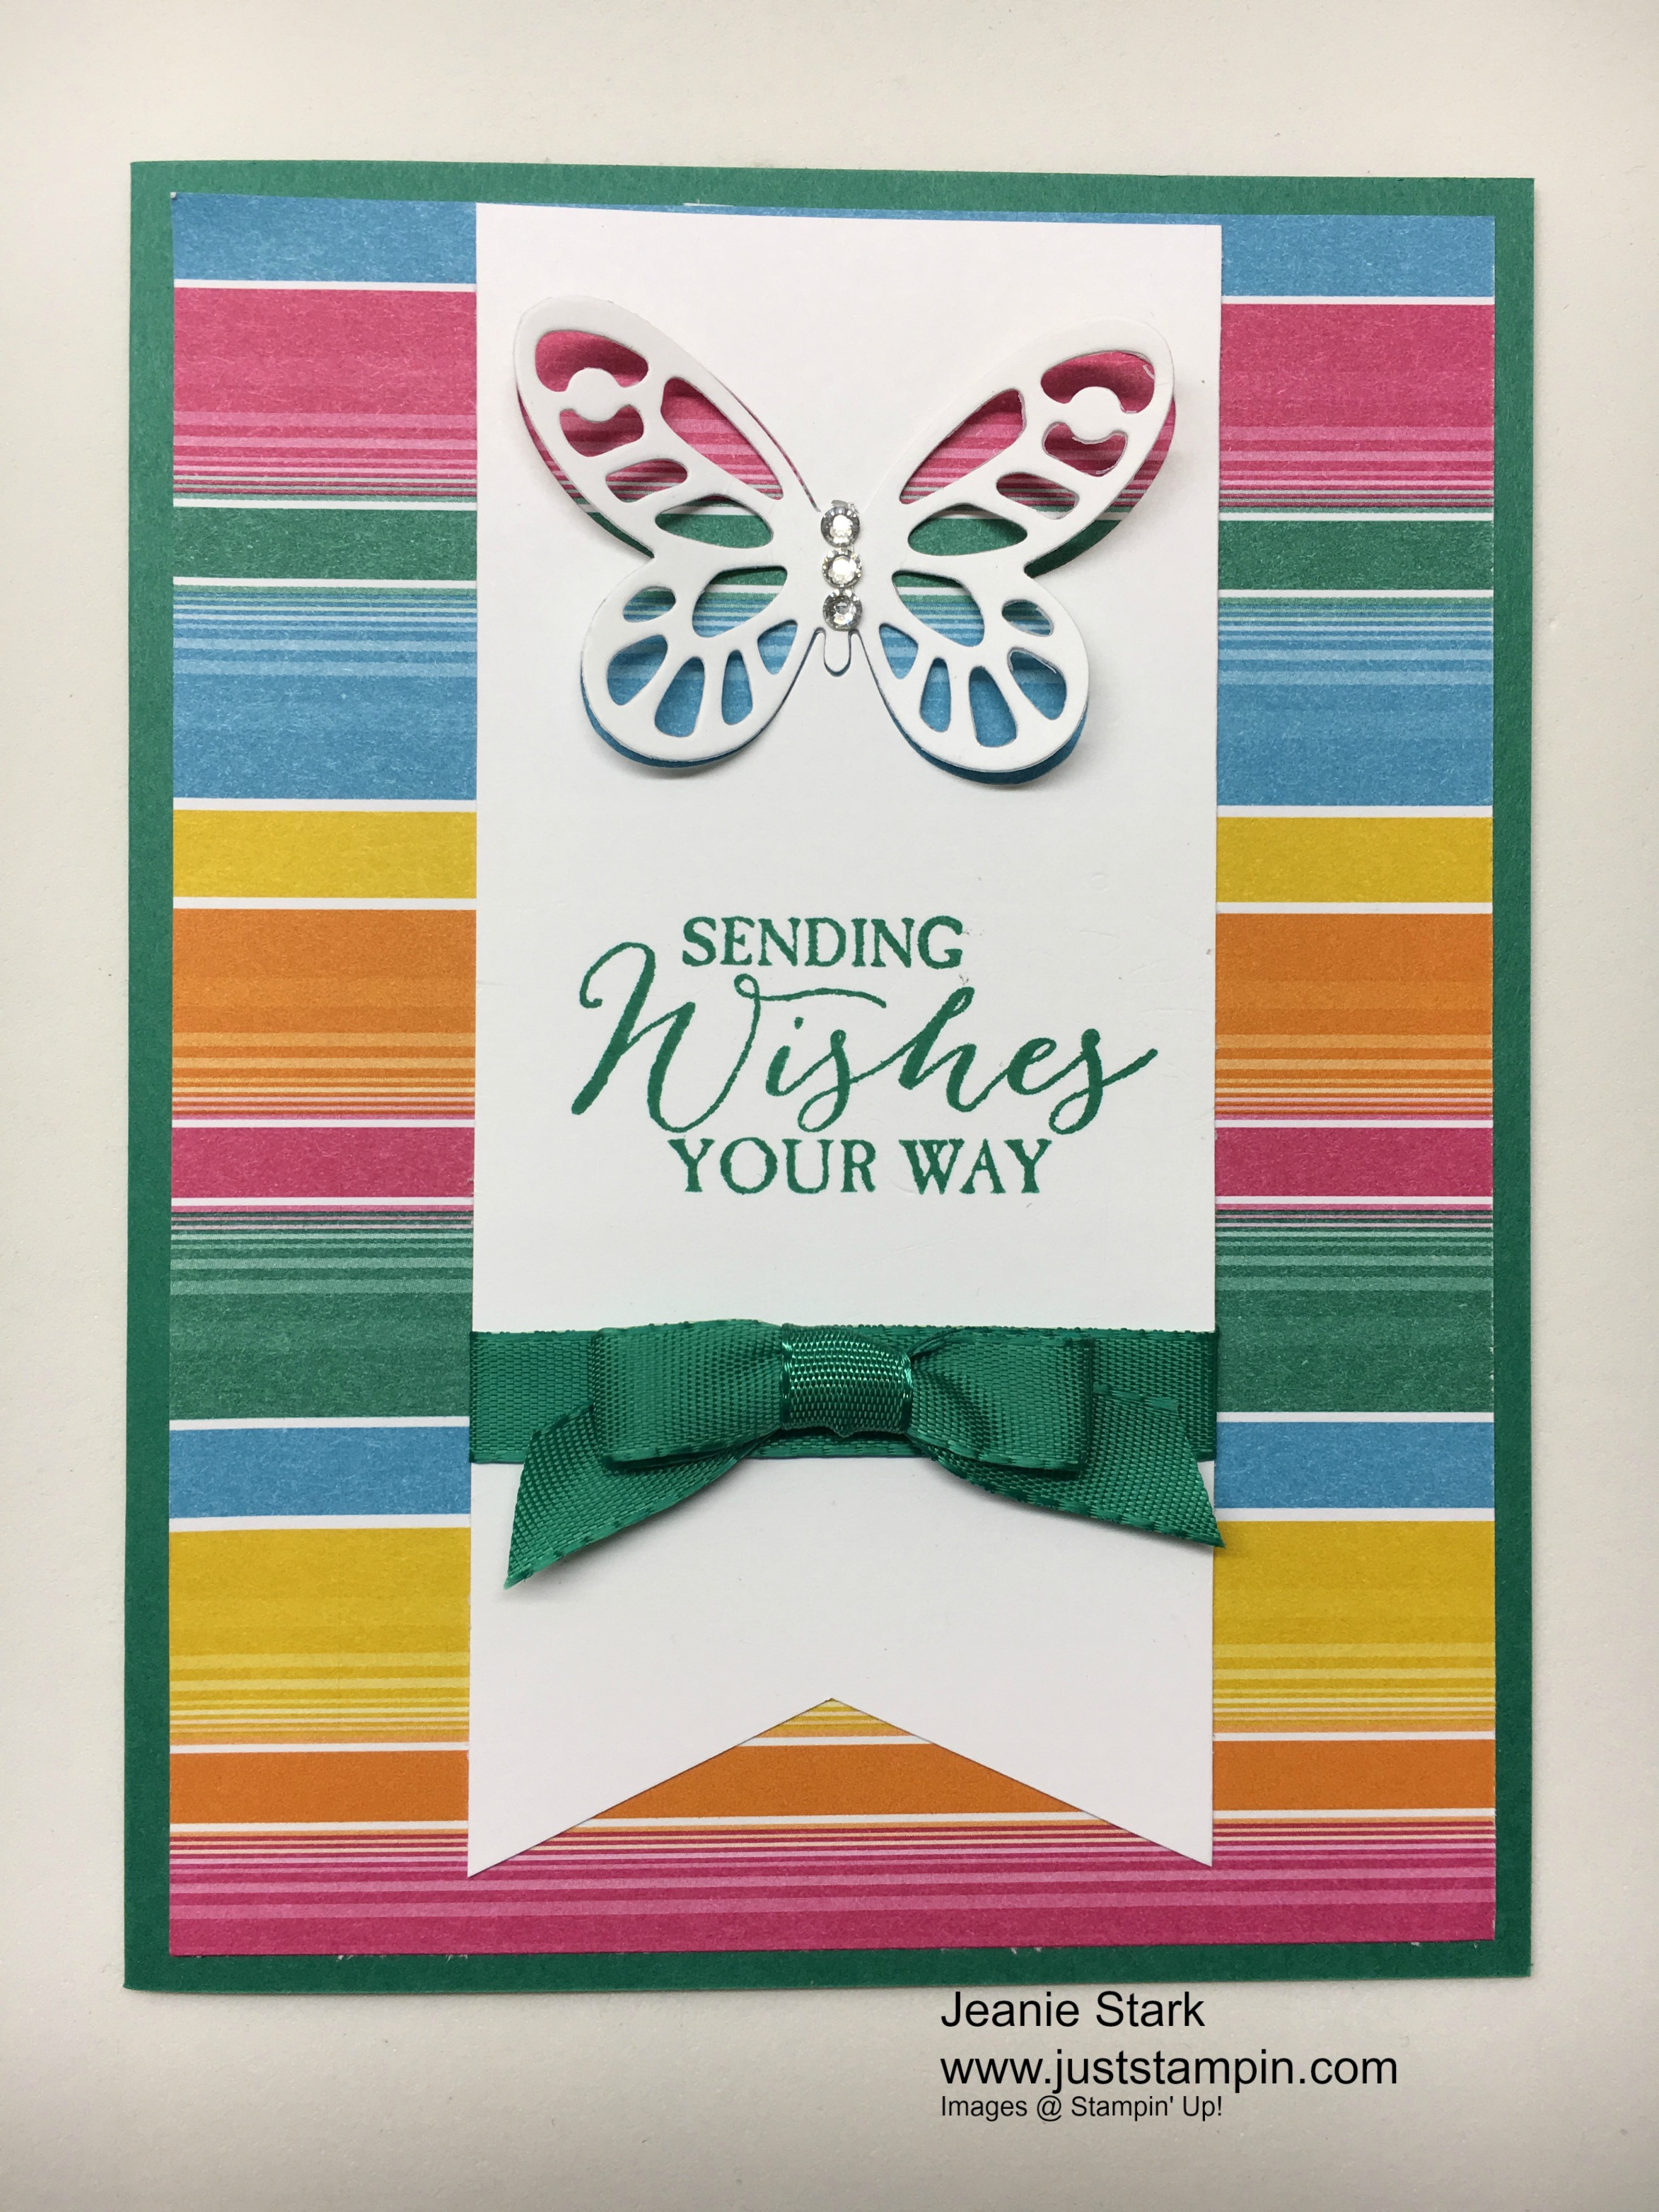
My next card also uses a piece 4 x 6 DSP trimmed to 4 x 5 1/4. (This time I saved the 3/4 x 4 inch piece for another card.) I love the way the Stampin’ Up! DSP is double sided. Here I used the Bold Butterfly Framelits to cut my butterfly from a piece of 2 1/4 x 5 Whisper White cardstock. I stamped the sentiment from Butterfly Basics in Emerald Envy, cut the banner, and attached some Emerald Envy ribbon and a bow. I used a glue dot to adhere the butterfly and added some Rhinestone Basic Jewels.

The first 2 cards and envelopes used 3 pieces of the 4 x 6 DSP. For my next 2 cards I will use 2 more pieces. I cut one piece of 4 x 6 DSP in half to make 2 3×4 inch pieces. (The other 4 x 6 piece is used for the envelopes.)

I adhered the 3 x 4 piece on to a Crushed Curry card base. I stamped the sentiment from Watercolor Words on Whisper White cardstock with Crushed Curry ink. I used the Layering Circles Framelits to cut the sentiment and a scalloped circle from Emerald Envy cardstock. I added a piece of the Emerald Envy ribbon with a glue dot and attached the sentiment layer with Stampin’ Dimensionals. The Rhinestone Basic Jewels finished off this quick & simple card.

My next card uses the 3/4 x 4 ” piece of DSP leftover from trimming the striped paper on the banner card. (It could be used on the inside of a card or layered on the front like I did here.)

I adhered the DSP to a piece of 4 x 5 1/4 Whisper White cardstock. I stamped the sentiment from Watercolor Words using Melon Mambo ink. I wrapped some Melon Mambo thick Baker’s Twine and tied a bow before adhering it all to the card base using Fast Fuse.

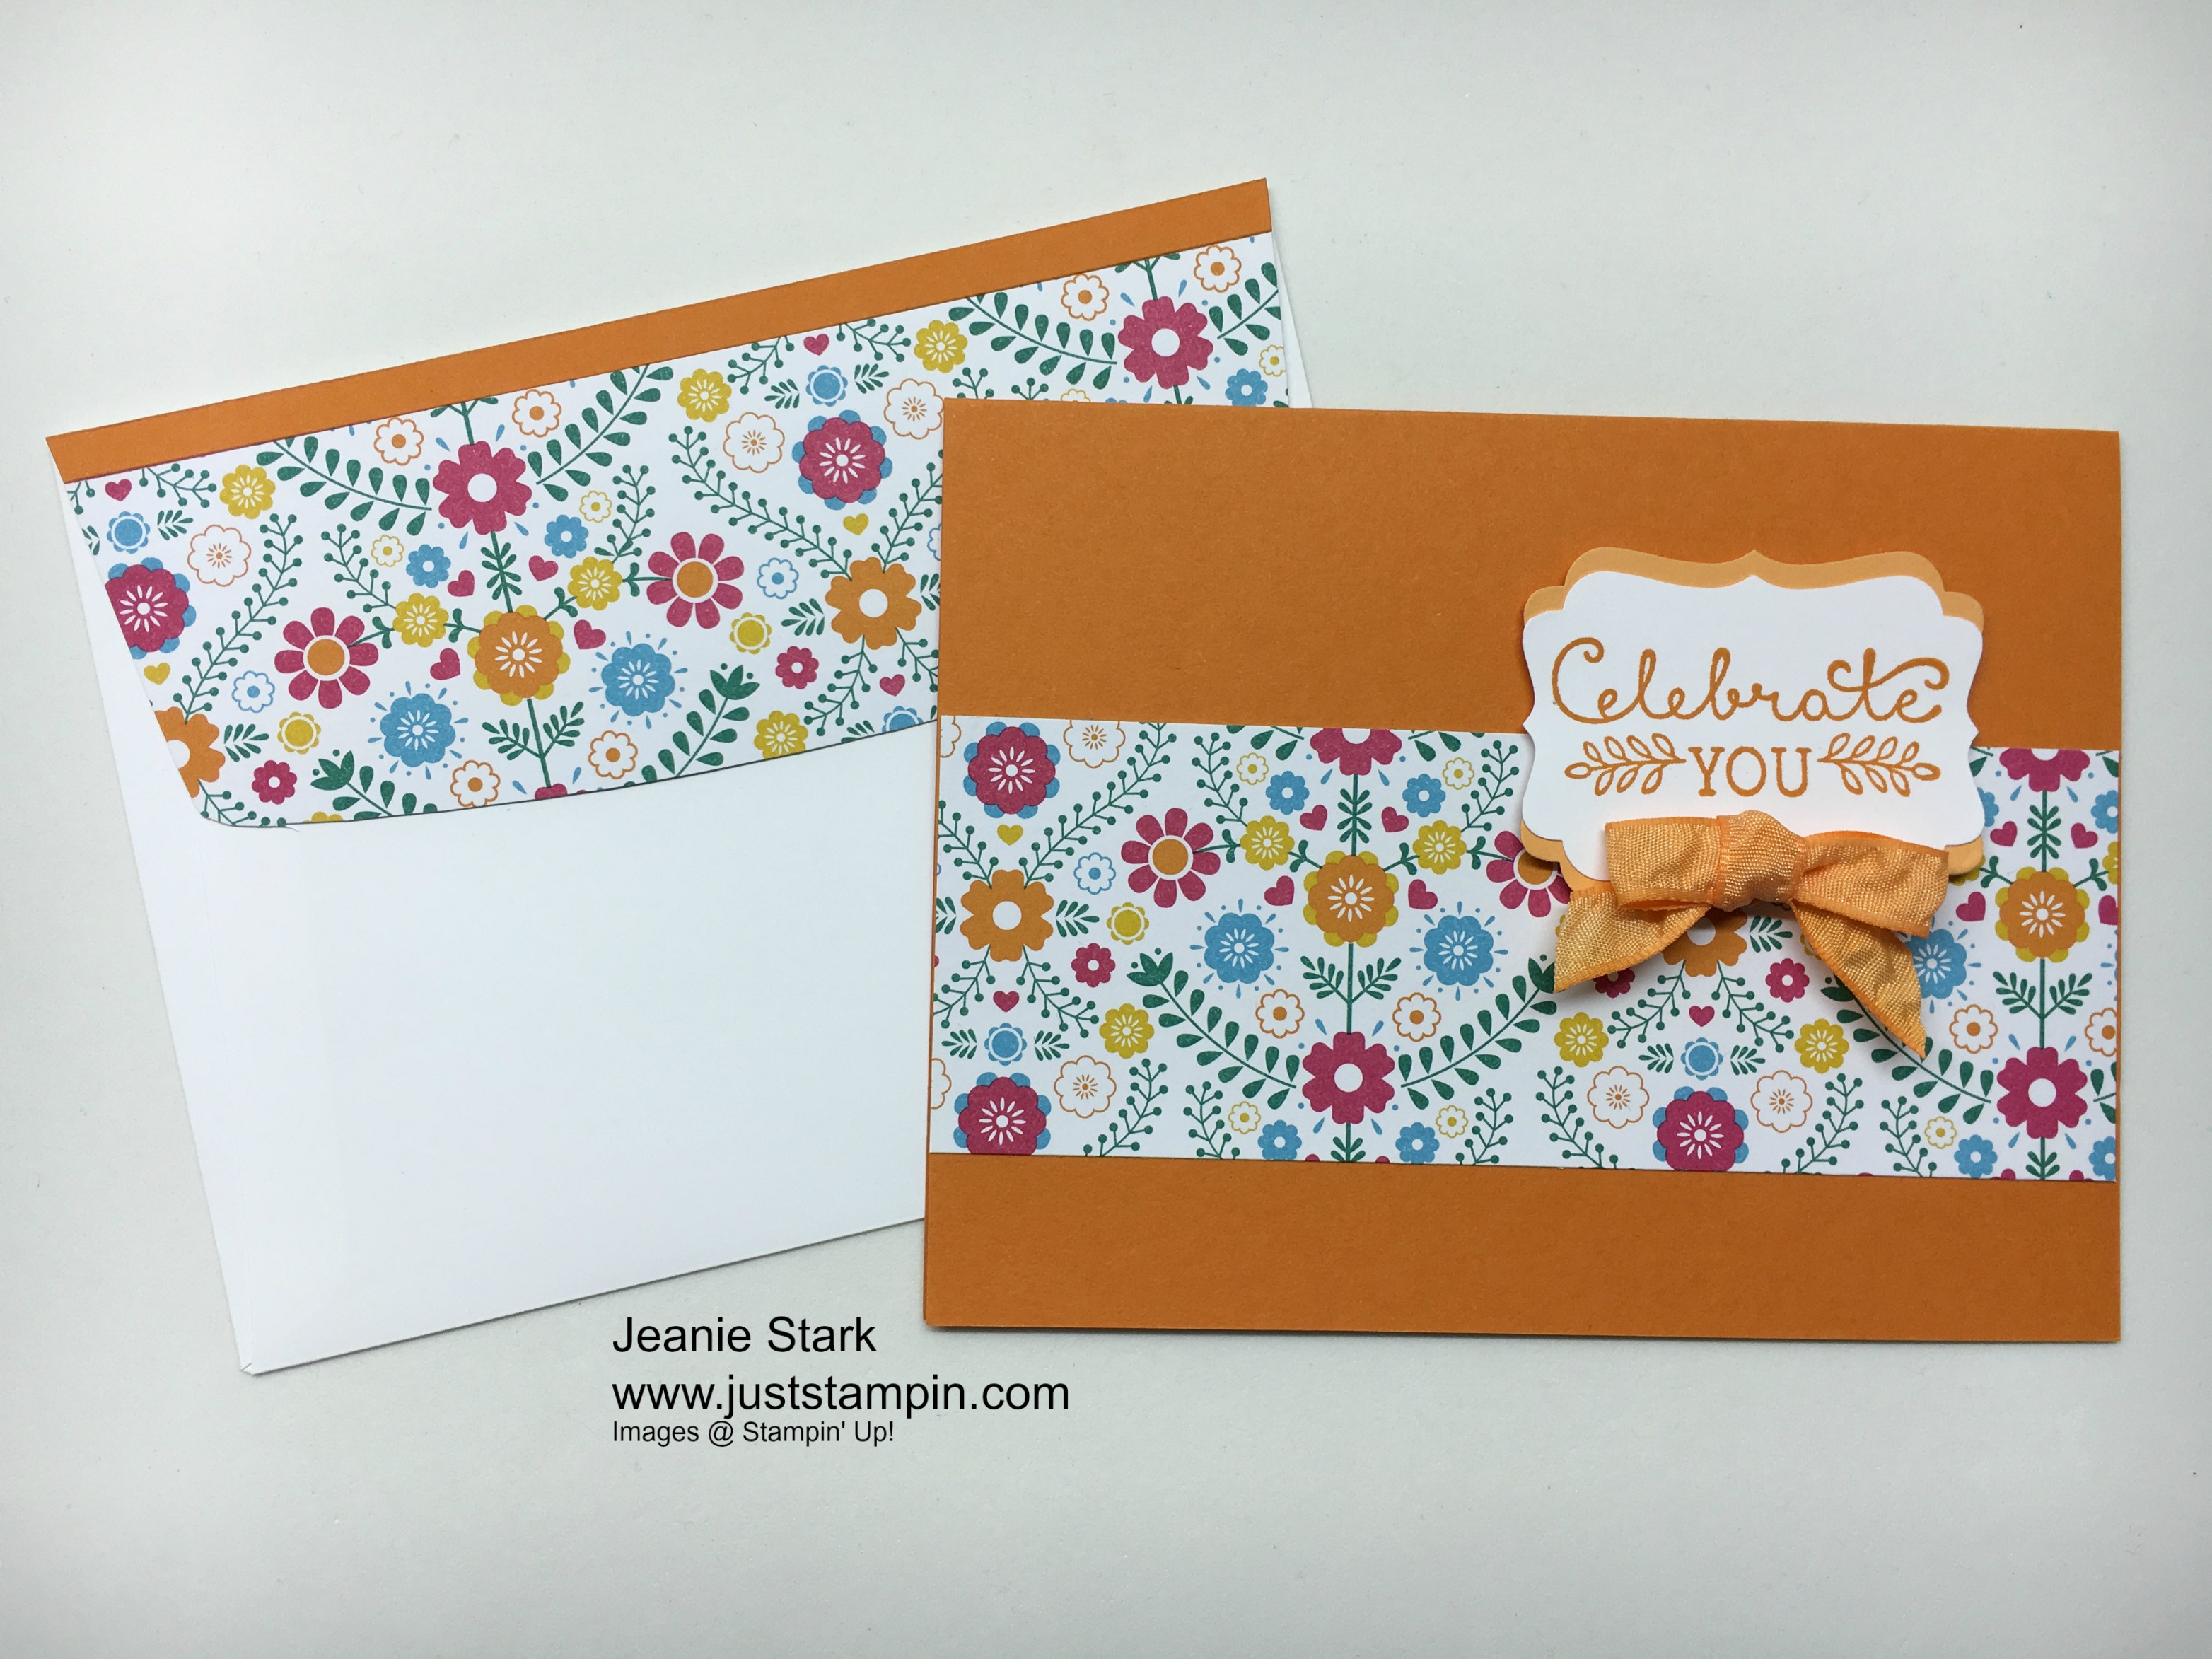
I cut my last piece of 4 x 6 DSP in half to make the card below. I attached the DSP to a Pumpkin Pie card base. This card could easily be vertical or horizontal. This is one of those layouts I use again and again. It seems to look different every time just by changing the DSP and matching cardstock, ribbon, cut out shape, and/or orientation.

I stamped the sentiment from Suite Sayings using Pumpkin Pie ink. I punched it out with the Decorative Label Punch and also punched one out from a scrap of Peekaboo Peach to layer the sentiment. I attached the sentiment with Stampin’ Dimensionals and added a Peekaboo Peach bow using a glue dot.
How cool is it that you can make 5 quick cards using just 1 piece of 12 x 12 DSP?! When you add the different sentiments and embellishments no one would ever know it was just a 4 x 6 piece of paper that started it all! They all look different. Do you have a favorite?

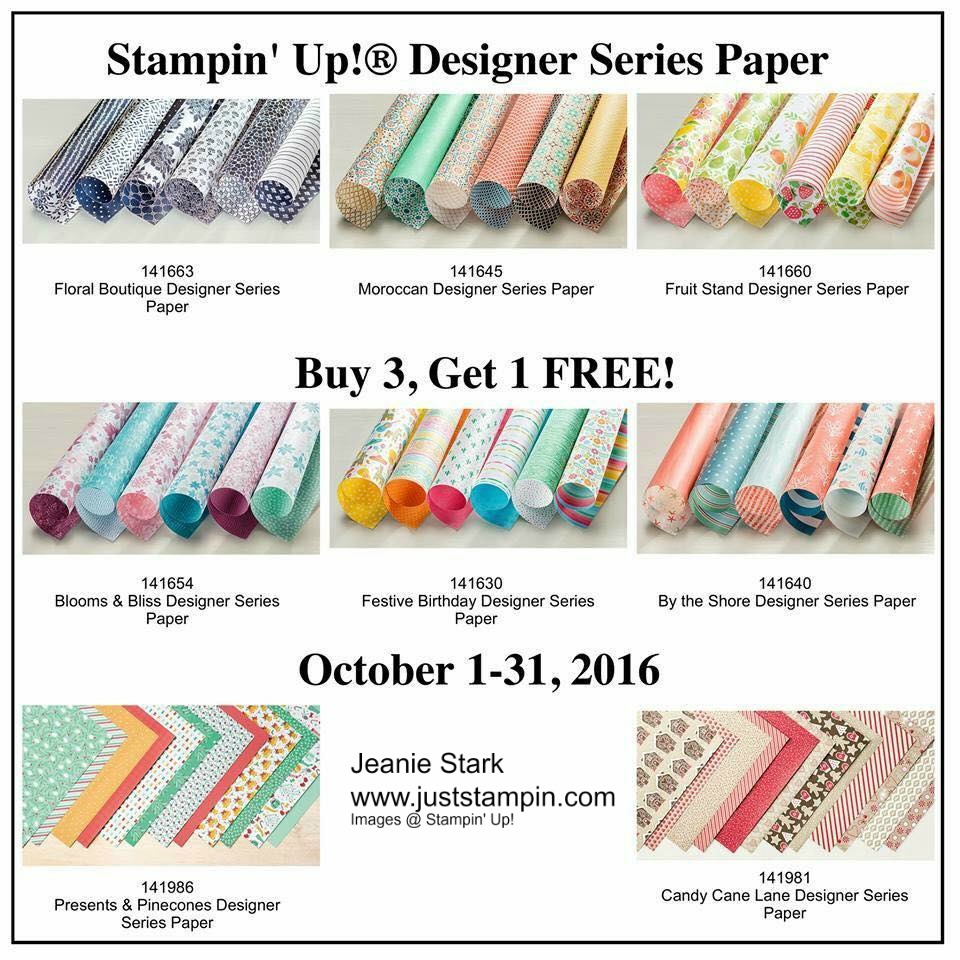
Click HERE to shop my online store and take advantage of the Stampin’ Up! Designer Series Paper Sale. Buy 3, Get 1 FREE Oct. 1-31. Please use the Hostess Code 7DB3CBKS when you check out. I’ve added a visual below to show where to enter the code. I always send a thank you gift each month when you order from me. I appreciate each and every order!
Thanks for stopping by!
Just Stampin’
Jeanie


Beautiful cards. Cheerful and happy looking DSP.
I love them all! So bright and cheery!! My biggest problem is actually cutting into the paper!!!!
I love these! Thank you so much for detailed instructions! It’s time to cut up some DSP!
Never thought about decorating the envelope. Thanks for the great idea.
I must be overlooking something. I don’t see how these cards “open”. Any help available here??
The cards all open. Each has a colored cardstock card base ( 5 1/2 x 8 1/2 scored at 4 1/4). THe DSP is adhered to the front of the cards.
What is the card size of the top/first featured card? Does it open? Thank you!
Yes it opens! The DSP is adhered to the front of a Tempting Turquoise card base (5 1/2 x 8 1/2 scored at 4 1/4).
I love your OSW cards and I am fascinated by your ABC series! I am a new subscriber!