T is for Stampin’ Trimmer

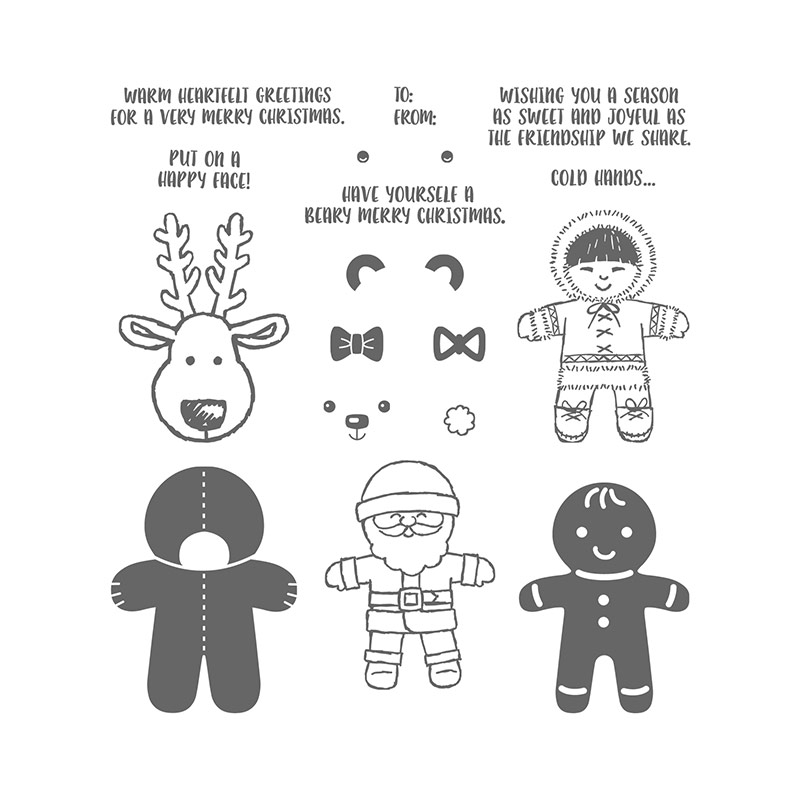
Welcome to my ABC’s of Stampin’ series!  Yesterday I left you with a teaser for today. I’m so glad you stay tuned as I have a real treat for you!  Before we take a look at the Stampin’ Trimmer and tips for using it, I want to share with you my Favorite Background Stamp that I did not tell you yesterday…it’s Merry Medley!  This stamp has so many cool sentiments that I thought it could be more than just a background stamp. In fact, when I started playing with it yesterday, I decided that I would offer this stamp with my Stamp of the Month Kit.  You can preorder this  kit from me now through September 29th. The kit includes the Merry Medley stamp, Cherry Cobbler & Garden Green Stampin’ Write Markers, and all the supplies…card bases, envelopes, ribbon, cardstock, Designer Series Paper, die cuts, embossed pieces (precut and ready to stamp and assemble) to make 5 cards and a 3D project (mini notebook)!

img_4537
Merry Medley Stamp of the Month   October 2016

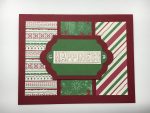
All the sentiments used on these projects came from just 1 stamp! Take a look.

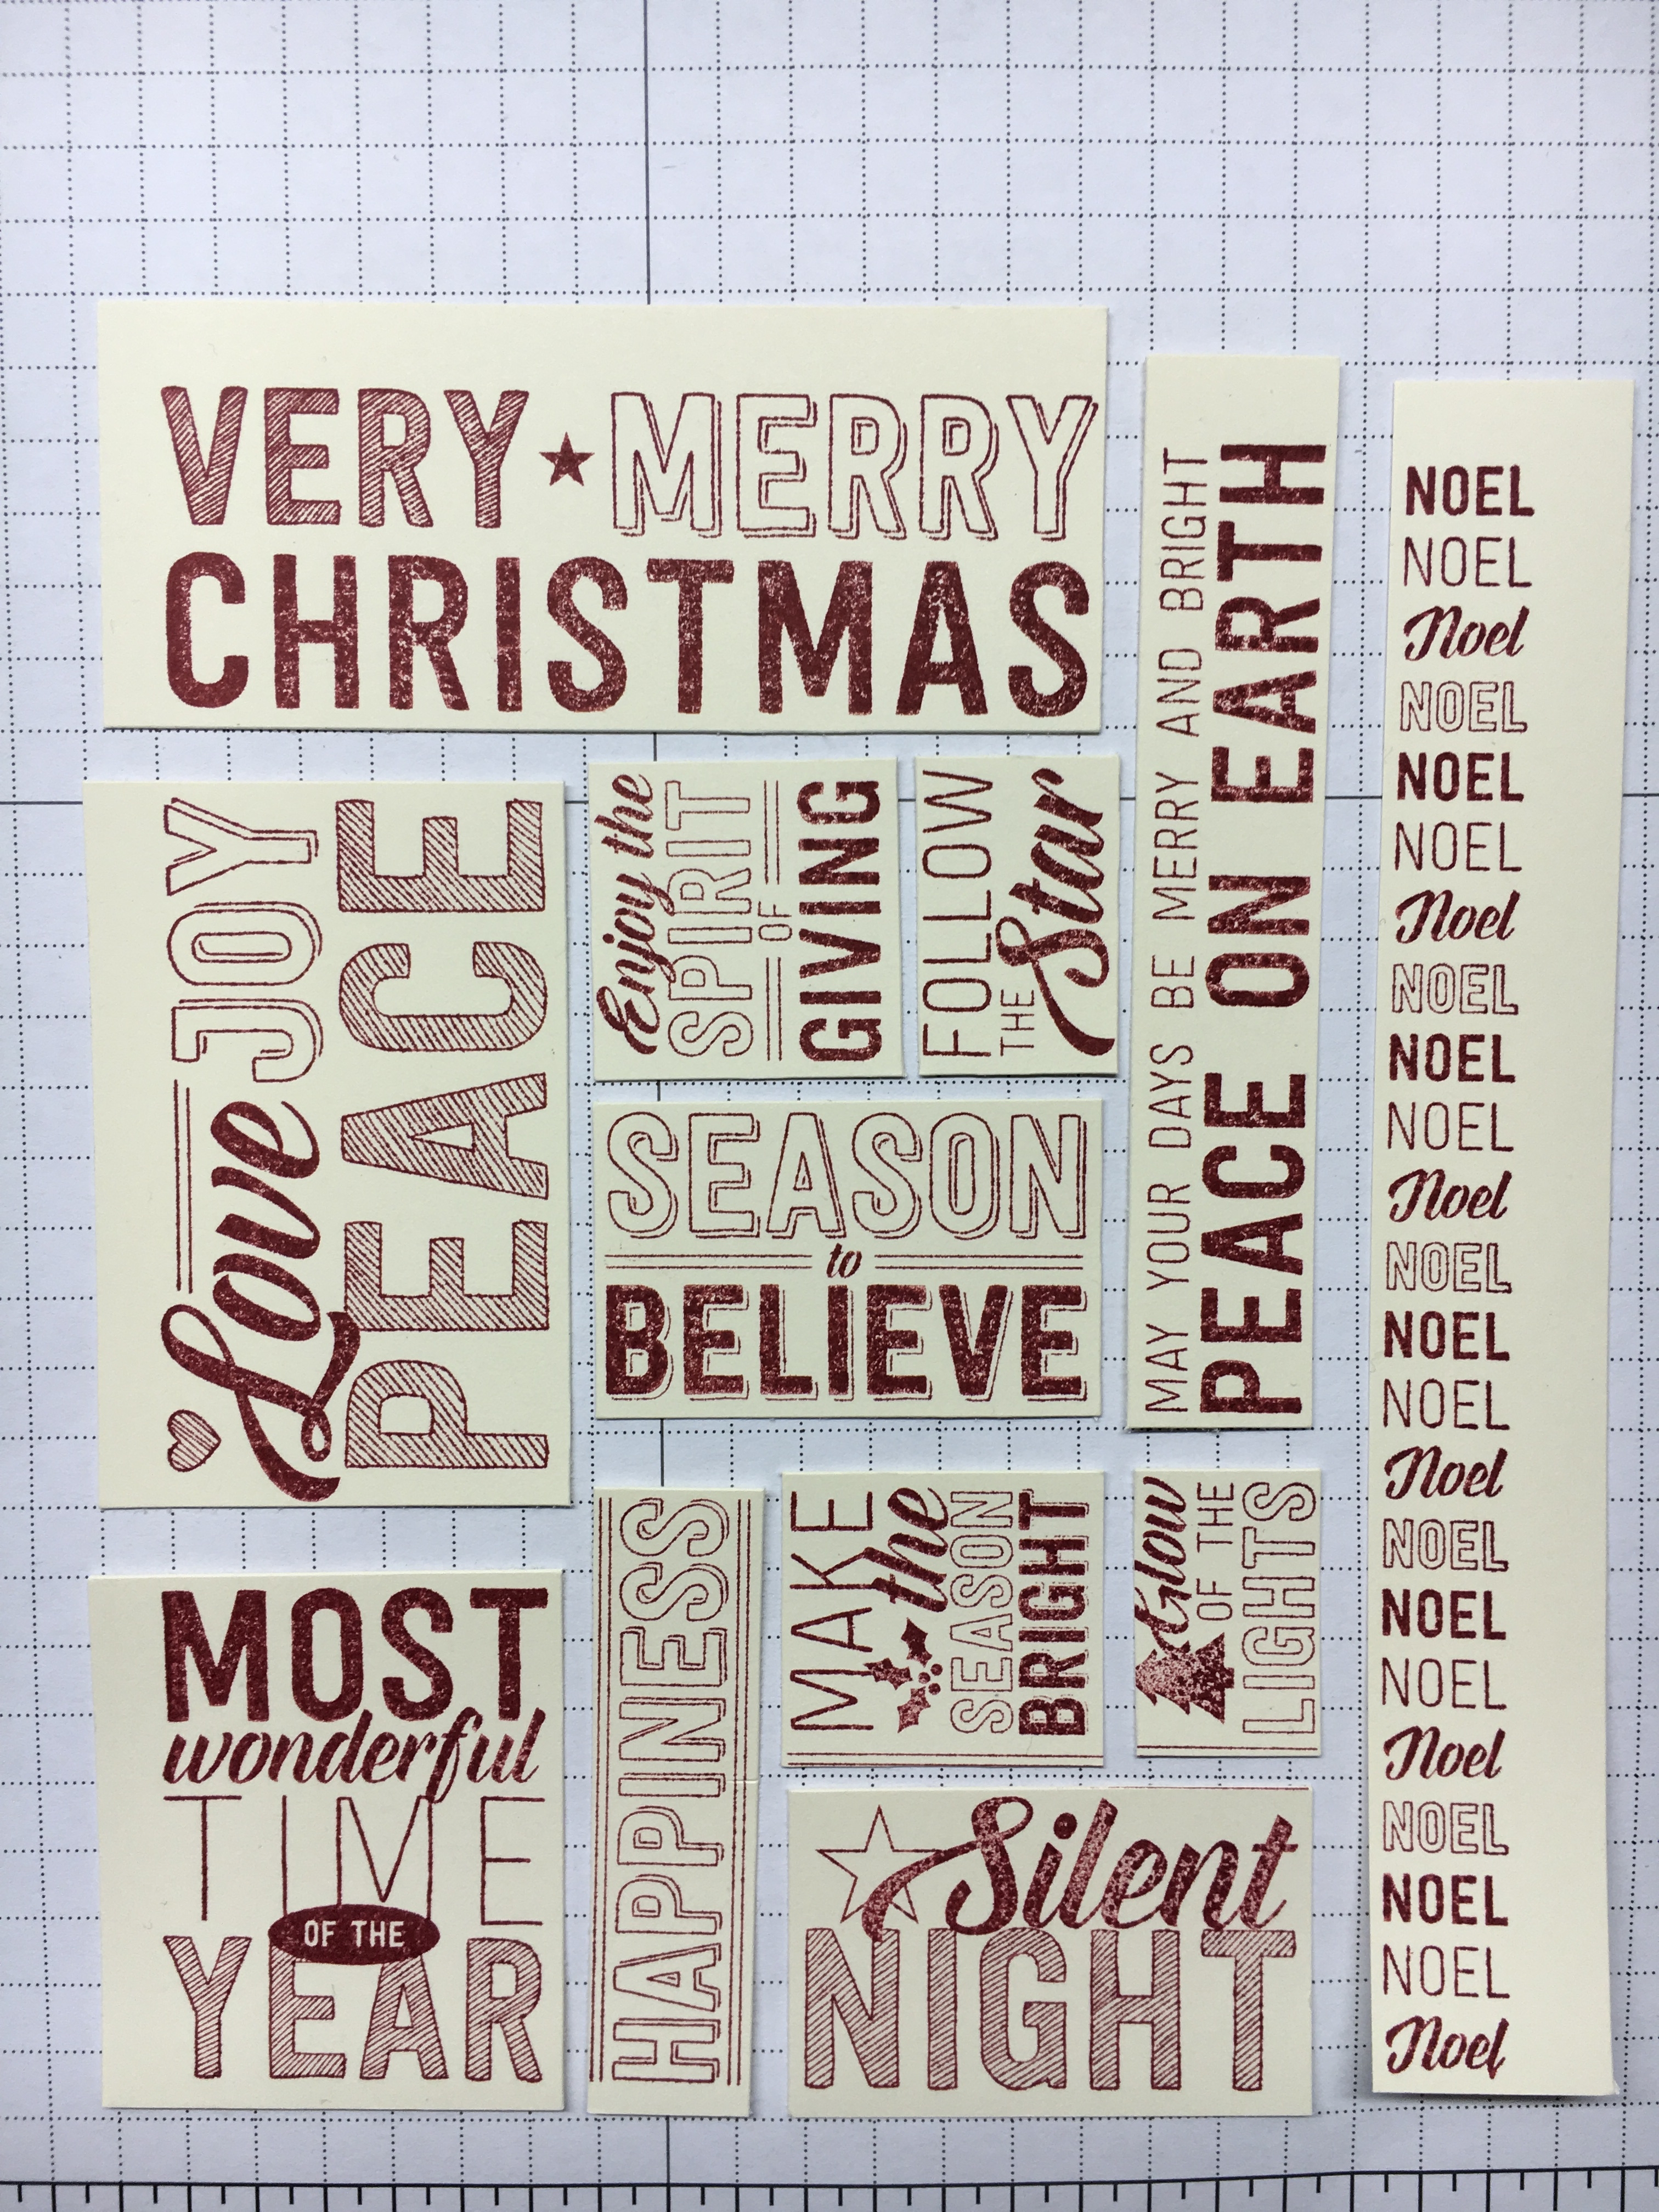
I inked it up and stamped it on Very Vanilla cardstock.  Then I  used my Stampin’ Trimmer to cut it up to make all the different sentiments for my cards! Here’s a tip for inking up large stamps like this one: Turn the stamp over and tap the ink on top of the stamp. It is easier to get good coverage that way. I love how some of the sentiments are open for you to color. I find it very relaxing to color!

I couldn’t have cut these pieces so precise without my Stampin’ Trimmer. Here’s a short video from Stampin’ Up! highlighting it’s features.

Here’s a visual for you showing how I cut the sentiments apart step by step.

img_4503

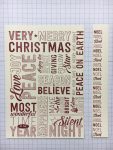
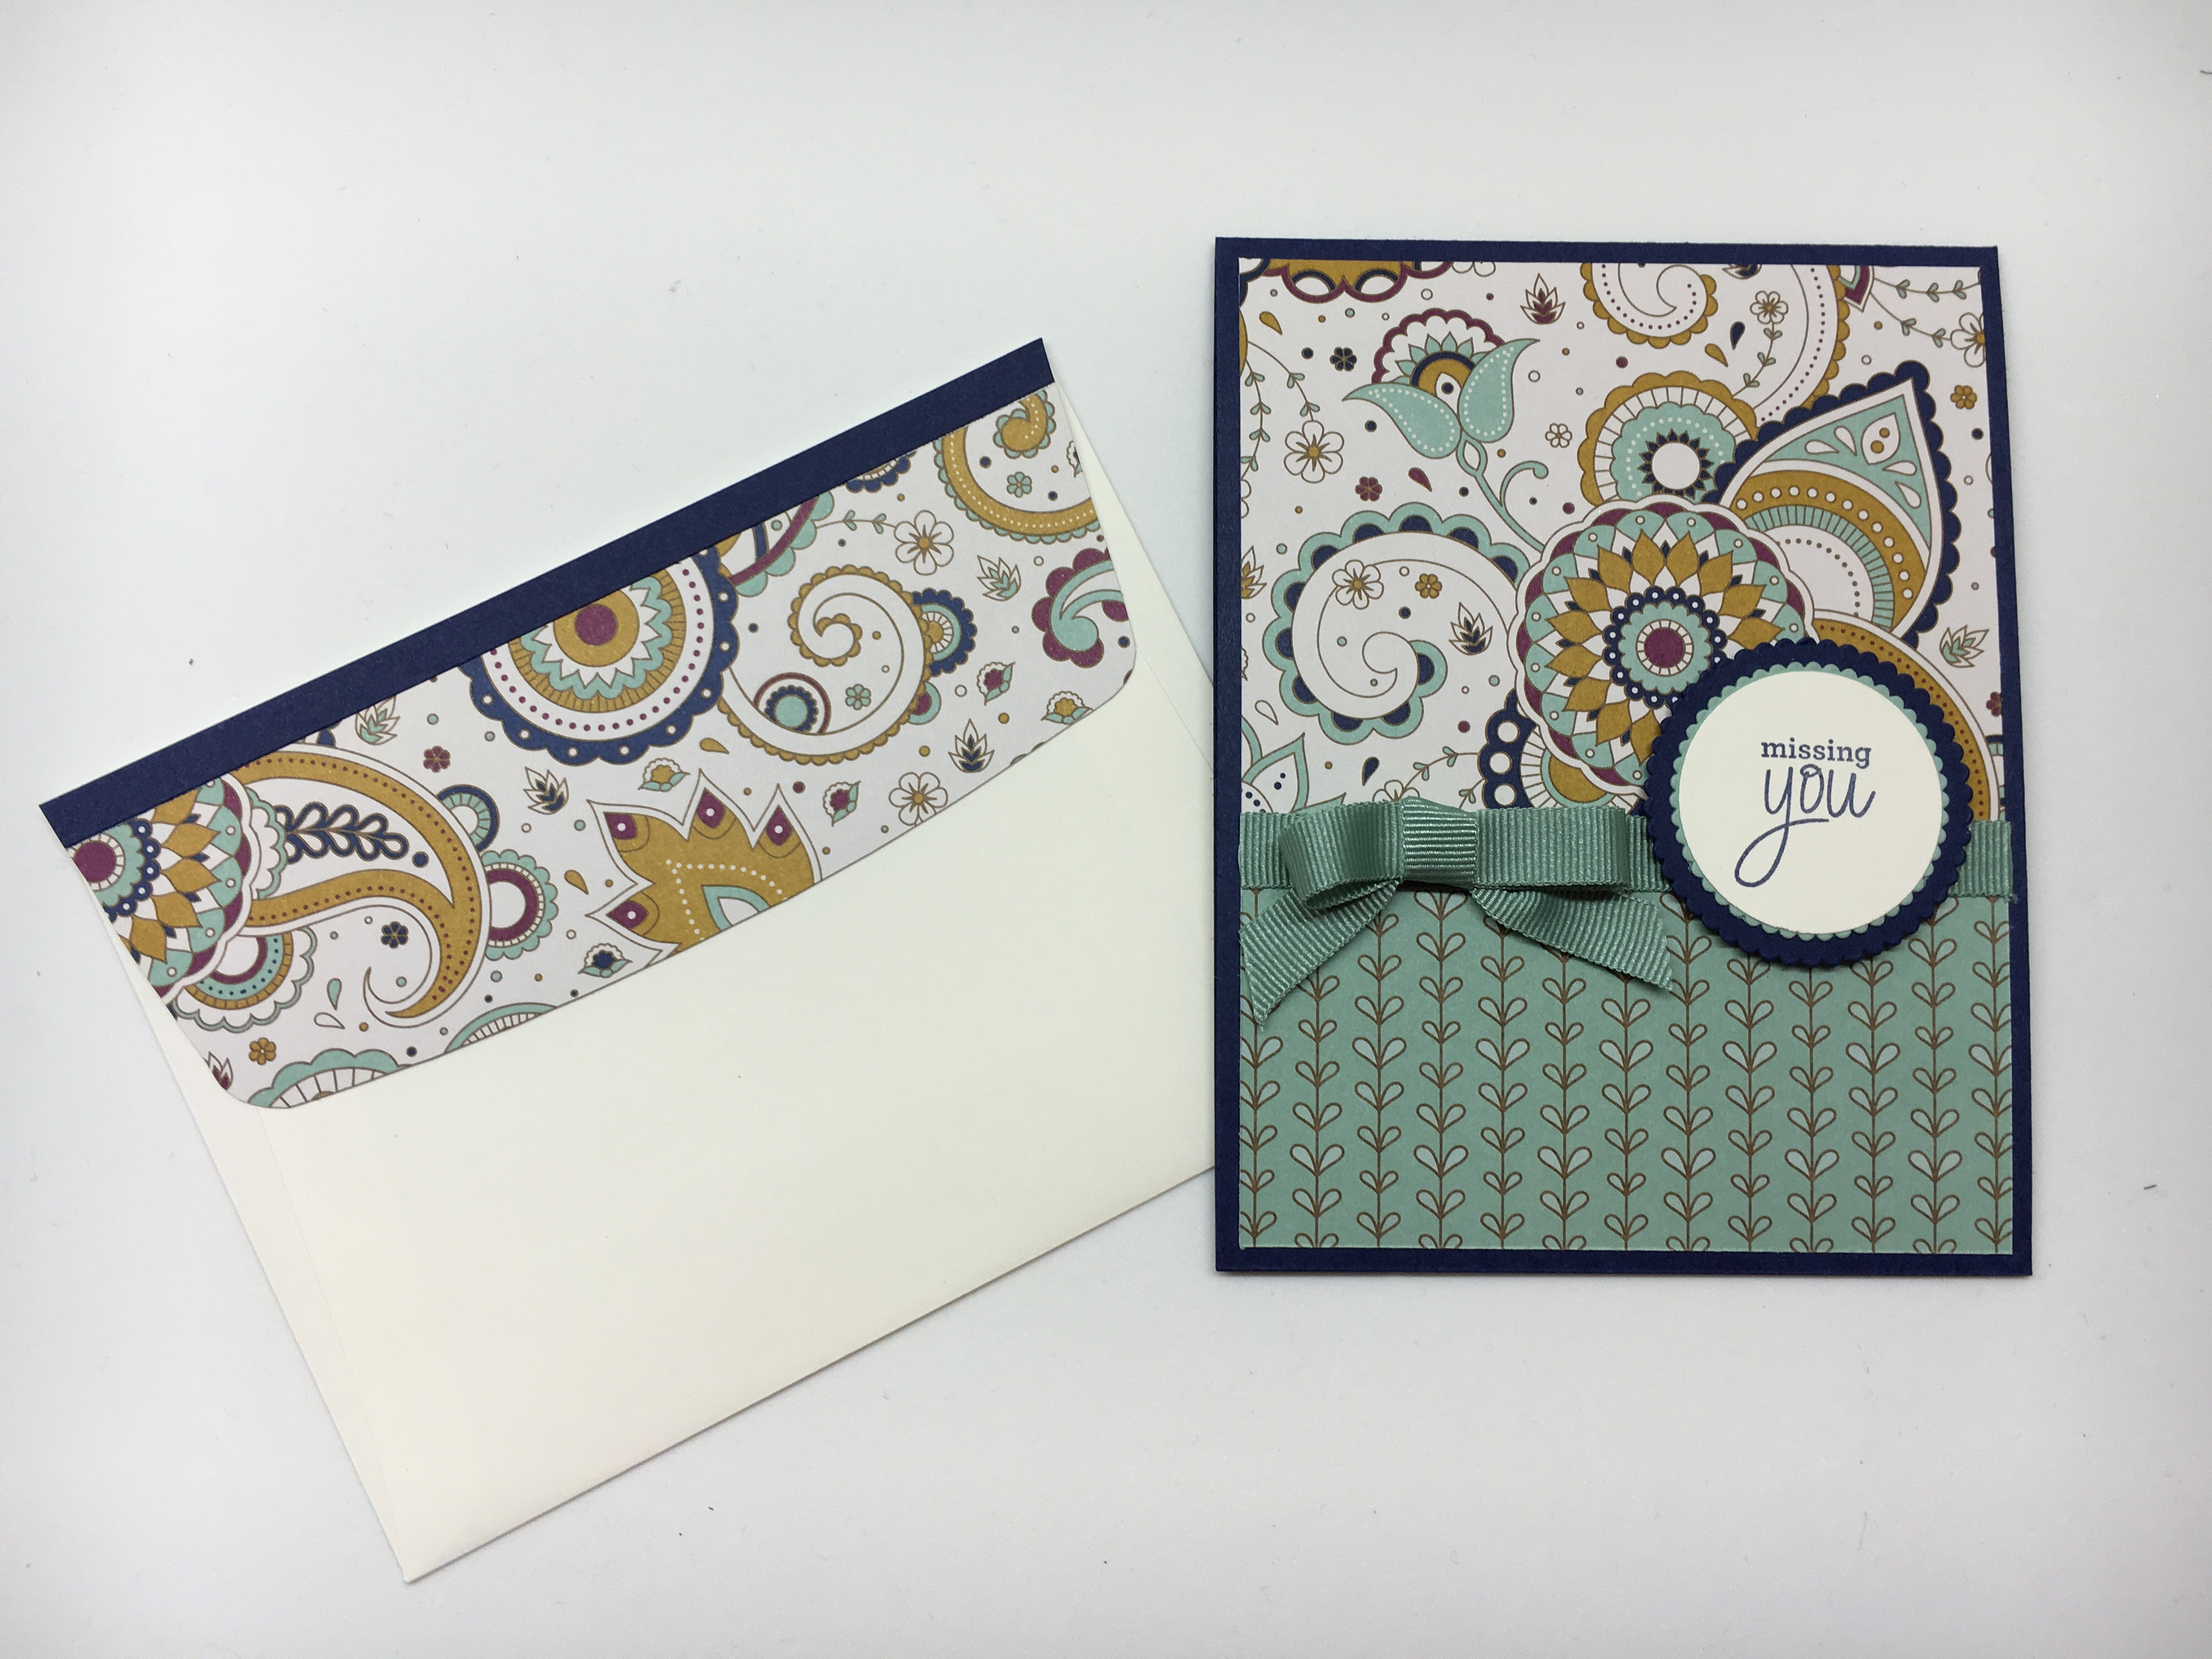
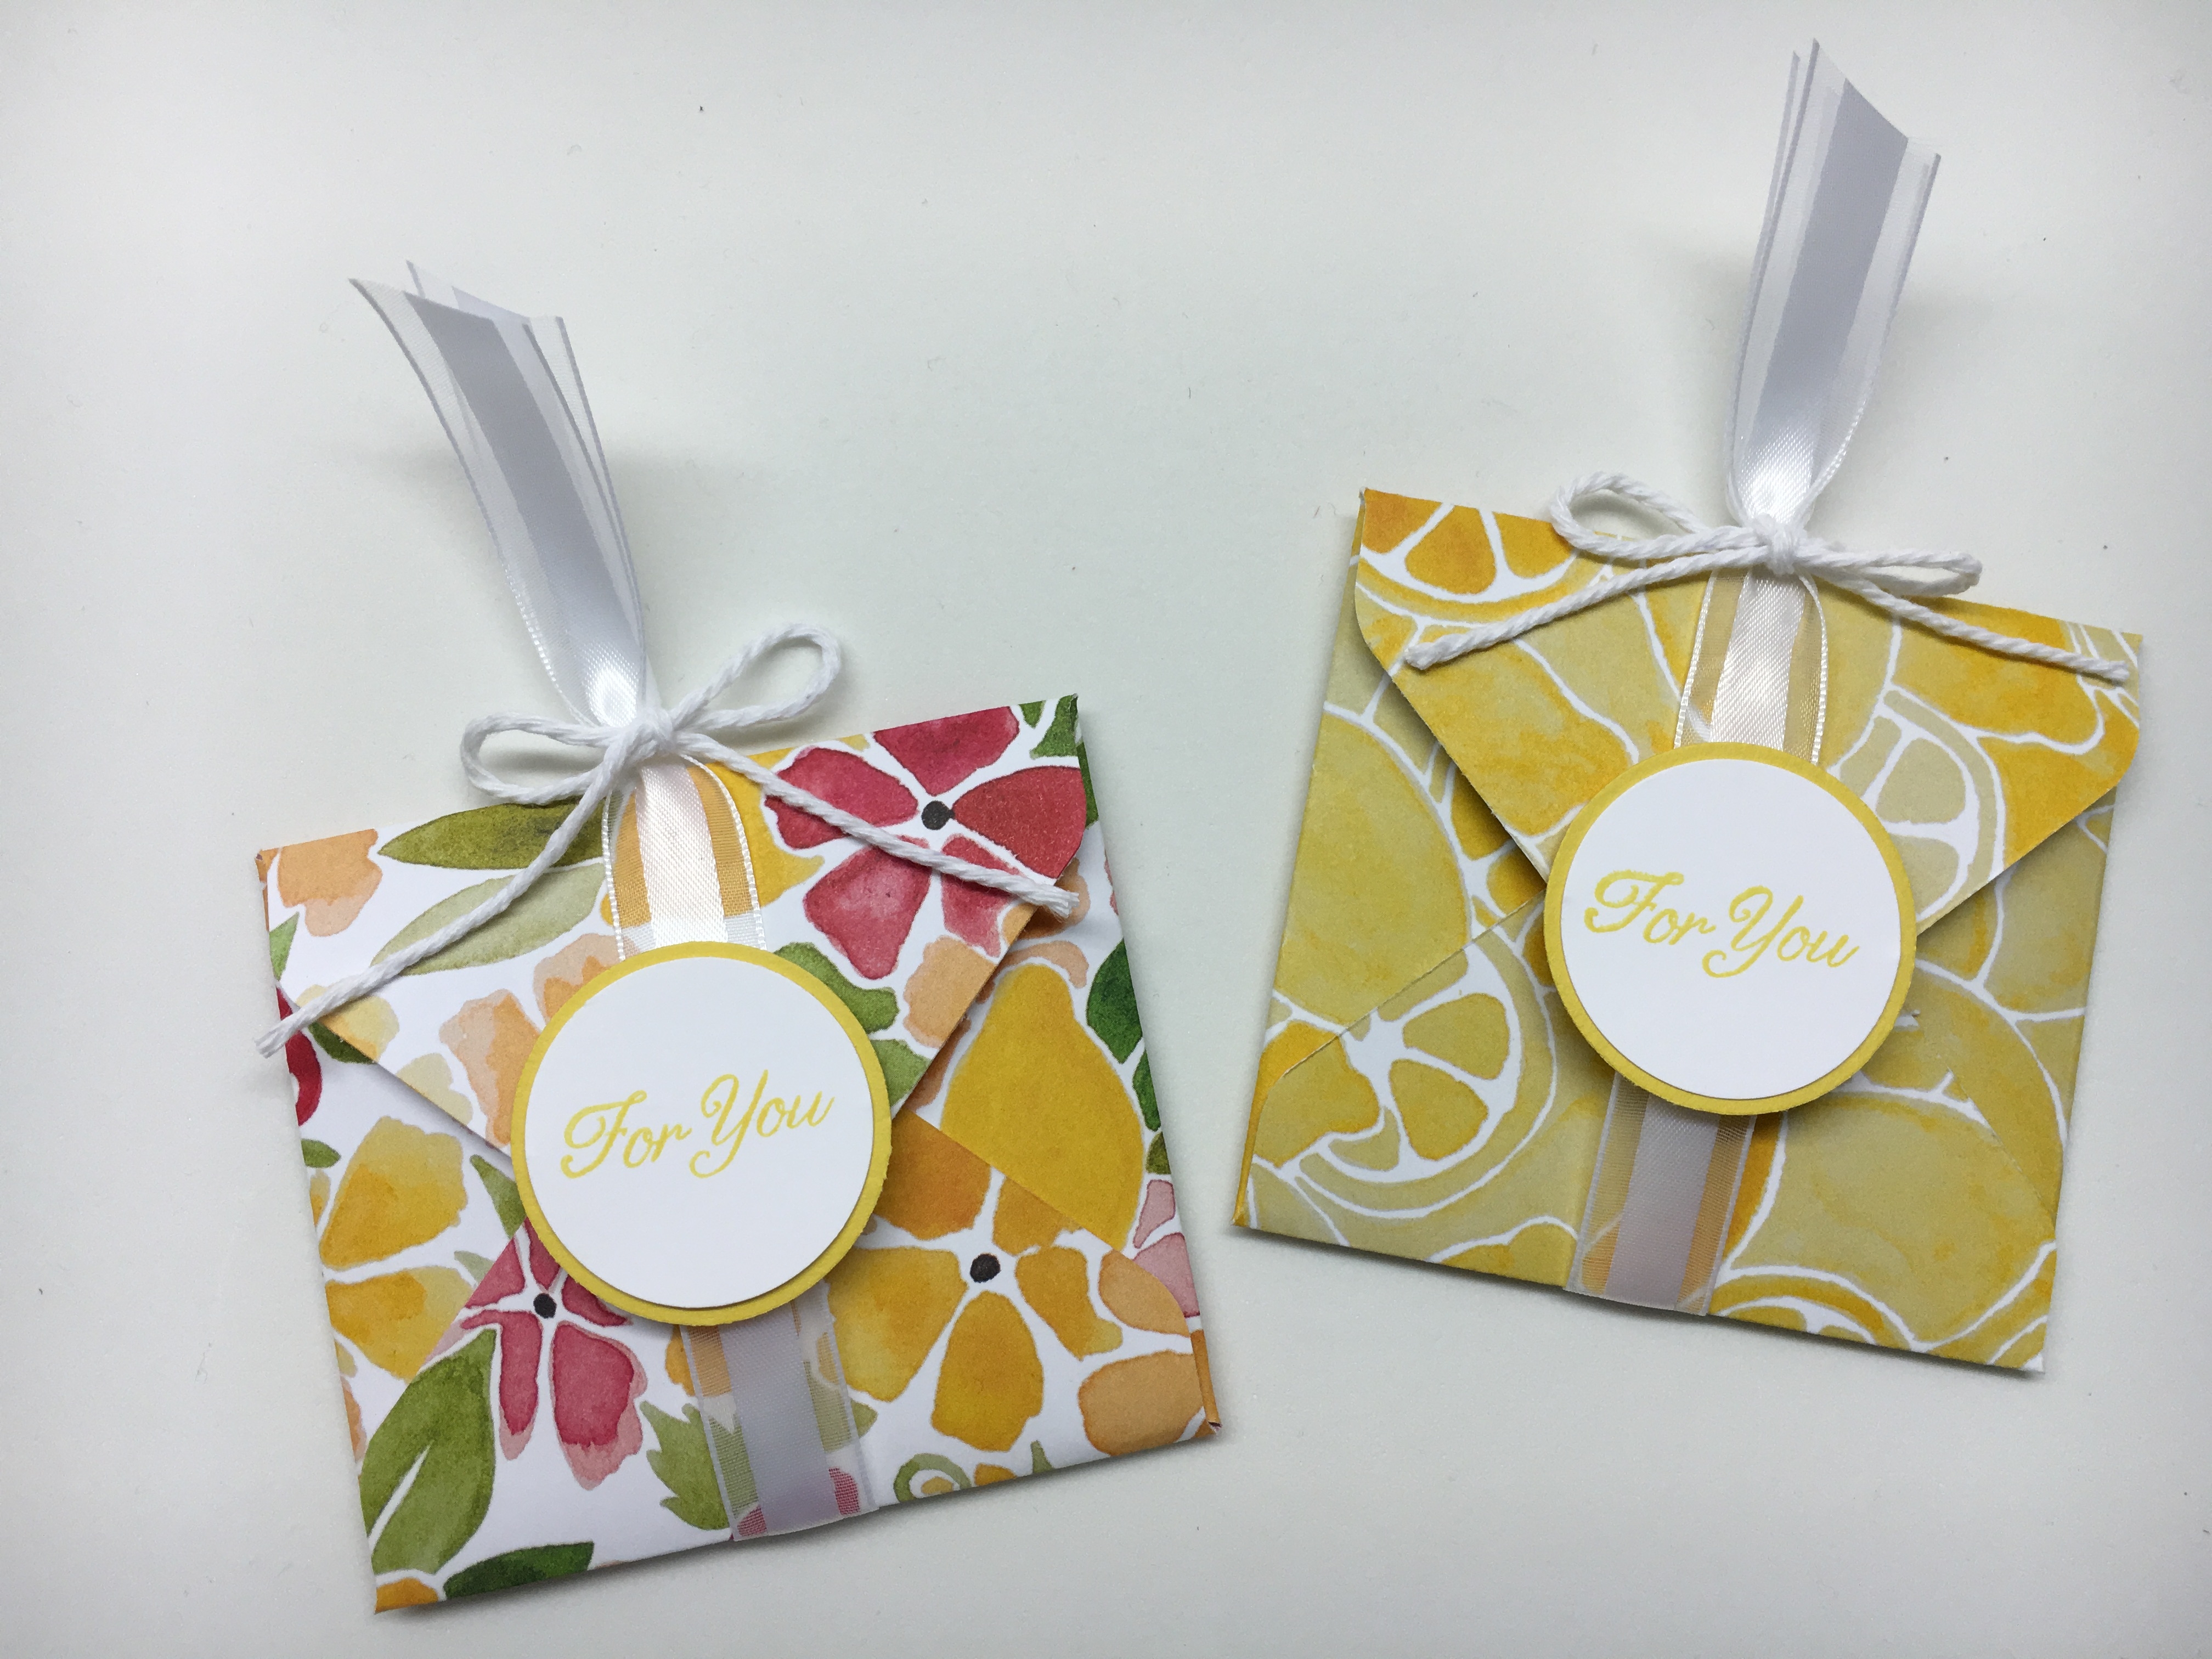
How cool is that! You get 12 different sentiments to use on cards, tags, etc. Here’s the 5 cards you’ll make from the kit.

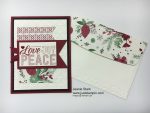
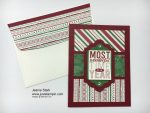
Here are some alternate ideas you could do using different sentiments.

You will make just one of the mini notebooks. The tag is included as a Bonus; however, the  sentiment shown on the tag is used on one of the cards above.

The cost of the Merry Medley Stamp Kit is $40 (Merry Medley clear mount stamp and set of 2 Stampin’ Write Markers are included with the kit).  Note: If you prefer the wood mount Merry Medley stamp the cost is $45. Email me (j.stark@myactv.net) by September 29th  with “Merry Medley Kit” in the subject and I will send you a PayPal invoice.  Be sure to include your shipping address! I will order the stamp set and markers and precut everything for your kit. You will just need ink (Cherry Cobbler or Garden Green), adhesive and trimmer.  I will send you a file with all the directions when I ship your kit.  Just think, you can get a head start on some fun Christmas cards to use or give as a gift to someone else.  I make Christmas cards for my mom to send out and I like the way this has different sentiments you can send to each person.  And I love the little notebook!  I keep one in my purse all the time and I have made a bunch to give as gifts. So, do you have a favorite card from today?  Leave me a comment.  I always enjoy hearing from you!

Have a Terrific Day!

Just Stampin’

Jeanie

S is for Stamps

Welcome to my ABC’s of Stampin’ series. I bet it was no surprise today that S is for Stamps! Stampin’ Up! offers 3 types of stamps…clear, wood mount, and photopolymer. You can learn about each type in this short video.

Here are some basic tips I’ve learned along the way to keep in mind when using stamps.

  1.  When inking your stamps use a light, repeating tapping motion. Make sure to move the stamp over the ink pad to ensure that the entire surface of the stamp gets covered.  Don’t use too much pressure or rub the stamp on the pad. Over-inking can lead to blotchy designs. Using too much pressure can result in ink on the block which could transfer to the cardstock.
  2. Take a look at the block before stamping on card stock.  Wipe off any ink on the block using a tissue.
  3. When stamping with photopolymer stamps, use extra cushion under the cardstock to make sure the stamp makes even contact on the surface.  You can use a piece of foam or the Stampin’ Pierce Mat. This will also help the ink to transfer to the card stock evenly.
  4. You need to hold photopolymer stamps in position for an extra moment or two to allow the ink time to transfer properly to the card stock. You don’t need to apply extra pressure to the stamp, just give the ink extra time to absorb onto the card stock.

Check out this short video on using the photopolymer stamps.

*Note-Stampin’ Up’s! Photopolymer stamps have been available for several years now and come in clear mount cases just like the clear mount and wood mount stamp sets. (There are many retired photopolymer stamps sets on sale now in the Clearance Rack.)

I love our stamp sets! I especially like ones that have great sentiments & fonts and offer lots of versatility.  Here are some of my favorite current stamp sets…presented to you as “Stark’s Stampin’ Superlatives”

Favorite Bundle (from the Annual Catalog) – Flourishing Phrases (Great sentiments for a variety of cards and I just love the dies that come with the bundle!! SAVE 10%)

Favorite Christmas Bundle (from the Holiday Catalog) – Cookie Cutter Christmas (So stinkin’ cute!!)


Favorite Thank You stamp set – Thankful Thoughts (Everyone needs thank you cards and this one has great fonts and inside sentiments too!)

Favorite Female Birthday – Butterfly Basics (I love to watercolor the flower in this set!)


Favorite Celebration – Celebrate Today (Who doesn’t love balloons?!  And these have matching framelits!)

Favorite Limited Edition – Thoughtful Branches (available only while supplies last..Get it today!)


Favorite Single Stamp – Stylized Birthday (They had me with the font!)

Favorite Floral Pair – Flower Shop & Pansy Punch (I love how easy it is to add a quick flower to any card!)


Favorite Oldie –  Lovely As a Tree (this was one of the first stamp sets I bought and I have used it for so many different cards… masculine, birthday, thank you, sympathy, thinking of you, Fall, Winter, Christmas)


Favorite Hostess Set – Time of Year (You can use this Thinking of You for any occasion! Coordinates with Bunch of Banners Framelits Dies)

Favorite Background Stamp – ?? Not Telling Today! Stay Tuned Til Tomorrow!


What’s your favorite stamp set? Do you want to know what’s better than Stampin’ Up! stamp sets?  SAVING on stamp sets!! Check out these Bundles and Save 10%!

Here’s today’s Back to School Special…for every stamp set you purchase through me, I will send you my “All Set to Stamp” card kit so you can get started stamping with your new set immediately!  And that’s not all!  Because today is “S is for Stamps”, I will send a Secret Stamp Set Surprise to one random shopper! Remember to enter the Hostess Code 7CNZAUYM when you check out. (See the visual below.)  Click HERE to start shopping!

Have a Spectacular Day!

Just Stampin’

Jeanie

R is for Ribbon

Welcome to my ABC’s of Stampin’ series. Today I am showcasing some of the gorgeous ribbon from Stampin’ Up! I absolutely LOVE how the ribbon coordinates with the paper and ink! The 2016-2018 In Color Ruched Ribbon is some of my favorite ribbon ever!! (I am already on my second rolls!!) If you have never tried Stampin’ Up ribbon before here is your chance!  I am offering a Ribbon Share to give you a sampling at a reasonable rate. You can order either set or both.  You will get 2 yards of each of the 5 colors in the set (10 yards) for $10.  Specify if you want 2015-2017 In Color  5/8″ Mini Striped Ribbon or 2016-2018 In Color  3/8″ Ruched Ribbon.  If you want both sets the cost is $20.

img_4214

Your ribbon will come on these cute little “spools” wrapped in a clear envelope.  If you purchase both sets I will send you 2 yards of Whisper White Organza Ribbon FREE as my Back to School Special. Do you remember when I shared how to dye the organza ribbon?  You can see that post HERE.

Here are some recent cards and projects I’ve made using these ribbons. Relax and enjoy the replay. (You can click on any photo to see that post.)

img_4415

img_4238

img_4350img_4351

img_4140

img_4304

img_3547

img_4070


img_3530

img_3209

img_3187

img_4038

img_4162

Now that you have had time to reflect on the ribbon projects, you will want to respond by emailing me your ribbon order (j.stark@myactv.net). Put Ribbon Share in the subject.  I will reply to let you know I received your order.  Orders will be sent out in October.

Hope you have a Relaxing day!

Just Stampin’

Jeanie

P.S. I am so laughing at myself right now as I just noticed something ridiculous in my post.  I could remedy it, but I’d rather have a little fun…see if you can find my error and report in the comments. I will pick a random winner to receive 2 yards of Organza Ribbon. ( I really did not plan this!!)