Snowflake Wishes for the Pals Blog Hop

Hello, welcome to the Stampin’ Pretty Pals’ Blog Hop! This month our Design Team created projects showing “My Favorite Things” from any of the two current catalogs or the upcoming catalog in January. We hope you enjoy and will be inspired by them! Don’t forget to leave comments! We love hearing from you. At the end of my post, you will find the full line-up to help you “hop” along from Pal to Pal.

One of my favorite things to make is fun fold cards. I used the gorgeous Snowflake Wishes Bundle to create a lighted easel tent card for Christmas.Stampin' Up! Snowflake Wishes light up fun fold Christmas card idea - Jeanie Stark StampinUp
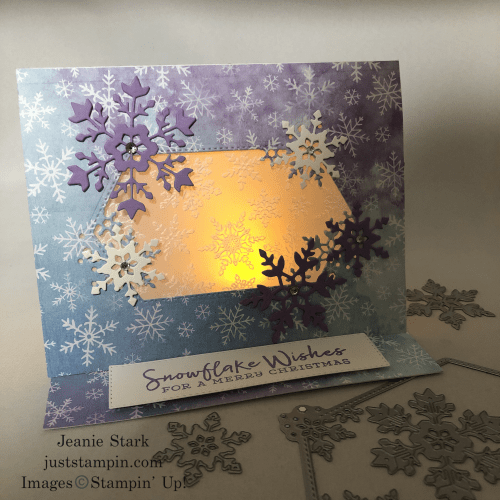
This card would look great on a mantel or end table. It could also serve as a great little nightlight in a kids room or bathroom. I embossed a piece of vellum for the center piece using the Winter Snow Embossing Folder. When the card is closed you get a peek at the sentiment on the inside.
Stampin' Up! Snowflake Wishes light up fun fold Christmas card idea - Jeanie Stark StampinUp
Here’s a few more photos showing the inside.

I stamped a snowflake on the inside where the tea light goes (just in case the recipient wondered where to place it. LOL) I cut a strip from the foam adhesive sheets to pop up the sentiment. The sentiment is cut using the stitched rectangle die from Ornate Layers. (That’s another set with some awesome dies!) I added the die cut snowflakes using mini glue dots and accented with Rhinestone Basic Jewels. I think this card looks pretty even when it’s not lit up!

Stampin' Up! Snowflake Wishes light up fun fold Christmas card idea - Jeanie Stark StampinUp
The Snowflake Wishes Stamp Set and So Many Snowflakes Dies are not retiring; however, the bundle is retiring so if you want to save that extra 10% (and of course you do!!!) you need to purchase it by Jan. 4th.Stampin' Up! Snowflake Wishes Bundle - for inspiration, exclusive tutorials, and more, visit juststampin.com - Jeanie Stark StampinUp
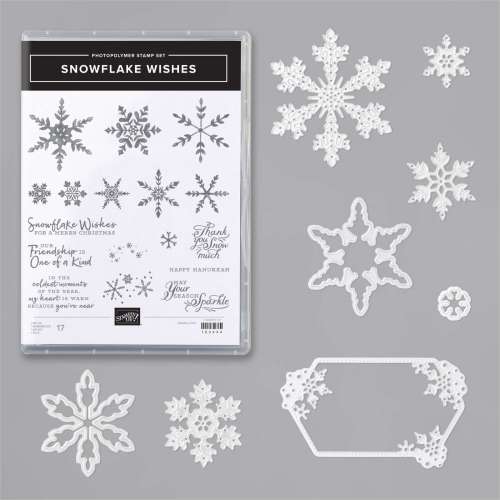
The sentiments in this set are great for Christmas, friendship, thank you cards, and more! The “appropriately named” So Many Snowflake Dies are so unique (just like snowflakes)! I shared another card I made with this set yesterday. You can view it HERE.

Check back tomorrow for more details! Another one of my favorite things is a SALE! Don’t forget to check out the Clearance items and Year-End Closeout Sale. The Winter Snow Embossing Folder and Snowflake Splendor Designer Series Paper I used on today’s card are retiring and on sale while supplies last! You can view the list of products I used below.

More inspiration awaits! Use the Blog Hop Line-up below to visit the rest of this month’s Design Team. My fellow Pals are excited to show you what they’ve created! Mark your calendars for our next blog hop on January 13th when our theme will be Time to Sale-A-Brate. Participants will showcase tags or 3D items that will be great for gifts for any occasion. Don’t miss the fun! Until then, please stay safe and have fun in your craft room.

Stampin’ Pretty Pals’ Blog Hop Line-up

  1. Mary Fish at Stampin’ Pretty
  2. Mary Hanson at Up North Stampin’
  3. Debbie Mageed at Secrets to Stamping
  4. Tricia Chuba at ButterDish Designs
  5. Wendy Klein at Doggone Delightful Stampin’
  6. Jackie Beers at Blue Line Stamping
  7. Sue Jackson at Just Peachy Stamping
  8. Melissa Seplowitz at The Stamping Ninja
  9. Jeanie Stark at Just Stampin’ <<YOU ARE HERE>>
  10. Lisa Ann Bernard at Queen B Creations
  11. Debbie Crowley at expressivelydeb…
  12. Stesha Bloodhart at Stampin’ Hoot!
  13. Jennifer Roque at Stamp Camp with Jen
  14. Lori Pinto at LollyPop Paper and Ink
  15. Pamela Sadler at Stampin Pink Rose
  16. Beth McCullough at Stamping Mom
  17. Su Mohr at Aromas And Art
  18. Jennifer Michalski at Stamping Serenity
  19. Deb Walker at Deb Stamps Life
  20. Peggy Noe at Pretty Paper Cards
  21. Rae Harper Burnet at Wild West Paper Arts
  22. Lori Webb at Clever Copies
  23. Renae Novak at Blessed By Cards w/Renae Novak
  24. Lisa Milligan at Stamp a Rainbow

Have a great day! Stay Safe! Stay well!
Just Stampin’
Jeanie

Product List (Click on image to shop my online store.)

Clearance Rack Refresh & Year-End Closeouts On Sale NOW!

Save up to 50% on select retiring items and up to 60% on Clearance Rack. Items are available while supplies last! Shop early to avoid missing out!

Forever Fern Forever After

Stampin' Up! Forever Fern Wedding Card idea - Jeanie Stark StampinUp

Today’s card showcases products from the Forever Greenery Suite. This Suite Collection by Stampin’ Up! features watercolor patterns and images in a glorious array of green hues.

Stampin' Up! Forever Greenery Suite - visit juststampin.com for inspiration and ordering - Jeanie Stark StampinUp

The Forever Greenery Suite Collection includes
* Forever Fern Cling Stamp Set (10% off)
* Forever Greenery Designer Series Paper
* Forever Gold Laser-cut Specialty Paper
* Gold Hoops Embellishments
* Forever Greenery Trim Combo Pack
* Greenery Embossing Folders
* Forever Flourishing Dies (10% off)

Product colors: Garden Green, Just Jade, Pear Pizzazz, Pretty Peacock, Shaded Spruce, Soft Sea Foam, Whisper White

Stampin' Up! Forever Fern Wedding Card idea - Jeanie Stark StampinUp

You can create custom die-cut foliage using the Forever Flourishing Dies and Forever Fern Stamp Set.

Stampin' Up! Forever Fern Bundle - for inspiration and ordering information visit juststampin.com - Jeanie Stark StampinUp

Here’s the card details:

Measurements

  • Card Base (Pretty Peacock): 5 1/2 x 8 1/2 scored at 4 1/4
  • Forever Greenery DSP: 3 1/2 x 5 1/2, 2 1/4 x 6 (for envelope flap)
  • Whisper White: 1 1/2 x 4 1/2 strip to stamp and cut with Ornate Layers Dies,  4 x 5 1/4 for the inside, scrap to stamp and cut greenery from Forever Flourishing Dies
  • Old Olive: scrap to cut greenery from Forever Flourishing Dies
  • Vellum: 3 1/2 x 3 1/2 to cut Stitched Circle Die

Directions

  1. Fold and burnish the card base.
  2. Layer the ribbons and adhere to the bottom of the DSP. Wrap and secure on back. (*I’d like to give a shout out and thanks to Mary Fish for sharing this layering idea.)
  3. Adhere the DSP and ribbon layers to the card base.
  4. Cut Vellum with largest Stitched Circle Die.
  5. Stamp the sentiment from the Forever Fern Stamp Set in Pretty Peacock Ink.  Cut with Ornate Layers Dies and adhere over Vellum circle with Stampin’ Dimensionals.
  6. Stamp greenery in Pretty Peacock. Cut stamped image and Old Olive with Forever Flourishing Dies.
  7. Adhere die cuts and gold accents (from Forever Gold Laser-cut Specialty Paper).
  8. Make a double bow with Old Olive/Pretty Peacock Reversible Ribbon and attach to card with a Glue Dot.
  9. Adhere DSP to the envelope flap and trim.

Stampin' Up! Forever Fern Wedding Card idea - Jeanie Stark StampinUp

This suite is one of my favorites from the new Annual Catalog.  If you want any of these products don’t wait as it has been very popular and inventory is already low. You can click on the product list below to shop from my online store.

Make sure you check back tomorrow for the Pals Blog Hop! We will be showcasing the new 2020-2022 In Colors!

Have a great day! Stay Safe! Stay well!

Just Stampin’

Jeanie

Host Code Exclusive Offer! All orders placed through my online store are eligible for my FREE monthly gifts (card kits, tutorials, treats, and more! * See Rewards below). Please use the current host code.  *If your order is $150 or more, do not use this code as You become the hostess and get the Rewards! Click HERE to Shop. 

June Host Code: PBQNSJER

Product List (Click on the image to purchase in my online store.)

Just Stampin’ Rewards

I appreciate each and every order! Here are the things you can expect when you place an online order with me in June:

  • Handmade thank you card in the mail with any order.
  • 3 FREE exclusive card tutorials featuring the stamp/bundle of the month when you order $40 or more (before tax & shipping).  New tutorials every month! June tutorials feature the Jar of Flowers Bundle. You can view one of the cards included in the tutorial HERE. *Remember to add the current host code when you check out. Current Host Code: PBQNSJER
  • Bonus– Free card kit to make one of the cards featured in the tutorial if you purchase the Jar of Flowers Bundle. *Click on the image below to purchase.

FREE Tutorials with Purchase (Please remember to add the host code!)

  • Ornate Garden – Purchase the Ornate Styles Bundle or Ornate Thanks Bundle and receive 3 exclusive card tutorials. If you purchase both the Ornate Styles Bundle and Ornate Thanks Bundle I will send you all three kits to create each of the cards featured in the tutorials!
  • Timeless Tulips – Get 3 Exclusive Card Tutorials PLUS my 3D Tulip Treats Tutorial (Click HERE to view tulip treats) with the purchase of the Timeless Tulips Bundle!
  • So Sentimental – Get 3 exclusive tutorials with the purchase of the So Sentimental Bundle.
  • Peaceful Poppies –  Get 3 exclusive tutorials with the purchase of the Painted Poppies Bundle or the Peaceful Moments Bundle. If you purchase both the Painted Poppies Bundle and the Peaceful Moments Bundle I will send you all three kits to create each of the cards featured in the tutorials!
  • Everything is Rosy – Purchase the Product Medley (on sale for $44/reg. $80) and receive 3 exclusive card tutorials plus a purse kit (featured HERE).

Product List (Click on the image to purchase in my online store.)

Annual Catalog Kickoff

ANNUAL CATALOG KICKOFF CELEBRATION

From June 3-30, earn an additional $25 in Stampin’ Rewards on orders of $250 or more! Ask me how to host a virtual party! Contact your friends to go in on a large order or shop big for yourself and enjoy the extra rewards!

Pick A Free Bundle Starter Kit Promotion

PICK A FREE BUNDLE STARTER KIT PROMOTION

From June 3-30, when you purchase a Starter Kit, you can select ONE stamp and punch bundle (p. 168–169) or ONE stamp and die bundle (p. 173-179) from the 2020–2021 Annual Catalog in addition to $125 of product for only $99! 

Contact me for more information or click HERE then click JOIN and start your stamping journey! It’s a great time to stamp and/or work from home!

Click Here for a few FAQs about being a demonstrator.

Ornate Garden Thanks and Note Card Tips & Tricks

I love Stampin’ Up! note cards & envelopes! You get 20 cards & envelopes in a pack all scored and ready to go! They are my “go to” favorite for thank you cards as well as quick & easy (and economical!) for when you need to make multiple cards!  I have been “sheltering in place” and making many cards lately to send to friends, family, nursing homes, and our essential workers. Here’s a note card I made with the gorgeous new Ornate Garden Suite.

Stampin' Up! Ornate Garden Thank You card idea - Jeanie Stark StampinUp

The Ornate Layers Dies in this suite are exquisite! They really add a beautiful layer to any card! I love how there’s one that fits the note cards perfectly!  Here’s the details:

  • Card Base: Whisper White Note Card
  • Old Olive layers: 3 3/8 x 4 7/8, 2 3/16 x 3 9/16
  • Early Espresso Layer: 3 1/2 x 5 cut with Ornate Layers Die
  • Whisper White Layer: 2 1/16 x 3 7/16
  • Stamp Daisy from Ornate Style Stamp Set in Early Espresso on Whisper White piece toward the top.
  • Color Daisy with Old Olive and Daffodil Delight Blends.
  • Stamp Thanks from Ornate Thanks Stamp Set in Early Espresso on Whisper White piece along the bottom.
  • Adhere all the layers together.
  • Add 3/4 x 2 1/16 piece of DSP to Whisper White layer.
  • Add Old Olive ribbon from Ornate Garden Ribbon Combo Pack with Mini Glue Dot.
  • Stamp and color envelope to coordinate.

Stampin' Up! Ornate Garden Thank You note card idea - Jeanie Stark StampinUp

You can easily adapt any note card to a standard size card.  One way is simply to cut a 4 1/4 x 5 1/2 piece of coordinating cardstock and adhere the note card on top.

Stampin' Up! Ornate Garden Thank You card idea - Jeanie Stark StampinUp

My family likes to recycle the cards I send them. It’s really kind of comical to see how they reuse them. I thought I would make is easier for them from now on by sending note cards. Here’s another quick tip/trick with note cards…

Cut a piece of coordinating cardstock 5 1/2 x 8 1/2 and score it at 4 1/4. Then cut the note card in half. Adhere the top piece to the front of the card and turn over the other piece to adhere the written part to the inside of the card. Now you have a clean white piece to write on the inside. Quick & easy!!!

Stampin' Up! Ornate Garden Thank You card idea - Jeanie Stark StampinUp

Which one do you prefer?

You can use note cards in so many ways! I shared previously how I used a note card (I stamped on the wrong side) to make a unique fun fold. Click HERE or on the image below to see the original post.

Fun Fold Sympathy card with Stampin Up Tranquil Tulips and Flourishing Phrases Stamp Sets. For directions, supplies, and more card inspiration visit www.juststampin.comimg_6007

You could easily adapt this card to use with the Ornate Style stamp set or any floral stamp.

I hope you enjoyed today’s cards and tips & tricks! I love the Ornate Garden Suite so much I am featuring it in my monthly tutorials. Check out my Just Stampin’ Rewards below.

Want to make more cards quick & easy? Order my Just Stampin’ Card Kit and 3D project Buffet to Go! Click HERE for details. I have just a few left!!!

Have a great day! Stay safe! Stay well!!

Just Stampin’

Jeanie

Host Code Exclusive Offer! All orders placed through my online store are eligible for my FREE monthly gifts (card kits, tutorials, and more! * See Rewards below). Please use the current host code.  *If your order is $150 or more, do not use this code as You become the hostess and get the Rewards! Click HERE to Shop. 

April Host Code: 2C2S6XZE

Product List  (Click on image to view in my online store.)

Just Stampin’ Rewards

I appreciate each and every order!  Here are the things you can expect when you place an online order with me in April:

  • Handmade thank you card in the mail with any order.
  • FREE fun fold pocket card tutorial (featured HERE) with the Ornate Garden “Suite Product Share”.
  • 3 FREE exclusive card tutorials featuring the stamp/bundle of the month when you order $40 or more (before tax & shipping).  New tutorials every month! April tutorials feature the Ornate Garden Suite (Check it out HERE). *Remember to add the current host code when you check out. April Host Code: 2C2S6XZE
  • Bonus– Free card kit to make one of the cards featured in the tutorial if you purchase the Ornate Styles Bundle or Ornate Thanks Bundle. If you purchase both the Ornate Styles Bundle and Ornate Thanks Bundle I will send you all three kits to create each of the cards featured in the tutorials!
  • Free Gift – Mini Notebook with an order of $50 or more (before tax & shipping).
  • Stampin Up mini notebook featuring the Ornate Style stamp set and Ornate Garden Specialty Designer Series Paper - Jeanie Stark StampinUp