Oops! Card and Blog Candy Winner

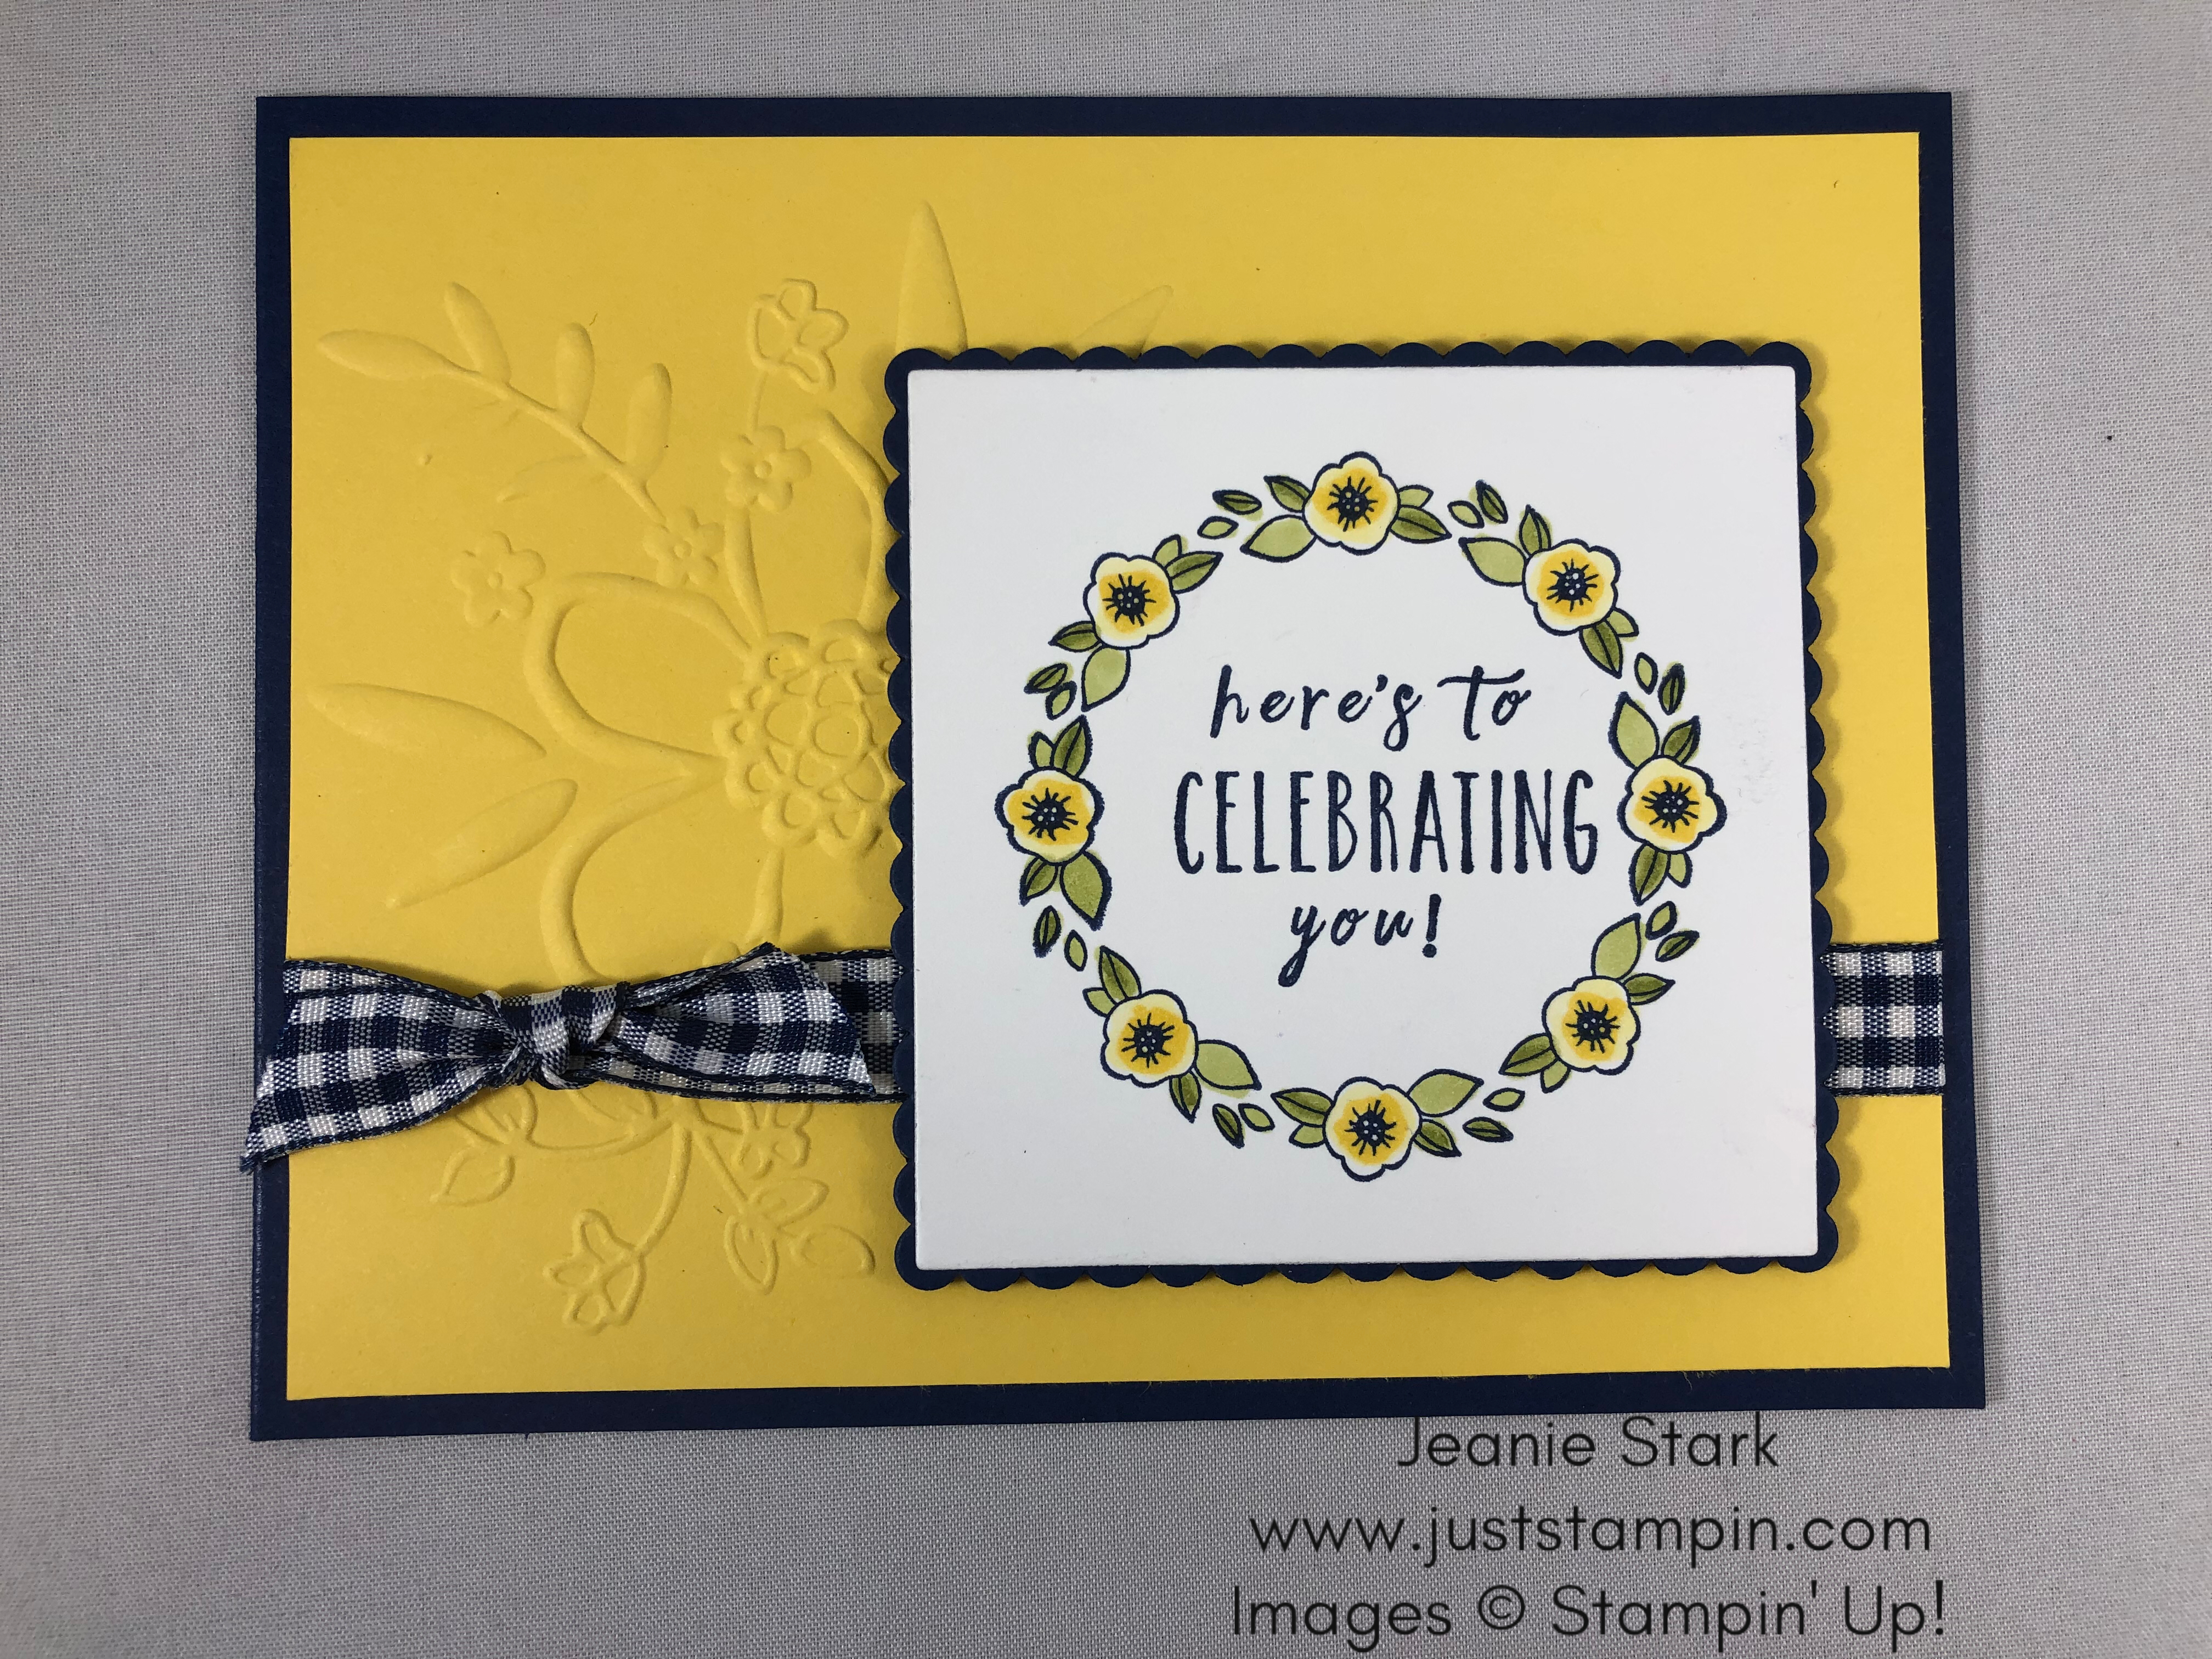
Yesterday I shared a spring wreath birthday card I made using the Stamparatus.  If you missed that post, you can see it HERE.  I love the Stamparatus for many reasons, one of which is I get a “do over” if I don’t get a good image the first time I stamp.  It’s so easy to just reink and stamp again…it stamps in the exact spot making it look great every time! Here’s a video showcasing the Stamparatus if you want to see it in action.

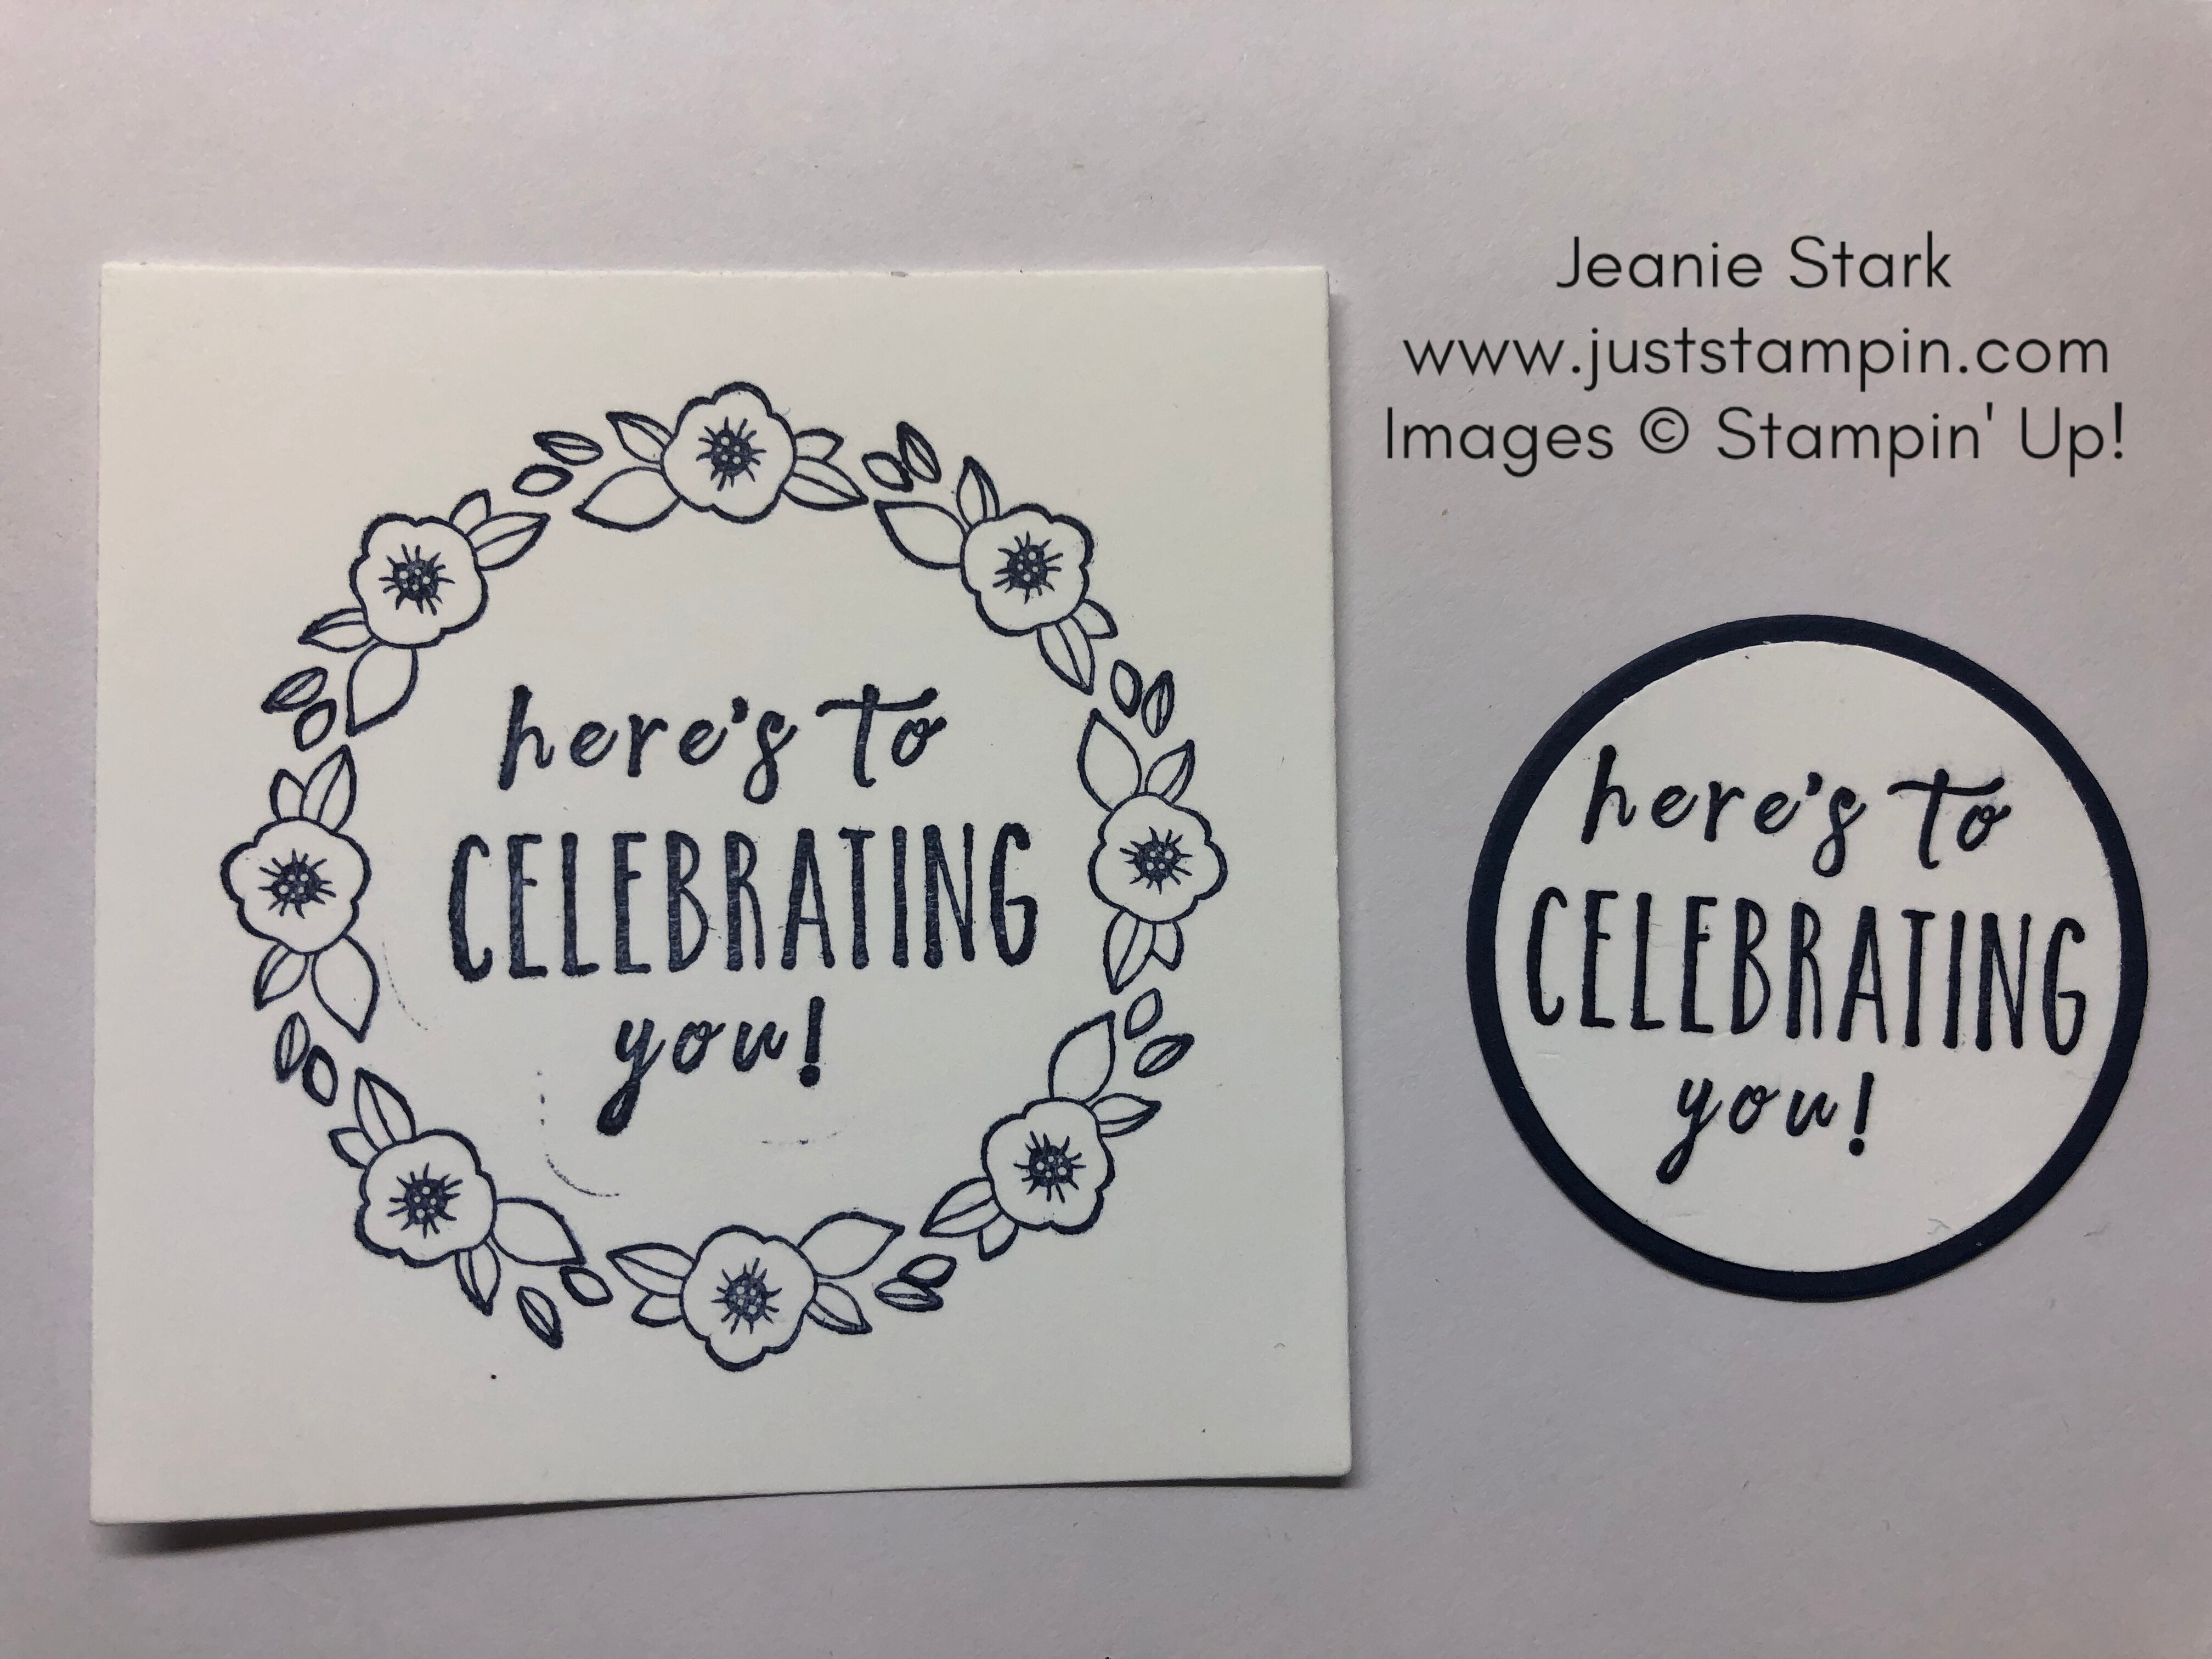
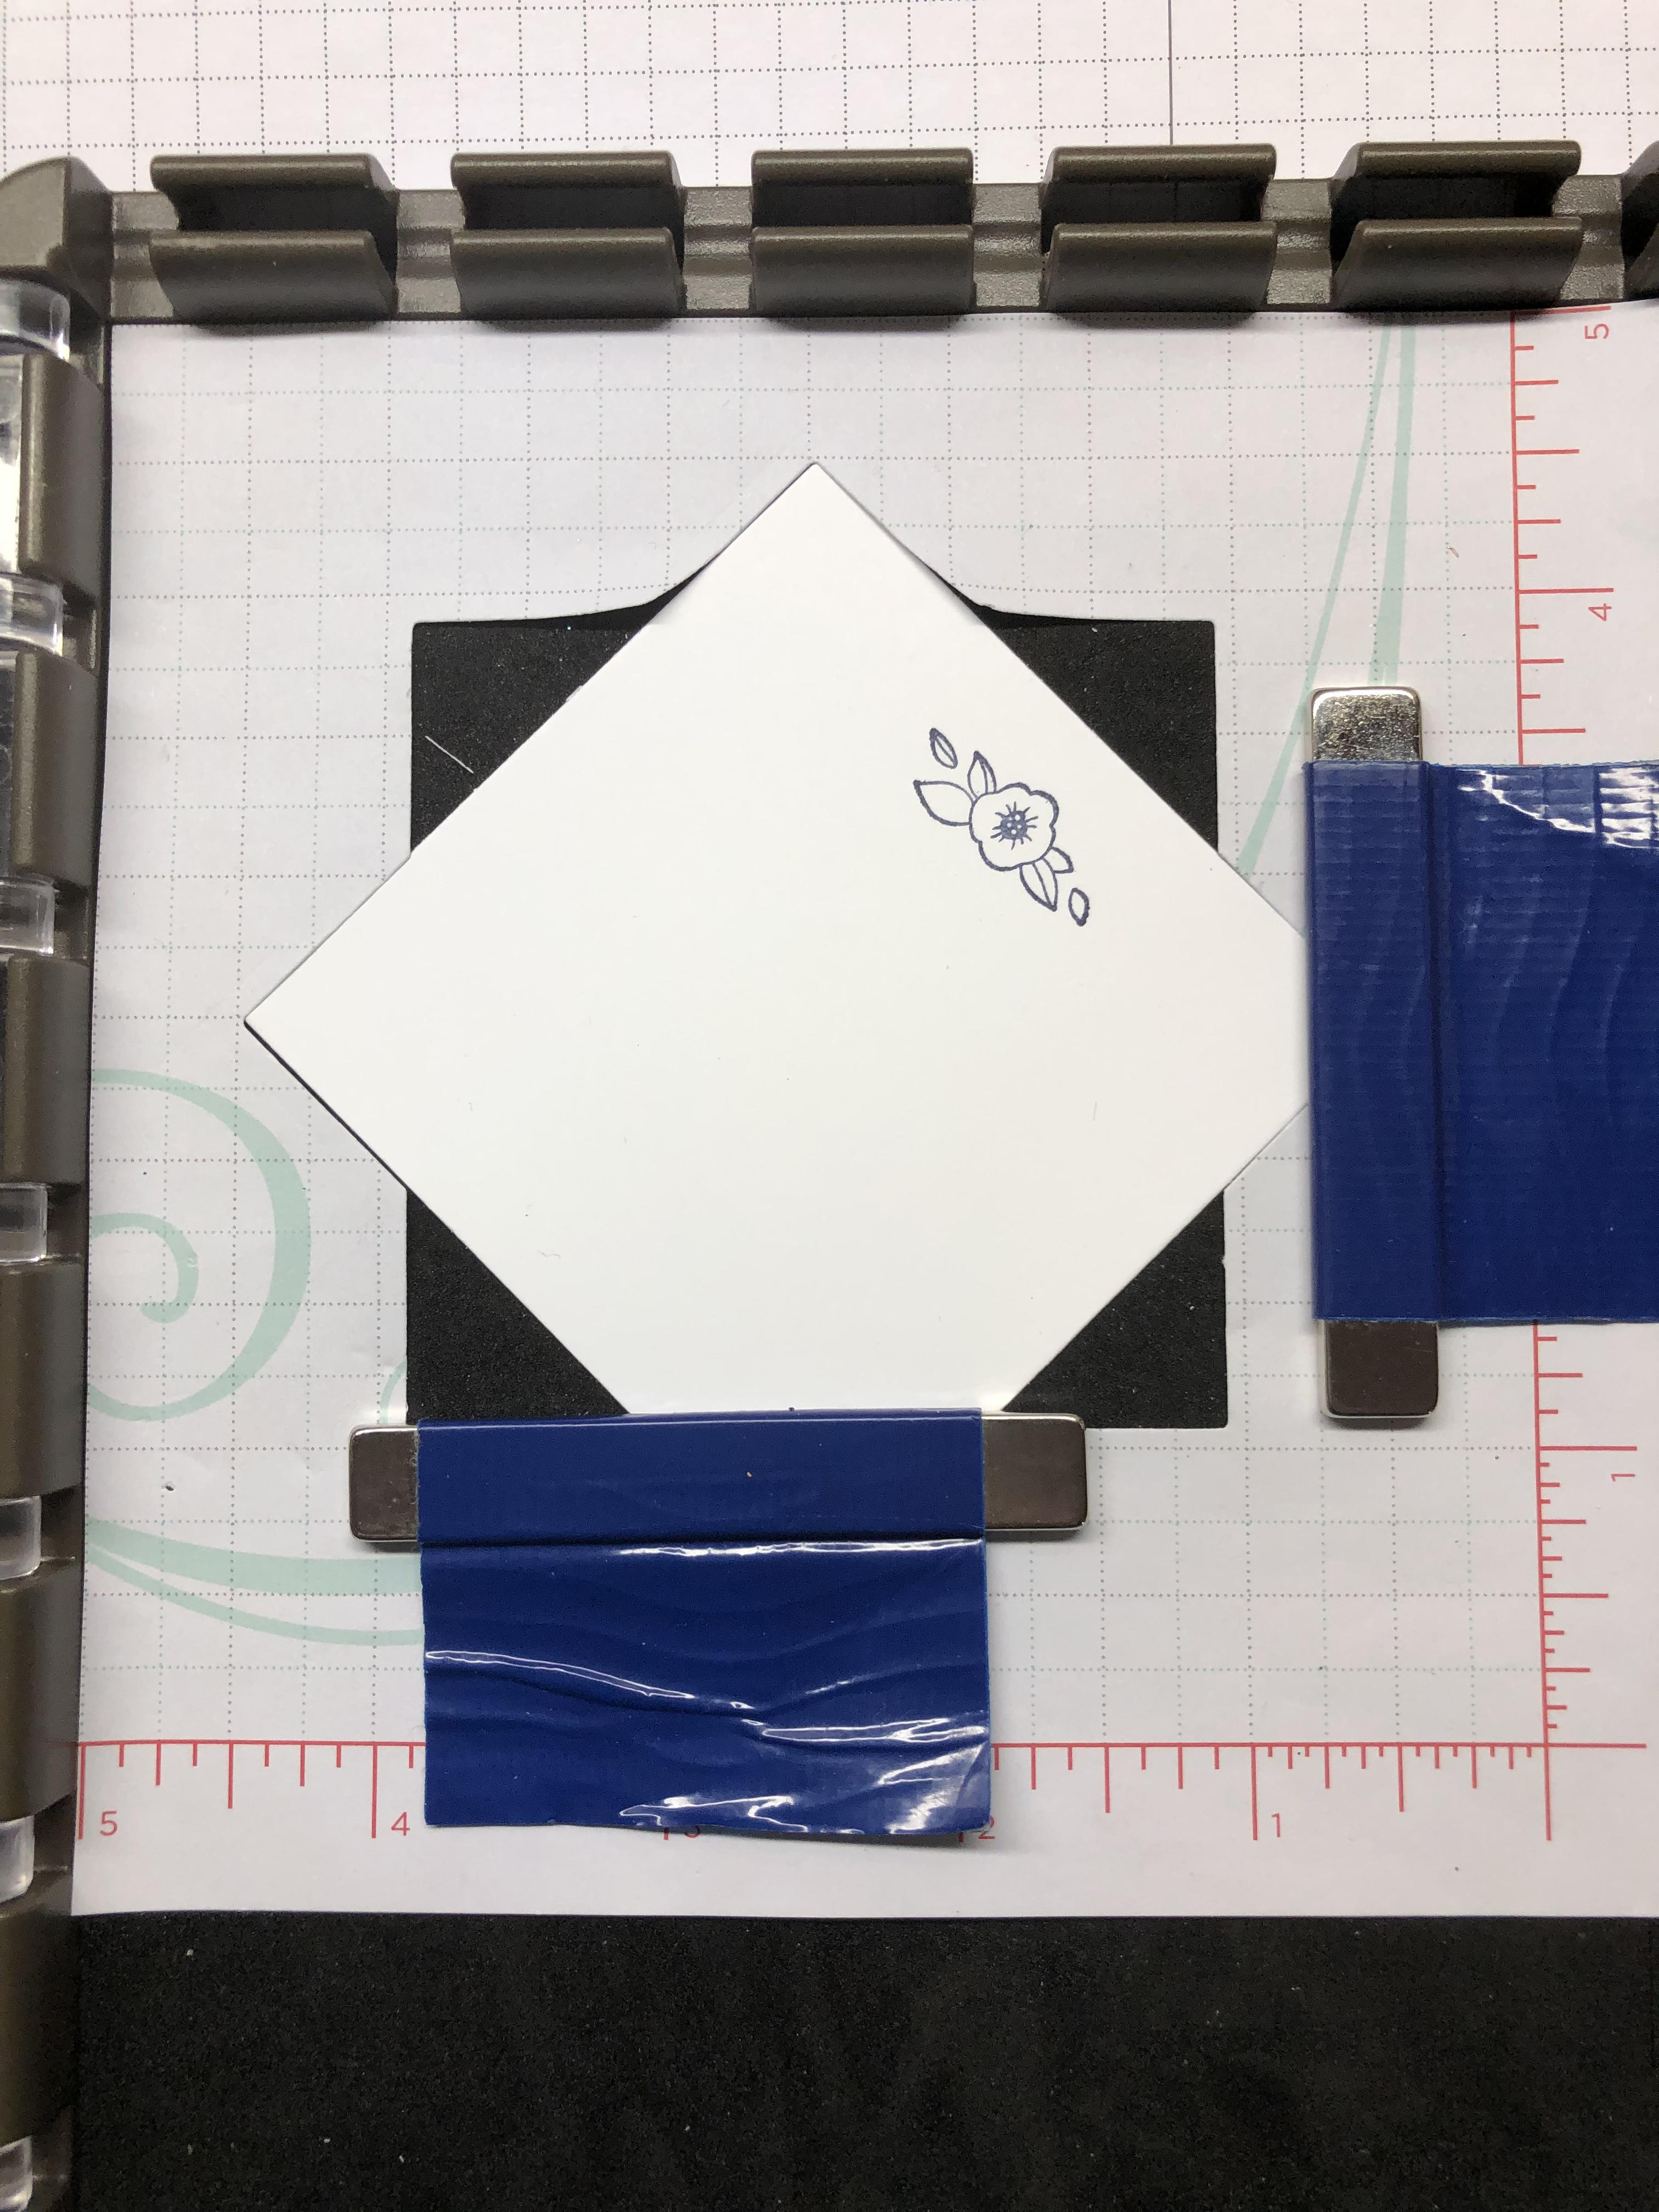
So, what do you do if you get too much ink? I’m sure we’ve all experienced inky fingers getting on our project after it was finished! I prefer not to start over again so I try to turn my “boo boos” in to new creations.  Let’s face it, the recipient had no idea what my first attempt was supposed to look like (right?). Most times I just add an embellishment to cover it up (which is why I’m in love with the new Butterfly Duet Punch and Bitty Blooms Punch Pack).  Unfortunately, that wouldn’t work with this particular oops! Look what happened when I stamped the sentiment (after I had stamped my pretty spring wreath).

Stampin' Up! wreath builder template - Jeanie Stark StampinUp

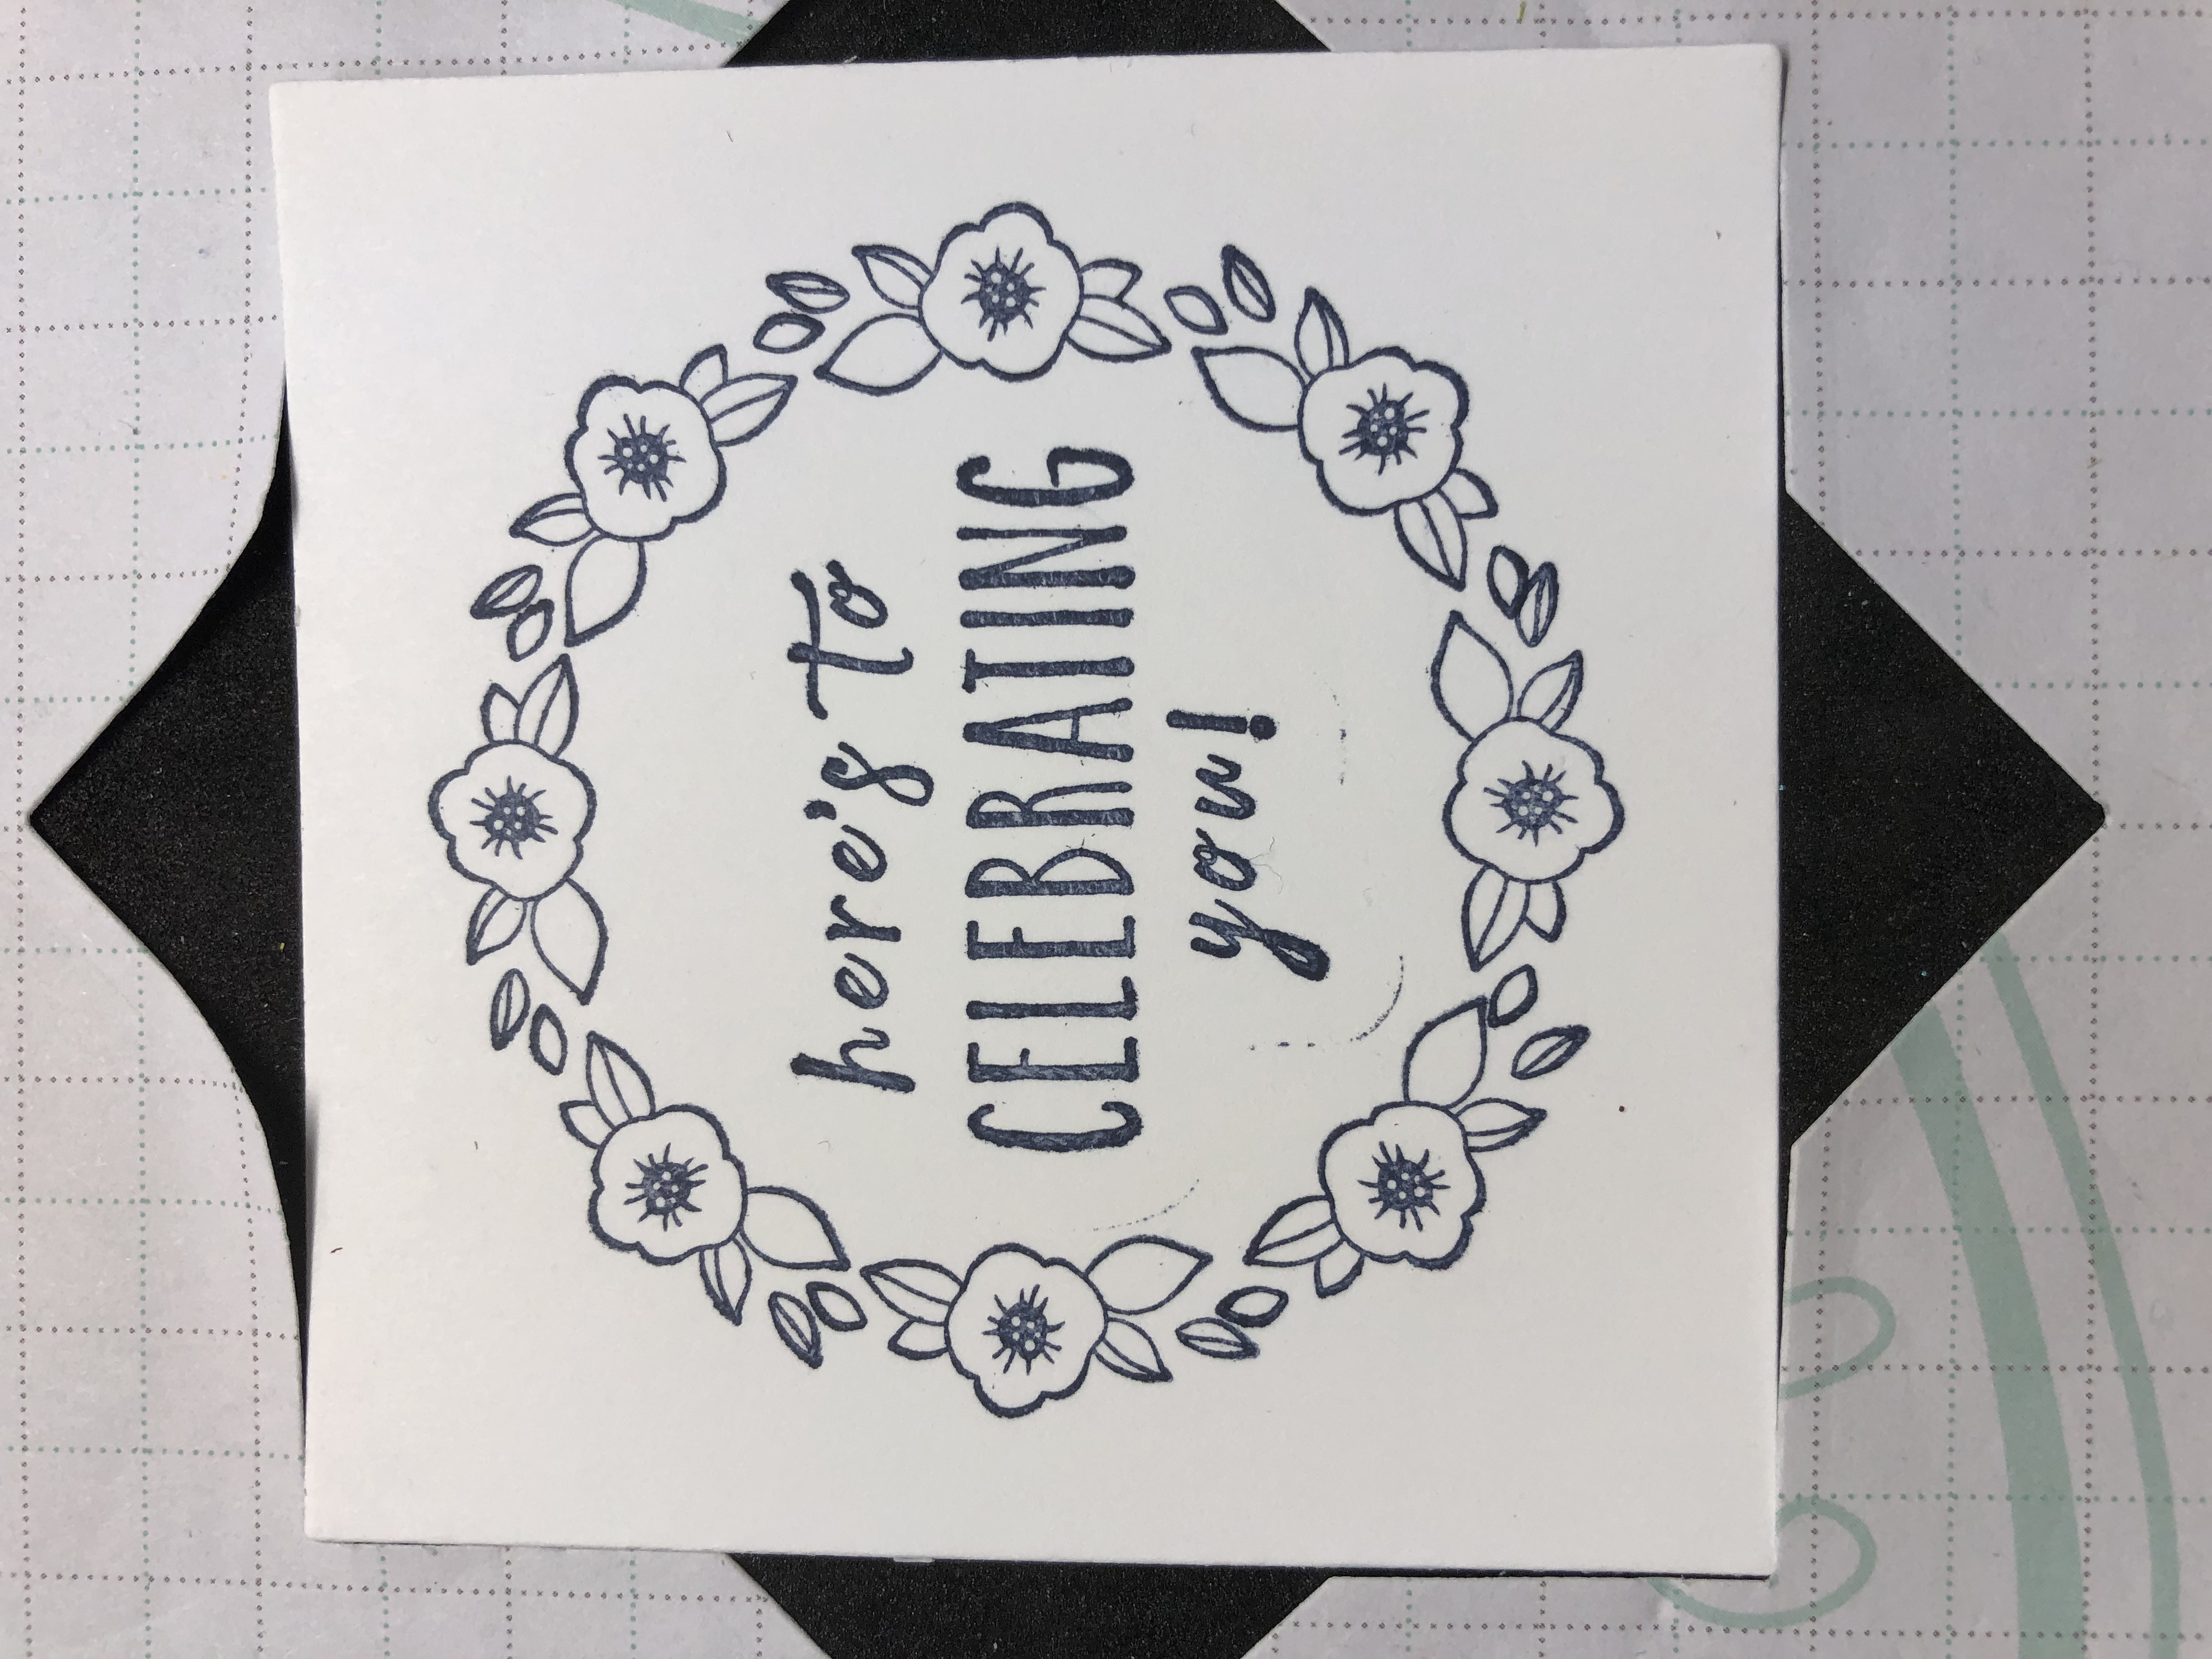
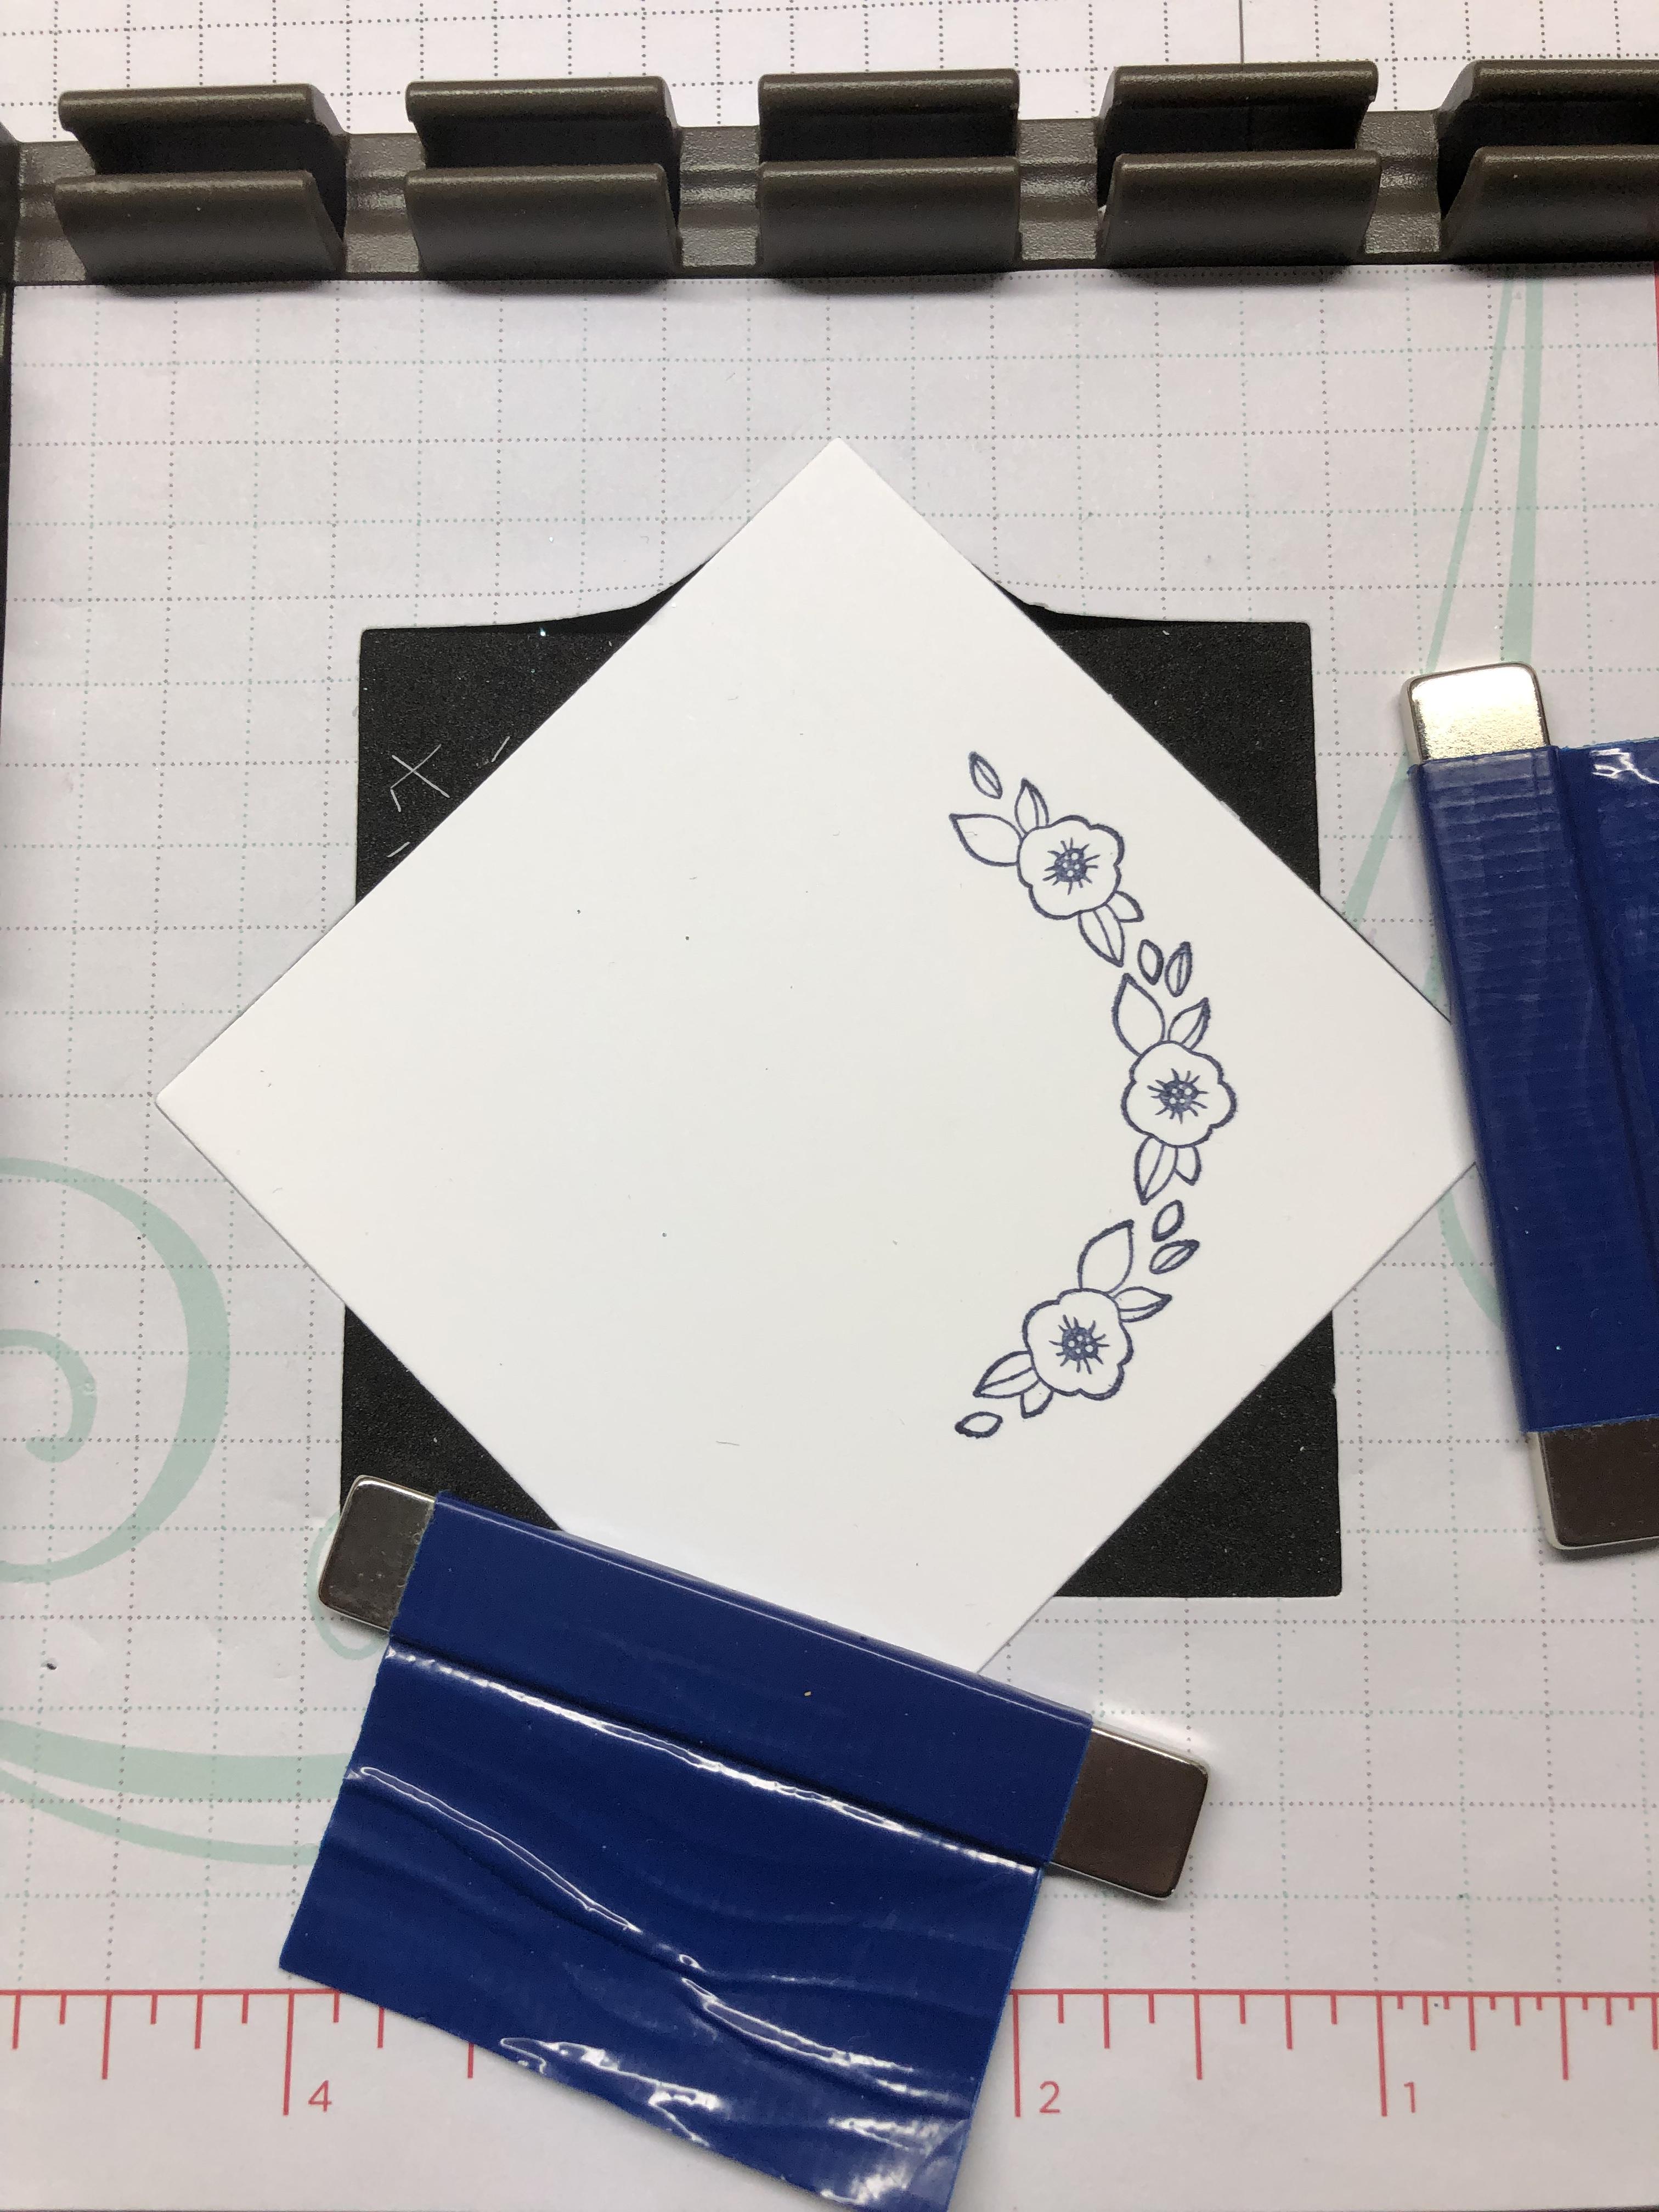
I hate it when ink gets on the rim of the stamp and transfers to the paper! I did not want to toss my pretty wreath! So a quick fix was to stamp the sentiment again on a scrap of Whisper White cardstock, punch it out with the 1 1/2″ Circle Punch and cut a navy layer with the Layering Circles Framelits.  Just adhere on top and mission accomplished!

Stampin Up Perennial Birthday and Accented Blooms wreath - Jeanie Stark StampinUp

I like to challenge myself to find a way to “make it work” before tossing it in the trash and starting over. My friend Susan gave me a Tombow sand eraser and it helps to fix little smudges.

savingpng-205

You can purchase these from Amazon. If you have a stamping fix story or idea, I’d love for you to share.  Email me (j.stark@myactv.net) or leave a comment below.

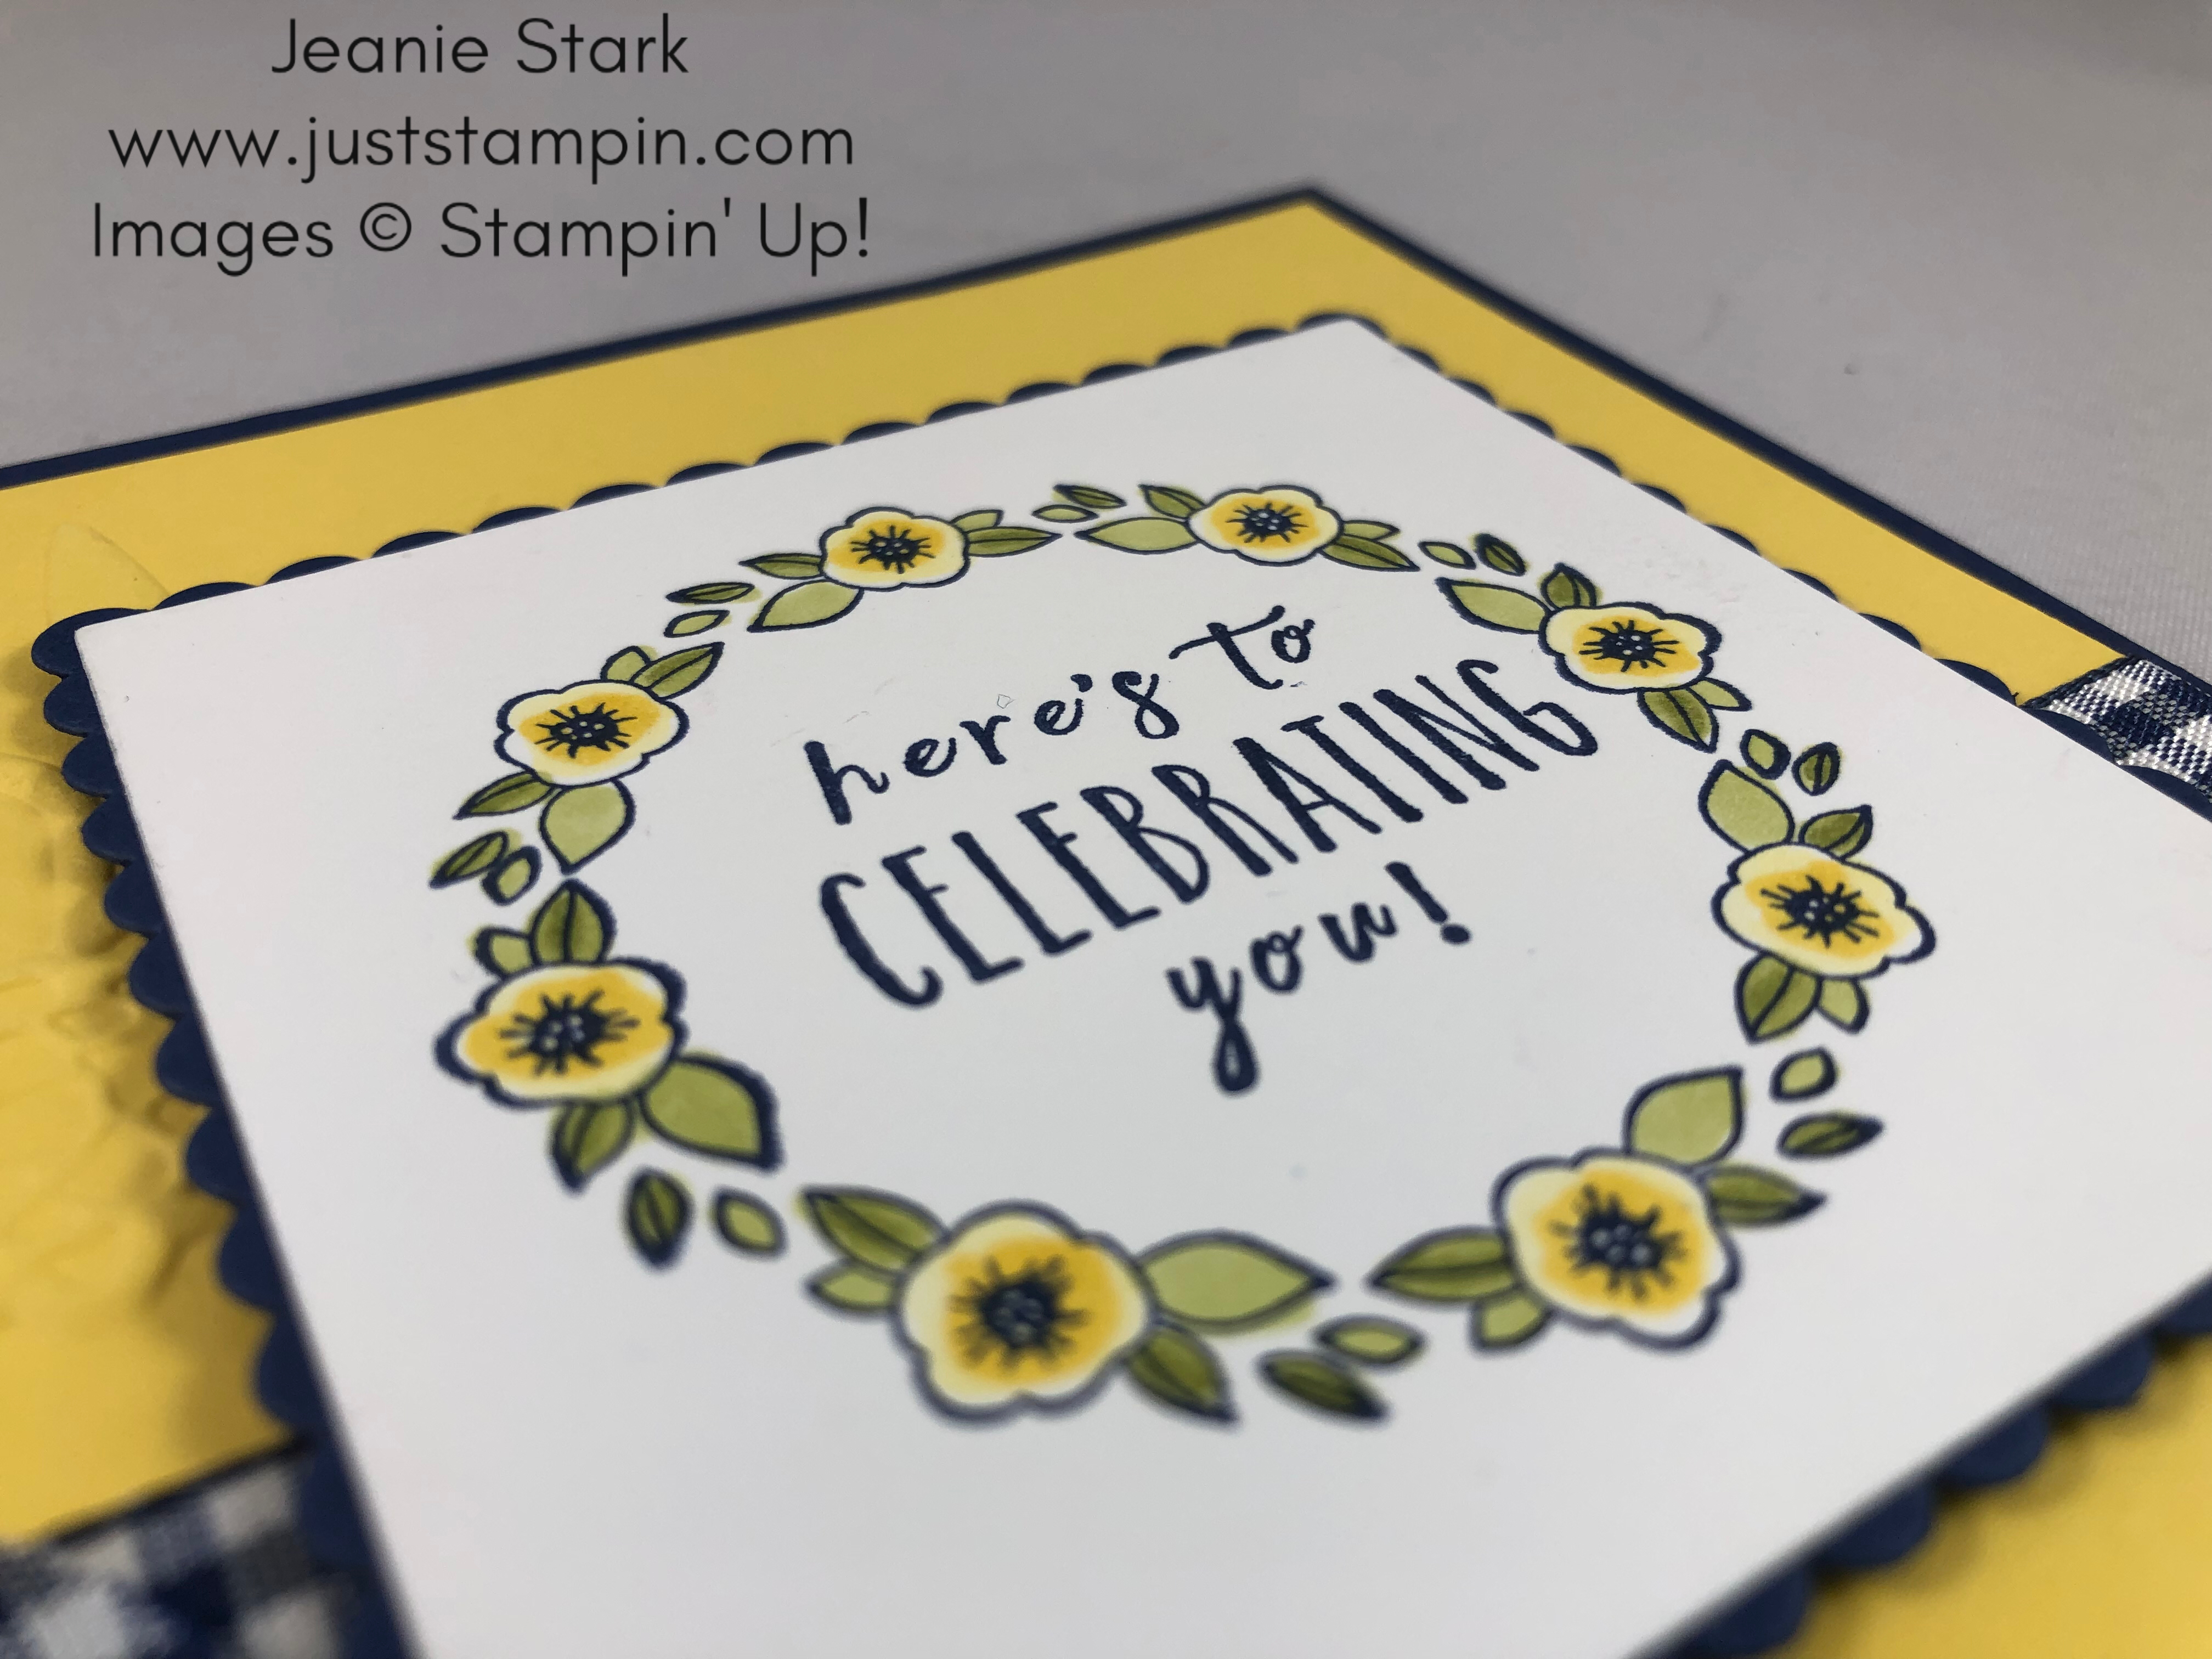
I can’t decide which card I like better. Do you have a preference?

Stampin Up Perennial Birthday and Accented Blooms birthday wreath card idea made using the Stamparatus and Lovely Floral Embossing Folder - Jeanie Stark StampinUp

Stampin Up Perennial Birthday and Accented Blooms birthday wreath card idea made using the Stamparatus and Lovely Floral Embossing Folder - Jeanie Stark StampinUp

Are you ready to find out the lucky blog candy winner? I really do appreciate everyone who took the time to comment.  The winner (chosen from random.com) is……..

random number 25

Beth Ann Halvorson!  Here’s what Beth had to say:

Happy Birthday Month! I like to spend my birthdays with family and friends, eating tacos and/or pizza, and angel food cake with strawberries! Yum!

Congratulations Beth!  Email me your address and I’ll put your birthday stamp set in the mail. I loved reading each and every comment the other day about how you like to spend birthdays. An underlying theme was certainly enjoying it with family and friends! My daughter is coming home this weekend for spring break so she can spend my birthday with me.  She is the sweetest! I feel like the luckiest person in the world!

Have you signed up for my Just Stampin’ Card Kit and 3D Project Buffet for March? Click HERE to see what others say about my kits and get all the details!!! You don’t want to miss out!!!

Are you celebrating your birthday this month?  I offer FREE shipping (and a birthday card) on any Stampin’ Up! product purchase of $50 or more placed through my online store during your birthday month (in addition to my monthly thank you gift!) *Please use the current host code.

Have a wonderful day!

Just Stampin’

Jeanie

*Host Code Exclusive! All orders placed through my online store are eligible for my FREE monthly gifts (card kits and more!). Please use the current host code below. *If your order is $150 or more, do not use this code as You become the hostess and get the Rewards! Click HERE to shop.  

March Host Code: H9P4JHEV

Product List (CLICK ON ANY PRODUCT TO SHOP ONLINE):

Grid Paper

$11.75

Stamparatus

$49.00

Big Shot

$110.00

TODAY ONLY…..SAVE ON NEW STAMP N STORAGE 6X6 PAPER HOLDER!!!!!!

stamp n storage

Enter the coupon code below during the checkout process. Sale ends at Midnight (CST), March 14, 2019. *If you are reading this in your email, click on my blog title to view online.  Then Click on my Stamp ‘N Storage link on the side to go directly to their site! I LOVE my Stamp ‘N Storage organization and have been waiting for the 6×6 paper holders!!! Happy Birthday to me!!!  LOL

Coupon Code: 6N8SALE

Celebrating Spring Birthdays for the Pals Blog Hop

Pals Blog Hop badge for march 2019Welcome to the Pals’ March Blog Hop. We’re so glad you’re here because “Spring has Sprung” – at least on our blog hop if not outside! Our Design Team created beautiful projects to inspire you. You may be starting the hop here or coming from a previous Pal’s blog. Either way, you’ve come to the right place. You’ll find the full line-up below to help you move, or “hop” along from Pal to Pal.

I’m excited to share a fun technique to make a simple spring wreath birthday card.

Stampin Up Accented Blooms wreath birthday card idea using the Stamparatus, Perennial Birthday stamp set and Lovely Floral Embossing Folder - Jeanie Stark StampinUp

Several friends and family members have birthdays this month so I need quite a few birthday cards. The Stamparatus makes it quick & easy to mass produce!  I attended a wreath builder workshop a few weeks ago (with Gina K of Gina K Designs) and absolutely fell in love with the wreath builder technique. I decided to make my own wreath builder template. I used the Stampin’ Up! Grid Paper and Layering Squares Framelits to cut the template.  I started with a piece of 5 x 5 grid paper and used the lines to help me line up the die.  I used the largest square and cut it twice. First I cut a straight square then I centered the die on top in a diamond and cut it again. I can use this template over and over again!

Stampin Up wreath builder template for the Stamparatus using the Layering Squares Framelits - Jeanie Stark StampinUp

I used the same Layering Square die to cut my Whisper White cardstock to stamp my wreath design.  I placed the square piece in my template. Next, I placed the small flower from the Accented Blooms stamp set on the cardstock piece where I wanted it and closed the Stamparatus so it stuck to the plate.

Stampin Up wreath builder template for the Stamparatus - Jeanie Stark StampinUp

I prefer to use the ink spots when I use the Stamparatus.  I have most colors from the Paper Pumpkin kits; however, if you don’t have them you can use the classic stamp pads or purchase Uninked Stampin’ Spots from my online store and use ink refills to make whatever colors you want.  I bought a few Uninked Spots for some missing colors I needed and it’s simple to do plus they save space and $.  Win! Win!

Stampin Up wreath builder template for the Stamparatus - Jeanie Stark StampinUp

To make the wreath just turn the paper to the right and secure in the template, stamp, and repeat all the way around (going from square to diamond).

Stampin Up wreath builder template for the Stamparatus - Jeanie Stark StampinUpStampin Up wreath builder template for the Stamparatus - Jeanie Stark StampinUp

Stampin Up wreath builder template for the Stamparatus - Jeanie Stark StampinUp Stampin Up wreath builder template for the Stamparatus - Jeanie Stark StampinUp

Stampin Up wreath builder template for the Stamparatus - Jeanie Stark StampinUp

I added the sentiment by placing the stamp in the center of the wreath then closed the second plate on top of the Stamparatus to secure it.  I inked it up and closed the plate. I love having the option to use both plates! I don’t have to remove my stamps so I’ll be ready to make more wreaths quick & easy without having to place the stamp again.  I know it’s all lined up and good to go!

Stampin Up wreath builder template for the Stamparatus - Jeanie Stark StampinUp

Another great feature of the Stamparatus is you can flip the plate over and use both sides! And that’s exactly what I did to add the sentiment for the inside.

Stampin Up wreath builder template for the Stamparatus - Jeanie Stark StampinUp

I used my Stampin’ Blends to color the flowers and leaves.

Stampin Up Perennail Birthday card idea using the wreath builder technique and the Accented Blooms stamp set with the Stamparatus - Jeanie Stark StampinUp

Finishing the card was simple. My card base is 4 1/4 x 11 Night of Navy scored at 5 1/2 for a side fold card. The Daffodil Delight layer measures 4 x 5 1/4 and is embossed with the Lovely Floral Embossing Folder. I wrapped Night of Navy Gingham Ribbon around the embossed layer and secured it on the back before adhering it to the card base.  I tied a simple knot on top with another piece of ribbon.  The wreath is layered with a Navy scallop square and adhered with Stampin’ Dimensionals. I embossed the envelope to coordinate. This is one of my favorite color combinations.

Stampin Up birthday card idea using the Accented Blooms and Perennial Birthday stamp sets, Lovely Floral Embossing Folder, and the Stamparatus - Jeanie Stark StampinUp

Stampin Up Perennial Birthday and Accented Blooms birthday card idea - Jeanie Stark StampinUp

Check back tomorrow to see how I changed it up a bit when I made a little boo boo! Often I like  my “oops!” just as much!  Many different stamps will work to make wreath designs.  You can bet I will be making more! See what you have and give it a try. I’ve listed the product links below. Feel free to contact me if you have any questions.

More inspiration awaits! Use the Blog Hop Line-up below to visit the rest of this month’s Design Team. My fellow Pals are excited to show you what they’ve created! Don’t forget to show us some love by commenting on our creations. Mark your calendars for Wednesday, April 10, 2019 when our Hoppin’ Pals share their “Families First” projects. Don’t miss the fun!

Pals Blog Hop


  1. Mary Fish at Stampin’ Pretty
  2. Susan Itell at Simple Stampin
  3. Tricia Chuba at ButterDish Designs
  4. Jackie Beers at Blue Line Stamping
  5. Peggy Noe at Pretty Paper Cards
  6. Pamela Sadler at Stampin Pink Rose
  7. Karen Hallam at Karen’s Stamping Habit
  8. Jennifer Michalski at Stamping Serenity
  9. Katy McGloin at Just Fun Stamping
  10. Su Mohr at Aromas And Art
  11. Debbie Mageed at Secrets to Stamping
  12. Lori Pinto at LollyPop Paper and Ink
  13. Stesha Bloodhart at Stampin’ Hoot!
  14. Linda Suarez at All Night Stamping
  15. Terri George at Stamp Me Crafty
  16. Beth McCullough at Stamping Mom
  17. Lisa Ann Bernard at Queen B Creations
  18. Patti MacLeith at Papercrafts by Patti
  19. Wendy Klein at Doggone Delightful Stampin’
  20. Jill Killeen at Killeen House Studio
  21. Mary Hanson at Up North Stampin’
  22. Roseanne Mulhern at Heartfelt Stamping
  23. Leah O’Brien at Stamping by the Bay
  24. Jackie Diediker at Stampin’ Jackie
  25. Denise Hoepfner at The Mountain Magpie
  26. Jeanie Stark at Just Stampin’
  27. Sue Becker at RnR Stamping


Just Stampin’

Jeanie

Product List for Spring Wreath Birthday Card (CLICK ON ANY PRODUCT TO SHOP ONLINE):

Grid Paper

$11.75

Stamparatus

$49.00

Big Shot

$110.00

Earn FREE Gifts with your purchase during Sale-A-Bration!

Shop & Earn Free Products during Sale-A-Bration! Visit juststampin.com for all the details! Jeanie Stark Stampin Up

Click HERE to shop. 

E is for Evergreens for Tic Tac Toe Challenge #18

Welcome to my ABC Holiday Series. Evergreens are a holiday symbol and the focal point on my card today.

Stampin Up Carols of Christmas Card Idea - Jeanie Stark StampinUp

I chose elements from this week’s Tic Tac Toe Challenge to create my card. It’s not often I make a card without a sentiment on the front. That’s one of the things I really enjoy about the Tic Tac Toe Challenge…. I try different things. Here’s this week’s board that inspired my card today:

img_7860

I made tic tac toe 2 ways…down the left row and across the bottom. It was easier than I thought! I hope you will pick 3 and play along this week!

Yesterday I shared a project I made using the Carols of Christmas Stamp Set. (If you missed that post you can see it HERE.) Today’s card uses the Card Front Builder Dies from the Carols of Christmas Bundle. I love that Stampin’ Up offers a 10% savings when you purchase the bundle!

Carols of CHristmas bundle

Today’s evergreen card is for my nephew. He recently purchased his first home and it’s in the woods with lots of trees and animals. He has been busy renovating his home so I made this card with a pocket for a gift card. Here’s the details how I made it.

I started with a 4 1/4 x 10 piece of Garden Green cardstock.  I scored it at 4 1/4 and 8 1/2.  I layered a piece of 4 x 4 DSP from Be Merry Designer Series Paper on the front.  I used the Layering Circles Framelits to cut 3 circles.  I embossed the white piece using the Gently Falling Embossing Folder. I cut the bottom off the Dazzling Diamonds Glimmer Paper circle and adhered it to the white layer. I used the Card Front Builder Dies to cut the evergreen trees from Garden Green cardstock and the deer from Chocolate Chip cardstock. I love all the layers with texture and sparkle!

Stampin Up Carols of Christmas Card Idea - Jeanie Stark StampinUp

I used the grid paper to line up my card before adhering the circle layer to make sure it was 5 1/2″ tall so it would fit in a standard envelope. I wrapped the Quilted Christmas Ribbon around the front of my card and tied a simple knot.

Stampin Up Carols of Christmas card idea - Jeanie Stark StampinUP

I cut a 4 x 4 piece of Whisper White cardstock and stamped the sentiment from Carols Of Christmas. I added Tear & Tape as shown to hold my gift card and used a 1 1/4 x 4 piece of matching DSP on the inside of my card.

I love to decorate my envelopes to coordinate and tie it all together.

Stampin Up Carols of Christmas Card Idea - Jeanie Stark StampinUp

Click HERE to see what the other designers created for the Tic Tac Toe Challenge this week then pick 3 in a row and go create something! You can do it!!!

To see more ideas using the Carols of Christmas Bundle Click HERE.

You can purchase any of the Stampin’ Up! products used to make today’s project from my online store. Click HERE to shop or click on the images below to order.

Have a wonderful day!

Just Stampin’

Jeanie

To get a FREE thank you gift from me, simply enter the host code below at checkout. *If you have an order over $150, DON’T USE THE HOST CODE, but get your Stampin’ Rewards AND the free thank you gifts from me!

Click HERE to Shop.

Current Host Code:  BHYQXWS2

*OCTOBER ONLINE ORDER SPECIAL…I am giving away the Merry Patterns Stamp Set for FREE to 1 lucky winner in October!  Anyone who places an online order using the host code will be entered in a drawing to win this stamp set. The winner will be announced November 1st after all October orders are complete!

Merry Patterns stamp set
Product List

img_7874

Say hello to a new world of colorful creativity! One of the perks of being a Stampin’ Up! Demonstrator is getting sneak peeks at new products and being able to order early. Demonstrators (and anyone who signs up between October 1st – 15th) can purchase the new Stampin’ Blends before the are released (sometime before the end of the year). You could get the Stampin’ Blends Marker Collection (all 26 colors plus the color lifter)  with “no strings attached” as part of your $99 starter kit.  I welcome hobby demonstrators! Click HERE for more information and to join my team! Questions? Email me and we can arrange a time to chat!

WCMD banner

Less than 1 week left to take advantage of these savings!!!!

World Card Making Day is October 7th. In celebration of this day, Stampin’ Up is offering 15% off select card making essentials, plus a deal on Fast Fuse Adhesive (BUY FAST FUSE ADHESIVE AND GET TWO REFILLS FOR FREE) October 1–10! Don’t miss out on this chance to stock up on card making staples to keep celebrating all year long. Click Here for the WCMD flyer.

DSP banner

During the entire month of October, select packs of Designer Paper will be part of a Buy 3, Get 1 Free special! Click HERE for the DSP sale flyer.

Paper Pumpkin season of style

Click on the image above to find out about the upcoming October and November Paper Pumpkin coordinating kits and how you can earn $5 off your next online order!