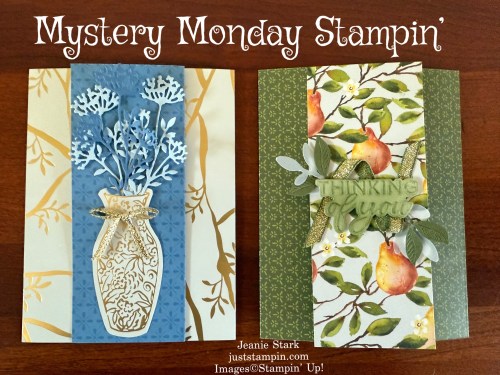
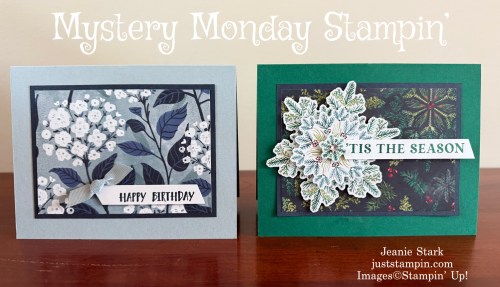
Did you play along with my Mystery Monday Stampin’? If you followed the clues you would have created a Reverse Easel Card similar to these.
Mystery Solved!
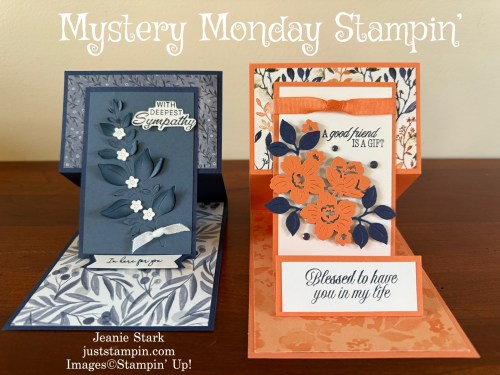
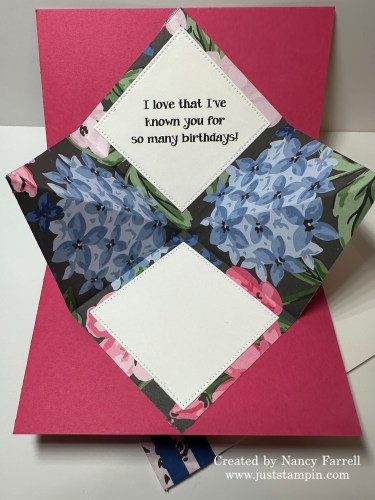
The Reverse Easel Card is, essentially, the same as the regular Easel Card, except that the 2-3/4″ score line is folded in the opposite direction (like a Z fold card). This small change makes the card base look taller and more elongated. It is a unique way to display a card! Here’s a closer look at each of today’s cards.

This card features the Peaceful Garden Designer Series Paper and several stamp sets. If you look closely you will see a sneak peek at a new Online Exclusive (available in November), the Banner Sayings Bundle. This was a “must have” bundle for me as I love a versatile sentiment set & punches for quick & easy creating! Here’s a look at the bundle (as well as the new stamp packaging).
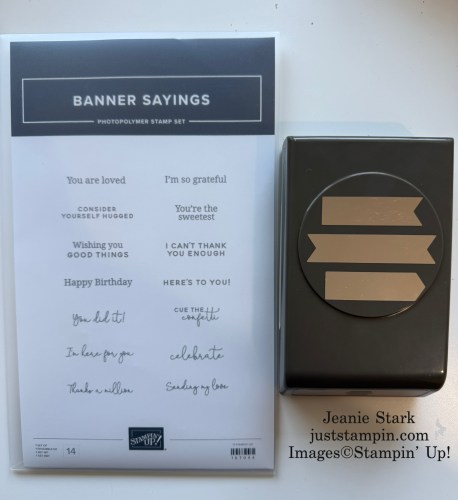
Add fun stamped banners to your cards and scrapbook pages with the Banner Sayings Bundle! It includes stamps with sentiments for nearly every occasion—congrats, thanks, thinking of you, and more—and a coordinating punch to cut them out quickly.
I used this set to stamp and punch my sentiment for the easel “stopper”. Just pop it up on Stampin’ Dimensionals and your focal panel stays put! Here’s a side view of this card.

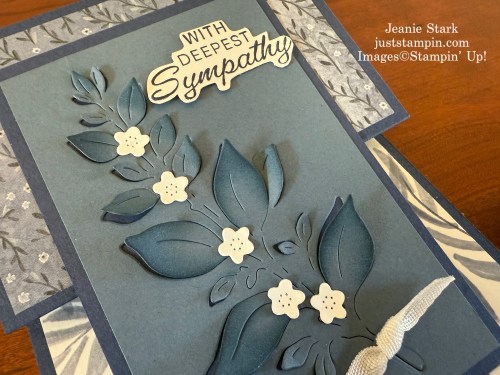
My focal piece was created using the Beautiful Motifs Dies.
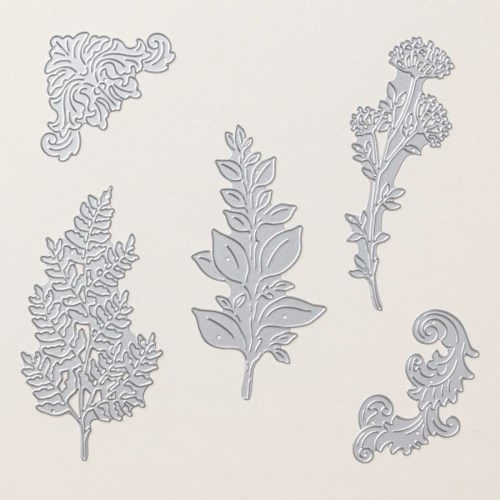
The Beautiful Motifs Dies include two decorative motif designs and three greenery shapes. Turn the motifs into corner details on your cards or scrapbook pages or use them as a key layering element.
The die I used partially cuts the leaves. I used a sponge dauber and lightly sponged the edges in Misty Moonlight Ink to highlight it better. Then I added some little flowers cut from the Impressions Abloom Dies.
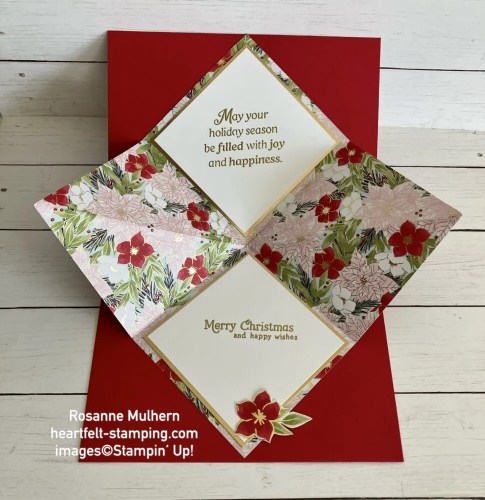
Since the Reverse Easel Card can stand up on its own and be displayed, you can put the personal message area on the back of the card between the 2-3/4″ score line and the 5-1/2″ score line to keep your personal message more private. This (optional) piece measures 2 1/2 x 4.
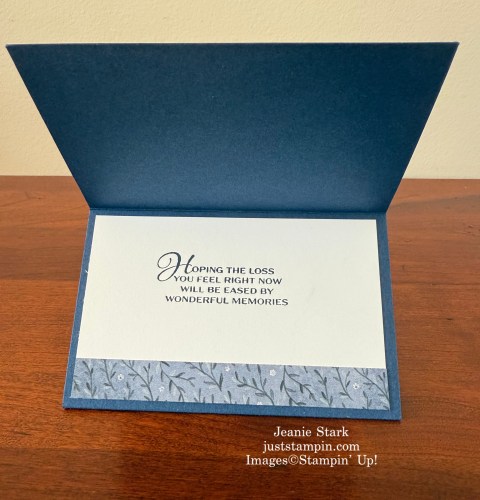
This card fold flat to fit in the envelope.

I had so much fun creating my second card for today!

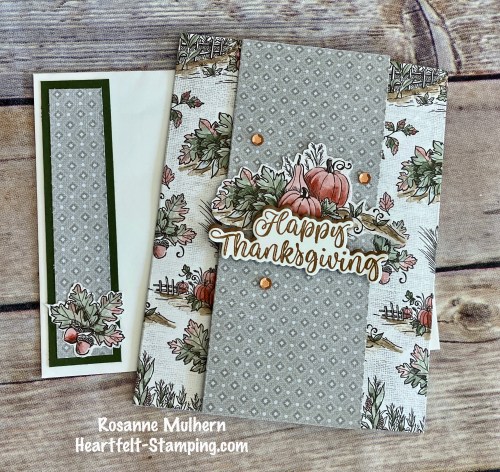
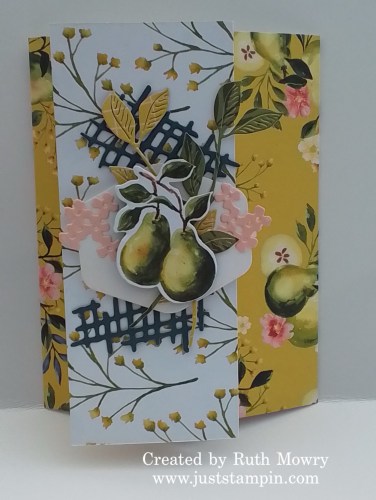
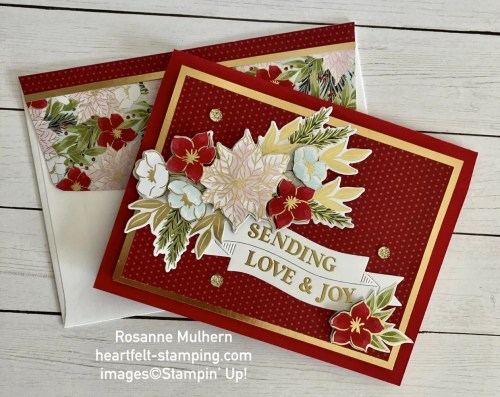
I have been working on making cards to send for Thanksgiving. I am blessed with wonderful friends and during this “season of thanks” I love to send a card to let them know how much I appreciate their friendship. I combined sentiments from several stamp sets for this card. I love the sentiment from Perfectly Pears I used on the front of this card. When you open the card I added a sentiment from Amber Autumn. (Another favorite!)
Then on the back where I’ll sign the card I used a sentiment from Words for The Season.

Words For The Season Bundle is right up there with my top favorites! I love versatile stamps sets as well as word dies and this bundle has both!!! Plus it comes with a banner die you can use with many different sentiments!
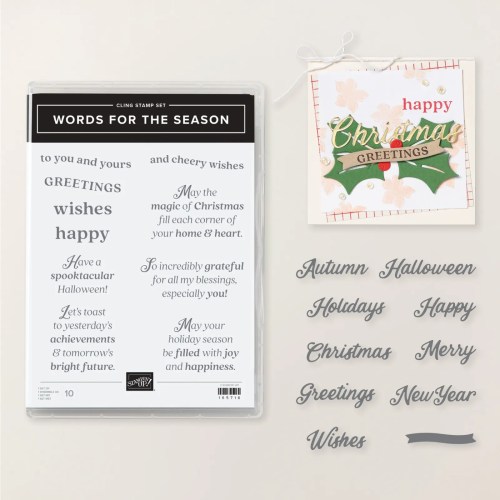
Create the perfect holiday greeting with the Words for the Season Bundle! This combination of festive sentiment stamps and versatile word dies lets you craft phrases for Christmas, New Year’s, Halloween, autumn, and more in a gorgeous script font. Mix, match, and layer for personalized cards, scrapbooks, and home decor.
You probably noticed I went a little “rogue” with my “stopper”/sentiment for this card. When I was creating this card I didn’t want the sentiment to be flat. I always love a challenge and I played around and came up with a really simple way to make it stand up and not cover the focal panel.

I cut a 3 x 3 piece of cardstock and scored it @ 1 1/4. My sentiment is stamped on a piece of 2 3/4 x 1 and adhered above the score line. I added this to the card front with Stampin’ Seal. Then I cut a 3 x 1/2 piece of cardstock & DSP, adhered them together, and adhered it to the card base with Stampin’ Dimensionals. The sentiment folds flat and meets the “stopper” to mail. It pops up when you open the card.

I love how this “stopper” turned out! I’ve never seen anything like it before so I guess I get to name it. I’m not sure what I should call this? It’s more than a reverse easel card. I’m thinking double panel reverse easel???? What do you think? I’d love to hear your thoughts! Leave a comment below.
I would love for you to play along with my mystery stamping! Click on the PDF below and follow the clues. Then take a photo of your card and send an attachment to my email (j.stark@goeaston.net). I’ll share your works of art on my Sunday Showcase!
Check back tomorrow for another example of a reverse easel card using the Fall for Toile Paper Pumpkin Kit.
Starting Tomorrow…3 Days of FREE SHIPPING!!!! Woo Hoo!!
Do you have a wish list of Stampin’ Up!® product that adds up to at least $75?Then you may want to take advantage of the Free Shipping promotion this coming Wednesday-Friday!! (*More details below)
Have a great day! Thanks for stopping by!
Just Stampin’
Jeanie

My Just Stampin’ Rewards:
I appreciate each and every order! Here are the things you can expect when you place an online order with me:
- Shop and earn 10% back in Stampin’ Rewards on orders of $20 or more. Use them on your next order or save them up to 1 year for something special!
- All orders will receive a handmade thank you card from me.
(*You can choose to remove the sticky note inside and reuse the card.)
- With a $50 order you will receive a PDF from my “Just Stampin’ Sketchbook” showcasing card designs that you can use with any stamp set. This is a great resource! (*You can collect new design tutorials each month!)
- With an order of $75 (or more) I will send you the PDF and thank you card as well as a card kit or Stampin’ Up Product of my choosing – this varies monthly.
Product List for Card #1 (Click on image to SHOP my online store.)
Product List for Card #2 (Click on image to SHOP my online store.)

Details…
- All order types qualify for this promotion.
- Free shipping applies after the qualifying amount has been met.
- The minimum qualifying amount to receive free shipping is $75 US dollars (before tax & shipping).
- Any applied/redeemed coupon codes, Stampin’ Rewards, or product credits will lower the order’s retail amount.
- Free shipping only applies during the 3-day period of the promotion.
- Phone order deadline: Friday, October 24, 2024; 6:59 pm (MT)
- Online order deadline: Friday, October 24, 2024; 11:59 pm (MT)
- Prepaid 3-, 6-, and 12-month Paper Pumpkin subscriptions and month-to-month subscriptions do not qualify for free shipping. Refills, past kits and add-ons do qualify toward free shipping, but you must be a subscriber to purchase.
- The free shipping promotion does not cover the additional cost for expedited shipping.
- Please keep in mind the distribution center may fall behind our typical shipping time frames. In such cases, we will do all we can to return to our regular service levels as quickly as possible.
CLICK HERE TO SHOP STAMPIN’ UP!
CLICK HERE TO VIEW THE ONLINE MINI CATALOG
CLICK HERE TO VIEW CURRENT ONLINE EXCLUSIVES
CLICK HERE to SHOP LAST CHANCE PRODUCTS
Click HERE TO SHOP KITS COLLECTION
CLICK HERE TO SUBSCRIBE TO PAPER PUMPKIN
CLICK HERE TO VIEW MY TUTORIALS
CLICK HERE & HERE TO VIEW PREVIOUS MYSTERY STAMPIN’ CARDS- FREE PDF’s


CLICK HERE FOR INFORMATION ABOUT JOINING STAMPIN’ UP!
CLICK HERE TO JOIN MY STAMPIN’ UP! Team
Email me (j.stark@goeaston.net) if you have questions or want to chat.


![Peace On Earth Photopolymer Stamp Set (English) [ 165918 ]](https://assets1.tamsnetwork.com/images/EC042017NF/165918s.jpg "Peace On Earth Photopolymer Stamp Set (English) [ 165918 ]")
![The Right Words Cling Stamp Set (English) [ 165316 ]](https://assets1.tamsnetwork.com/images/EC042017NF/165316s.jpg "The Right Words Cling Stamp Set (English) [ 165316 ]")
![Beautiful Motifs Dies [ 165205 ]](https://assets1.tamsnetwork.com/images/EC042017NF/165205s.jpg "Beautiful Motifs Dies [ 165205 ]")
![Impressions Abloom Dies [ 165610 ]](https://assets1.tamsnetwork.com/images/EC042017NF/165610s.jpg "Impressions Abloom Dies [ 165610 ]")
![Peaceful Garden 12" X 12" (30.5 X 30.5 Cm) Designer Series Paper [ 165917 ]](https://assets1.tamsnetwork.com/images/EC042017NF/165917s.jpg "Peaceful Garden 12\" X 12\" (30.5 X 30.5 Cm) Designer Series Paper [ 165917 ]")
![Night Of Navy 8-1/2" X 11" Cardstock [ 100867 ]](https://assets1.tamsnetwork.com/images/EC042017NF/100867s.jpg "Night Of Navy 8-1/2\" X 11\" Cardstock [ 100867 ]")
![Misty Moonlight 8-1/2" X 11" Cardstock [ 153081 ]](https://assets1.tamsnetwork.com/images/EC042017NF/153081s.jpg "Misty Moonlight 8-1/2\" X 11\" Cardstock [ 153081 ]")
![Basic White 8 1/2" X 11" Cardstock [ 166780 ]](https://assets1.tamsnetwork.com/images/EC042017NF/166780s.jpg "Basic White 8 1/2\" X 11\" Cardstock [ 166780 ]")
![Night Of Navy Classic Stampin' Pad [ 147110 ]](https://assets1.tamsnetwork.com/images/EC042017NF/147110s.jpg "Night Of Navy Classic Stampin' Pad [ 147110 ]")
![Misty Moonlight Classic Stampin' Pad [ 153118 ]](https://assets1.tamsnetwork.com/images/EC042017NF/153118s.jpg "Misty Moonlight Classic Stampin' Pad [ 153118 ]")
![Basic White Medium Envelopes [ 159236 ]](https://assets1.tamsnetwork.com/images/EC042017NF/159236s.jpg "Basic White Medium Envelopes [ 159236 ]")
![Misty Moonlight & White 1/4" (6.4 Mm) Starter Ribbon Pack [ 165276 ]](https://assets1.tamsnetwork.com/images/EC042017NF/165276s.jpg "Misty Moonlight & White 1/4\" (6.4 Mm) Starter Ribbon Pack [ 165276 ]")
![Sponge Daubers [ 133773 ]](https://assets1.tamsnetwork.com/images/EC042017NF/133773s.jpg "Sponge Daubers [ 133773 ]")
![Bone Folder [ 102300 ]](https://assets1.tamsnetwork.com/images/EC042017NF/102300s.jpg "Bone Folder [ 102300 ]")
![Paper Trimmer [ 152392 ]](https://assets1.tamsnetwork.com/images/EC042017NF/152392s.jpg "Paper Trimmer [ 152392 ]")
![Stampin' Cut & Emboss Machine [ 149653 ]](https://assets1.tamsnetwork.com/images/EC042017NF/149653s.jpg "Stampin' Cut & Emboss Machine [ 149653 ]")
![Perfectly Pears Photopolymer Stamp Set (English) [ 166147 ]](https://assets1.tamsnetwork.com/images/EC042017NF/166147s.jpg "Perfectly Pears Photopolymer Stamp Set (English) [ 166147 ]")
![Amber Autumn Cling Stamp Set (English) [ 165883 ]](https://assets1.tamsnetwork.com/images/EC042017NF/165883s.jpg "Amber Autumn Cling Stamp Set (English) [ 165883 ]")
![Words For The Season Cling Stamp Set (English) [ 165716 ]](https://assets1.tamsnetwork.com/images/EC042017NF/165716s.jpg "Words For The Season Cling Stamp Set (English) [ 165716 ]")
![Charming Day Dies [ 166135 ]](https://assets1.tamsnetwork.com/images/EC042017NF/166135s.jpg "Charming Day Dies [ 166135 ]")
![Floral Charm 12" X 12" (30.5 X 30.5 Cm) Designer Series Paper [ 166125 ]](https://assets1.tamsnetwork.com/images/EC042017NF/166125s.jpg "Floral Charm 12\" X 12\" (30.5 X 30.5 Cm) Designer Series Paper [ 166125 ]")
![Timid Tiger 8 1/2" X 11" Cardstock [ 165626 ]](https://assets1.tamsnetwork.com/images/EC042017NF/165626s.jpg "Timid Tiger 8 1/2\" X 11\" Cardstock [ 165626 ]")
![Stampin' Seal [ 152813 ]](https://assets1.tamsnetwork.com/images/EC042017NF/152813s.jpg "Stampin' Seal [ 152813 ]")
![Multipurpose Liquid Glue [ 110755 ]](https://assets1.tamsnetwork.com/images/EC042017NF/110755s.jpg "Multipurpose Liquid Glue [ 110755 ]")
![Mini Glue Dots [ 103683 ]](https://assets1.tamsnetwork.com/images/EC042017NF/103683s.jpg "Mini Glue Dots [ 103683 ]")
![Stampin' Dimensionals [ 104430 ]](https://assets1.tamsnetwork.com/images/EC042017NF/104430s.jpg "Stampin' Dimensionals [ 104430 ]")
![Timid Tiger 3/8" (1 Cm) Faux Linen Ribbon [ 165275 ]](https://assets1.tamsnetwork.com/images/EC042017NF/165275s.jpg "Timid Tiger 3/8\" (1 Cm) Faux Linen Ribbon [ 165275 ]")
![Charming Shimmer Faceted Dots [ 166139 ]](https://assets1.tamsnetwork.com/images/EC042017NF/166139s.jpg "Charming Shimmer Faceted Dots [ 166139 ]")


![Christmas Tags & More 6" X 6" (15.2 X 15.2 Cm) Mix & Match Specialty Designer Series Paper [ 165907 ]](https://assets1.tamsnetwork.com/images/EC042017NF/165907s.jpg "Christmas Tags & More 6\" X 6\" (15.2 X 15.2 Cm) Mix & Match Specialty Designer Series Paper [ 165907 ]")
![Lovely Garden 12" X 12" (30.5 X 30.5 Cm) Designer Series Paper [ 165524 ]](https://assets1.tamsnetwork.com/images/EC042017NF/165524s.jpg "Lovely Garden 12\" X 12\" (30.5 X 30.5 Cm) Designer Series Paper [ 165524 ]")
![Traditions Of Christmas 12" X 12" (30.5 X 30.5 Cm) Specialty Designer Series Paper [ 165853 ]](https://assets1.tamsnetwork.com/images/EC042017NF/165853s.jpg "Traditions Of Christmas 12\" X 12\" (30.5 X 30.5 Cm) Specialty Designer Series Paper [ 165853 ]")
![Thoughtful Journey 6" X 6" (15.2 X 15.2 Cm) Designer Series Paper [ 163303 ]](https://assets1.tamsnetwork.com/images/EC042017NF/163303s.jpg "Thoughtful Journey 6\" X 6\" (15.2 X 15.2 Cm) Designer Series Paper [ 163303 ]")
![Beautiful Gallery 6" X 6" (15.2 X 15.2 Cm) Designer Series Paper [ 165196 ]](https://assets1.tamsnetwork.com/images/EC042017NF/165196s.jpg "Beautiful Gallery 6\" X 6\" (15.2 X 15.2 Cm) Designer Series Paper [ 165196 ]")
![Elegant Pine Snowflakes 12" X 12" (30.5 X 30.5 Cm) Designer Series Paper [ 166066 ]](https://assets1.tamsnetwork.com/images/EC042017NF/166066s.jpg "Elegant Pine Snowflakes 12\" X 12\" (30.5 X 30.5 Cm) Designer Series Paper [ 166066 ]")