

I have a problem…I can’t stop making these Perpetual Birthday Calendars and boxes! It’s time to get out that designer series paper you’ve been hoarding and showcase your favorite patterns. What better project to make than one that will be used year after year. Yesterday I shared 3 different calendar boxes. (If you missed that post you can view it HERE.) Here’s another one.

Today’s design features the Paper Blooms Designer Series Paper. (You can get this paper for FREE with a qualifying purchase through the end of February). I used the Pierced Blooms Dies to fill the envelope I cut from the Snail Dies. (This set is worth it just for that envelope die!!!!) I love this color scheme of Navy, Seaside Spray, and Basic White.
These are really quite easy to make. You just print, cut/punch, and adhere to patterned paper and/or cardstock of your choice. There’s so many different ways to decorate the front of the boxes! I can’t wait to give these to my friends and family. I have two friends with birthdays this month. There’s even room to fit a set of homemade birthday cards in the box (which I love to give as gifts). The recipient just needs to fill in the names of family members & friends beside their birth date on the monthly dividers. Here’s the details:
To make the box: Cut cardstock 9 1/4 x 9. Score along the 9 1/4″ side @ 4 1/2 and 6. Score along the 9″ side at 1 1/2 and 7 1/2. Cut in on the 4 1/2″ and 6″ score lines up to the 2″score line on both sides. Notch the tabs as shown below. Fold and burnish along score lines. Add adhesive to the notched tabs and the smaller ends which will be the front of the box. *I adhered the tabs to the outside of the back of the box then folded the front flaps back over the tabs. (I did this because I didn’t want the tabs on the inside to interfere with pulling the cards in and out.)


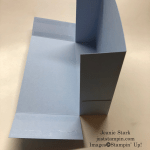
I cut the sides of the box at an angle from the front to the back but you could leave it straight if you prefer.
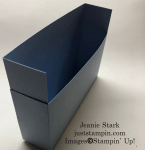

The cardstock layer on the front of the box measures 3 x 5 3/4. I cut the Designer Series Paper 1/8″ less (2 7/8 x 5 5/8).
The monthly dividers measure 4 x 5 1/2 and are cut from Thick Basic White cardstock. I adhered the same size patterned paper to each then adhered the calendars. I punched 24 cardstock ovals using the Double Oval Punch. I printed the months on Basic White cardstock and punched using the smaller of the Double Oval Punch.
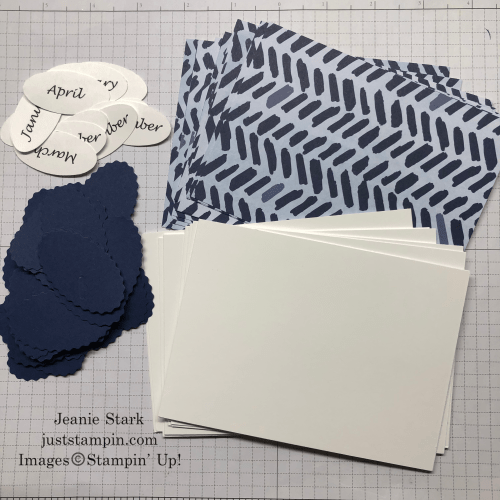
I adhered the months to the ovals then adhered to the front of the divider. I lined up the other oval and adhered to the back of the divider. I wanted it to be sturdy to pull out year after year. *Tip: Once you get the first 3 months lined up along the left, center, and right it is quick & easy to finish the rest by lining up the blank cards in front of these and using January, February, and March as a guide for where to place ovals.

I hope you enjoyed the different ideas for these boxes. If you have any questions feel free to email me. You can click on the print friendly version for my monthly calendars below.
*Note – If you plan to mail these, the box and a set of birthday cards fit nicely in the Paper Pumpkin boxes! I always save my Paper Pumpkin boxes and turn them inside out to send packages.
It’s time to place your order for my February Just Stampin’ Card Kit and 3D Project Buffet To Go!
Click HERE for details.
Have a great day! Stay Safe! Stay well!
Just Stampin’
Jeanie
Host Code Exclusive Offer! All orders placed through my online store are eligible for my FREE monthly gifts (*See Rewards below). Please use the current host code. *If your order is $150 or more, do not use this code as You become the hostess and get the Rewards! Click HERE to Shop!
Current Host Code: S3DVG9E7
Sale-A-Bration ends February 28th! Don’t miss out on FREE product!

For every $50 you spend between now and February 28th you can pick a free gift! There’s even a couple of choices for FREE if you order $100 or more. Plus, you can earn a special hostess set, Punch Party, FREE. I love this stamp set!

Here’s how you can receive the Punch Party Stamp Set for FREE..
- Contact your crafting friends and family and place an online order of $300. I can set up a hostess code for you and they can go online and have their order shipped directly to them and you will get the hostess rewards. Or you can take their orders and place the order yourself. I can help you with whichever way you prefer. You will not only earn the stamp set for FREE, you will also receive hostess $ towards anything else you want from either the annual catalog or new Mini Catalog. Plus everyone who orders at least $50 will get a FREE Sale-A-Bration item with their order!
- Simply place an online order with me this month (use the host code) and I will enter your name in a drawing to win this stamp set. I will post the lucky winner on March 1st. I love to reward my customers and this is just one of my “Just Stampin’ Rewards” this month! (*See below)
Product List (Click on image to view in my online store.)
|
|
|
|
|
|
|
|
|
|
|
|


 Designer Series Paper")
 Cardstock")


Just Stampin’ Rewards
I appreciate each and every order! Here are some of the things you can expect when you place an online order with me in February:
- Handmade thank you card in the mail with any order.
- Chance to win the Punch Party Stamp Set. Anyone who orders this month will have their name entered in a drawing to win the Host only stamp set. Winner will be posted March 1st.
- FREE Sale-A-Bration items of your choice with every $50 (or $100) order!
- Mystery gift????
- 3 FREE Exclusive Tutorials and a 3D Project featuring the stamp/bundle of the month when you order $50 or more (before tax & shipping). New tutorials every month! This month features the Pretty Perennials Bundle and includes a slimline card and custom envelope tutorial featured HERE. *Click on the image below to view in my online store.
