Welcome to my Holiday ABC series! I enjoy the holidays and today I am going to share with you one way I make my own invitations for different events. My holiday cookie exchange has become an annual tradition. Here’s a fun invitation I made that could also be used for birthdays or other parties by simply changing the DSP and stamped image.
This is a simple fun fold card. The card base measures 4 1/4 x 11 and is scored at 1 1/4 and 5 1/2. Fold the card in half then fold the top flap down. I adhered a 3 3/4 x 4 piece of DSP (from Christmas Around the World Designer Series Paper) to the front and wrapped the Quilted Christmas Ribbon around the card and tied a bow. You don’t need any adhesive to keep the card closed…the ribbon holds it together. (You could staple the flap on each side if you want and hide it under the ribbon but it really isn’t necessary.) I stamped the gingerbread man from the Cookie Cutter Christmas Stamp Set in soft suede ink and punched him out with the coordinating Cookie Cutter Builder Punch. I added a bow tie I punched from DSP and a candy cane I fussy cut from DSP. I adhered it to Layering Circles with Stampin’ Dimensionals.
I typed my invitation on the computer and printed it on Whisper White cardstock. I used my Stampin’ Trimmer to cut it to 3 1/2 x 4 3/4 and adhered it to a 3 3/4 x 5 piece of Old Olive Cardstock. It’s easy to slide in and pull out to read.
Here’s a couple of photos from last year’s cookie exchange. Looking at these yummy cookies is getting me thinking about what I will bake this year! Do you have a favorite cookie recipe?
I hope you enjoyed today’s card. The DSP used on my invitation is part of the special Stampin’ Up promotion going on now through the end of October. Buy 3, Get 1 Free!
You can purchase any of the Stampin’ Up! products used to make today’s project from my online store. Click HERE to shop or click on the images below to order.
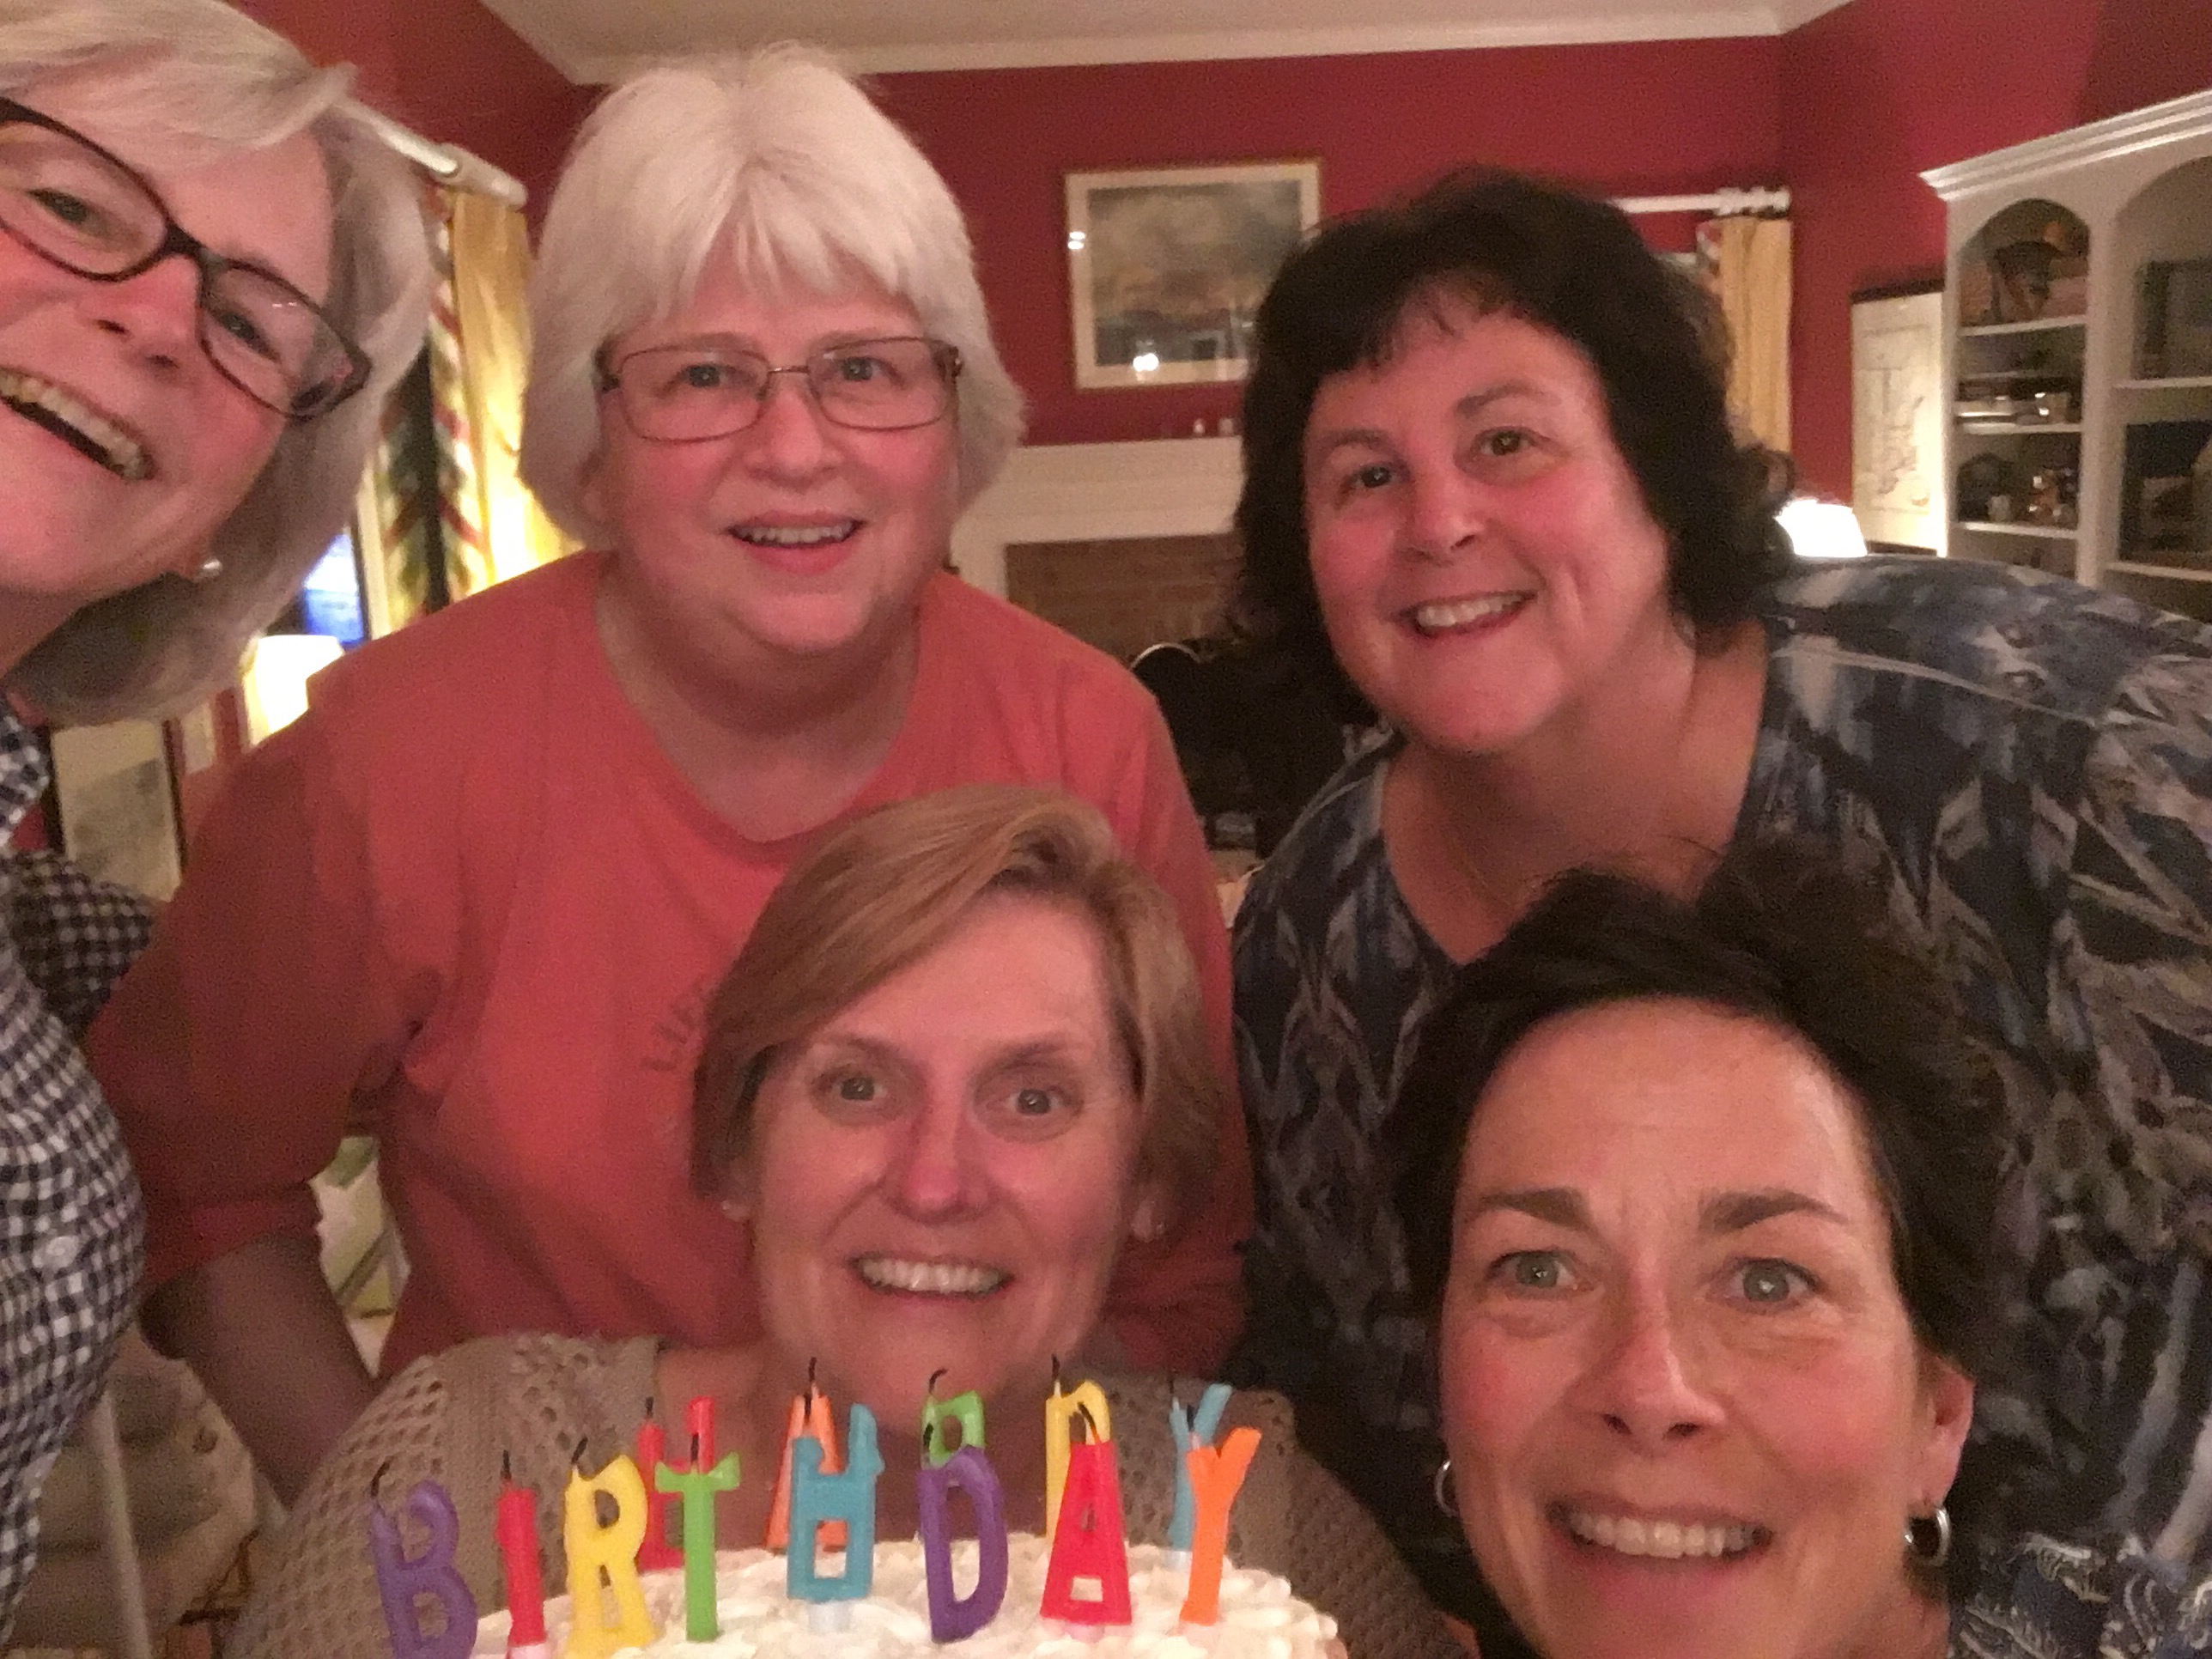
Today is my friend Susan’s birthday. We celebrated over the weekend with fellow demonstrators and team members. We call ourselves “Sisters of the Traveling Stamps”. We spent the weekend in Annapolis, Maryland at Ramsey’s and had so much fun sharing ideas (we each brought a shoebox swap), watching videos, learning new techniques, and stamping until the wee hours of the morning! Stampin’ Up! is so much more than just stamps and making cards…I love the friendships and spending time with “my people”. Here’s a photo from our fun weekend!
Have a wonderful day!
Just Stampin’
Jeanie
To get a FREE thank you gift from me, simply enter the host code below at checkout. *If you have an order over $150, DON’T USE THE HOST CODE, but get your Stampin’ Rewards AND the free thank you gifts from me!
*OCTOBER ONLINE ORDER SPECIAL…I am giving away the Merry Patterns Stamp Set for FREE to 1 lucky winner in October! Anyone who places an online order using the host code will be entered in a drawing to win this stamp set. The winner will be announced November 1st after all October orders are complete!
Last week my friend Rachel and I took a road trip to Alexandria, Virginia to meet one of my favorite children’s book illustrator/author, Jan Brett. Her detailed artwork is amazing!!! I was thrilled to meet her and get an autographed copy of her newest book, Gingerbread Christmas! I love books and reading as much as I love to stamp! I made these little treats for my students to go with this new Gingerbread story.
Candy Cane Lane Designer Series Paper and Cookie Cutter Christmas Stamp and Punch
I started with a piece of 2 x 7 1/2″ DSP from Candy Cane Lane. I punched one end using the Scalloped Tag Topper Punch. I scored the other end at 2 and 2 1/4. I folded on the score lines and secured each end with a glue dot at the top. I cut the gingerbread house out from another piece of DSP using my Paper Snips and glued it to the front. I stamped the gingerbread man using early espresso ink and punched him out with the Cookie Cutter Builder Punch. The bow tie is stamped in real red ink. I attached the bow tie and the gingerbread man with glue dots. I love the real red stitched ribbon and used that to thread through the top of the paper and around the candy cane. I used the Candy Cane Lane Baker’s Twine to tie a bow and keep it secure . Jan Brett’s team was most generous and gave me extra buttons and booklets for each of my Pre-K students. They are going to love the story and their treats!
img_7251
img_7253
Rachel and I had a fun time (until we had to drive home 2 hours in FOG)! Here’s some photos from our adventure.
Jan Brett Tour Bus in Alexandria, VirginiaAuthor/Illustrator Jan Brett
Now I need your help! Jan Brett is giving away 10 books to the person who receives the most votes from Facebook voters. Go to http://www.facebook.com/byjanbrett and vote for my photo with the tour bus! There’s only 1 week left in the contest and our school would love to win these books! Look for this silly photo of me.
I love to give books as gifts and it is always fun to make something to go with it…a card or a treat (or both). I have given Jan Brett’s book, The Mitten, to so many kids over the years and I would always include a pair of mittens. If you shop Kohl’s, they have a great program, Kohl’s Cares. They sell great classic books with stuffed animal characters (for just $5 each) and 100% of the net profit from the sale support kid’s health and education initiatives in communities nationwide. Whenever a parent asks me what they can do to help their child in school, my first response is always READ!!!! It’s simple, rewarding, and so effective! (I’ll spare you all the research and experience which proves it!)
So, to sum up today’s post…buy a book, make a card or treat to go with it, read to a child, and vote for me on facebook! LOL (Oh, and feel free to shop my online store!)
Welcome to my series, The ABC’s with DSP! This month I am featuring projects showcasing Stampin’ Up! Designer Series Paper.
Projects made using Stampin’ Up! Candy Cane Lane Designer Series Paper.
Today’s projects are just yummy with the Candy Cane Lane Designer Series Paper. I went a little crazy creating and made 4 projects to share with you today. Grab a cup of coffee and get comfortable as I have lots of photos to share with you.
When I first saw this paper in the Holiday Catalog I thought of my annual cookie exchange. I started hosting a cookie exchange and brunch about 15 years ago and look forward to this event every year. This paper would have been perfect for last years candy cane theme. Check out the cute lottery ticket favors at each place setting. I used 3 candy canes wrapped together to make a stand. These work great as place settings with the names of guests or on a buffet table to put the name of the dish.
Here’s a few photos from last year’s cookie exchange/brunch.
img_7214
img_7212
My daughter and her best friend made the cookies for me. 🙂 They made around 10 dozen pizzelles. (They look like pancakes in the photo below all stacked up on the breakfast bar. LOL) Just thinking about them is making me hungry! They were so good!! I decorated Stampin’ Up! boxes to put my cookies in. It’s all about the presentation (and getting together with friends)!
img_7193
img_7195
img_7225
img_7231
Well this little trip down Memory Lane made me want to bake some cookies. I decided to forgo the calories and make a cookie container using some Candy Cane Lane DSP. I made this using 1 sheet of 12 x 12 DSP.
Cookie Container using Stampin’ Up! 12 x 12 Candy Cane Lane DSP
This container was really easy to make. I was inspired by an article by Kristine at Down Home Inspiration. She needs a score board!!! She had to measure with a ruler and fold and if she only knew about Stampin’ Up!’s tools she would find this much quicker and easier to make. It took me no time at all. Simply score both sides at 4 and 8 inches. Then you do need to use a ruler and score (using your scoring tool) from the point at each corner to the intersection at the 4 inch score line.
img_4991
img_4992
You will fold on all the score lines then pinch the corner folds along the crease and bring them forward.
img_4994
img_4995
img_5010
Next, punch a hole in each corner point and thread some ribbon through and tie a bow. I used a 1/4 inch hole punch and the Real Red 3/4″ Stitched Edge Ribbon from the Holiday Catalog (page 5). This could easily hold a dozen or more cookies or muffins, etc. What a great gift to give a new neighbor or friend or even a little get well package for someone!
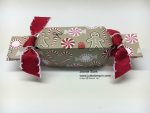
This next project uses the Envelope Punch Board. Today is the last day to get it on sale for $15 (reg. $20) The Envelope Punch Board comes with two built in punches and it’s own scoring tool, plus measurements for 66 different sized cards. Not only can you make envelopes and their liners with the board but a multitude of other things too. I have been using mine to make Christmas Crackers. These are a holiday tradition! I first learned how to make these from fellow demonstrator, Sharon Cline. Oh what fun!
Christmas Cracker using Stampin’ Up! Candy Cane Lane DSP and the Envelope Punch Board
You need a piece of 6 x 5 1/2 DSP to make the cracker box. Use the Simply Scored Scoring Tool to score the sides first. With the 6 inch side at the top score at 1 1/4 and 4 3/4. Rotate the paper so the 5 1/2 inch side is along the top of the Scoring Tool and score at 1 1/4, 2 1/2, 3 3/4, and 5 inches. Fold along the score lines.
img_5011
img_5012
Fold the 1/2″ strip along the 6″ inch side down and slide the paper into the Envelope Punch Board so the end of the paper is at the 1 1/4″ mark on the Punch Board and punch. You will be punching through a double thickness of paper. Flip the paper over and slide in again so you can punch at the 1 1/4″ mark on the other side. Fold the next crease line down and punch each side again at the 1 1/4″ mark. Flip and repeat until you’ve punched along all crease lines. Punch the final edge on each side at the 1 1/4″ mark. (You’ll only be punching through a single thickness this time.)
img_5013
img_5014
img_5015
img_5016
img_5018
img_5019
img_5020
img_5021
Add Tear & Tape Adhesive along the 1/2″ flap and tape the seam shut. Gently pinch the ends together, fill with candy or a small gift, and tie with a length of ribbon.
img_5024
img_5028
Here’a another project made using the Envelope Punch Board. (If you don’t have this handy tool you need to order it today and take advantage of the 25% off!) The measurements for this cute candy cane box came from the talented UK demonstrator, Sam Donald ( aka Pootles).
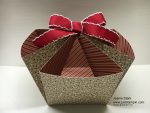
Candy Cane Box made with the Envelope Punch Board and Candy Cane Lane DSP
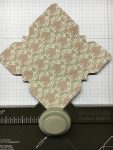
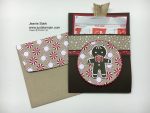
Start with a piece of 5 1/2 x 5 1/2 DSP. Line up at the 2 inch mark on the Envelope Punch Board and punch & score. Slide to the 2 5/8 inch mark and punch & score again. Rotate the paper, line up the score lines, and repeat for each side. On the last side only punch, don’t score. This will be the top of your holder. Round all corners using the corner rounder provided on the Punch Board. Fold all score lines and snip the little scored boxes along the edges (as shown in the photo below).
img_5029
img_5030
img_5031
img_5032
It takes just 3 glue dots to adhere this box together. Put one on the bottom point and bring the side in. Then put a glue dot on each side point and close.
img_5034
img_5035
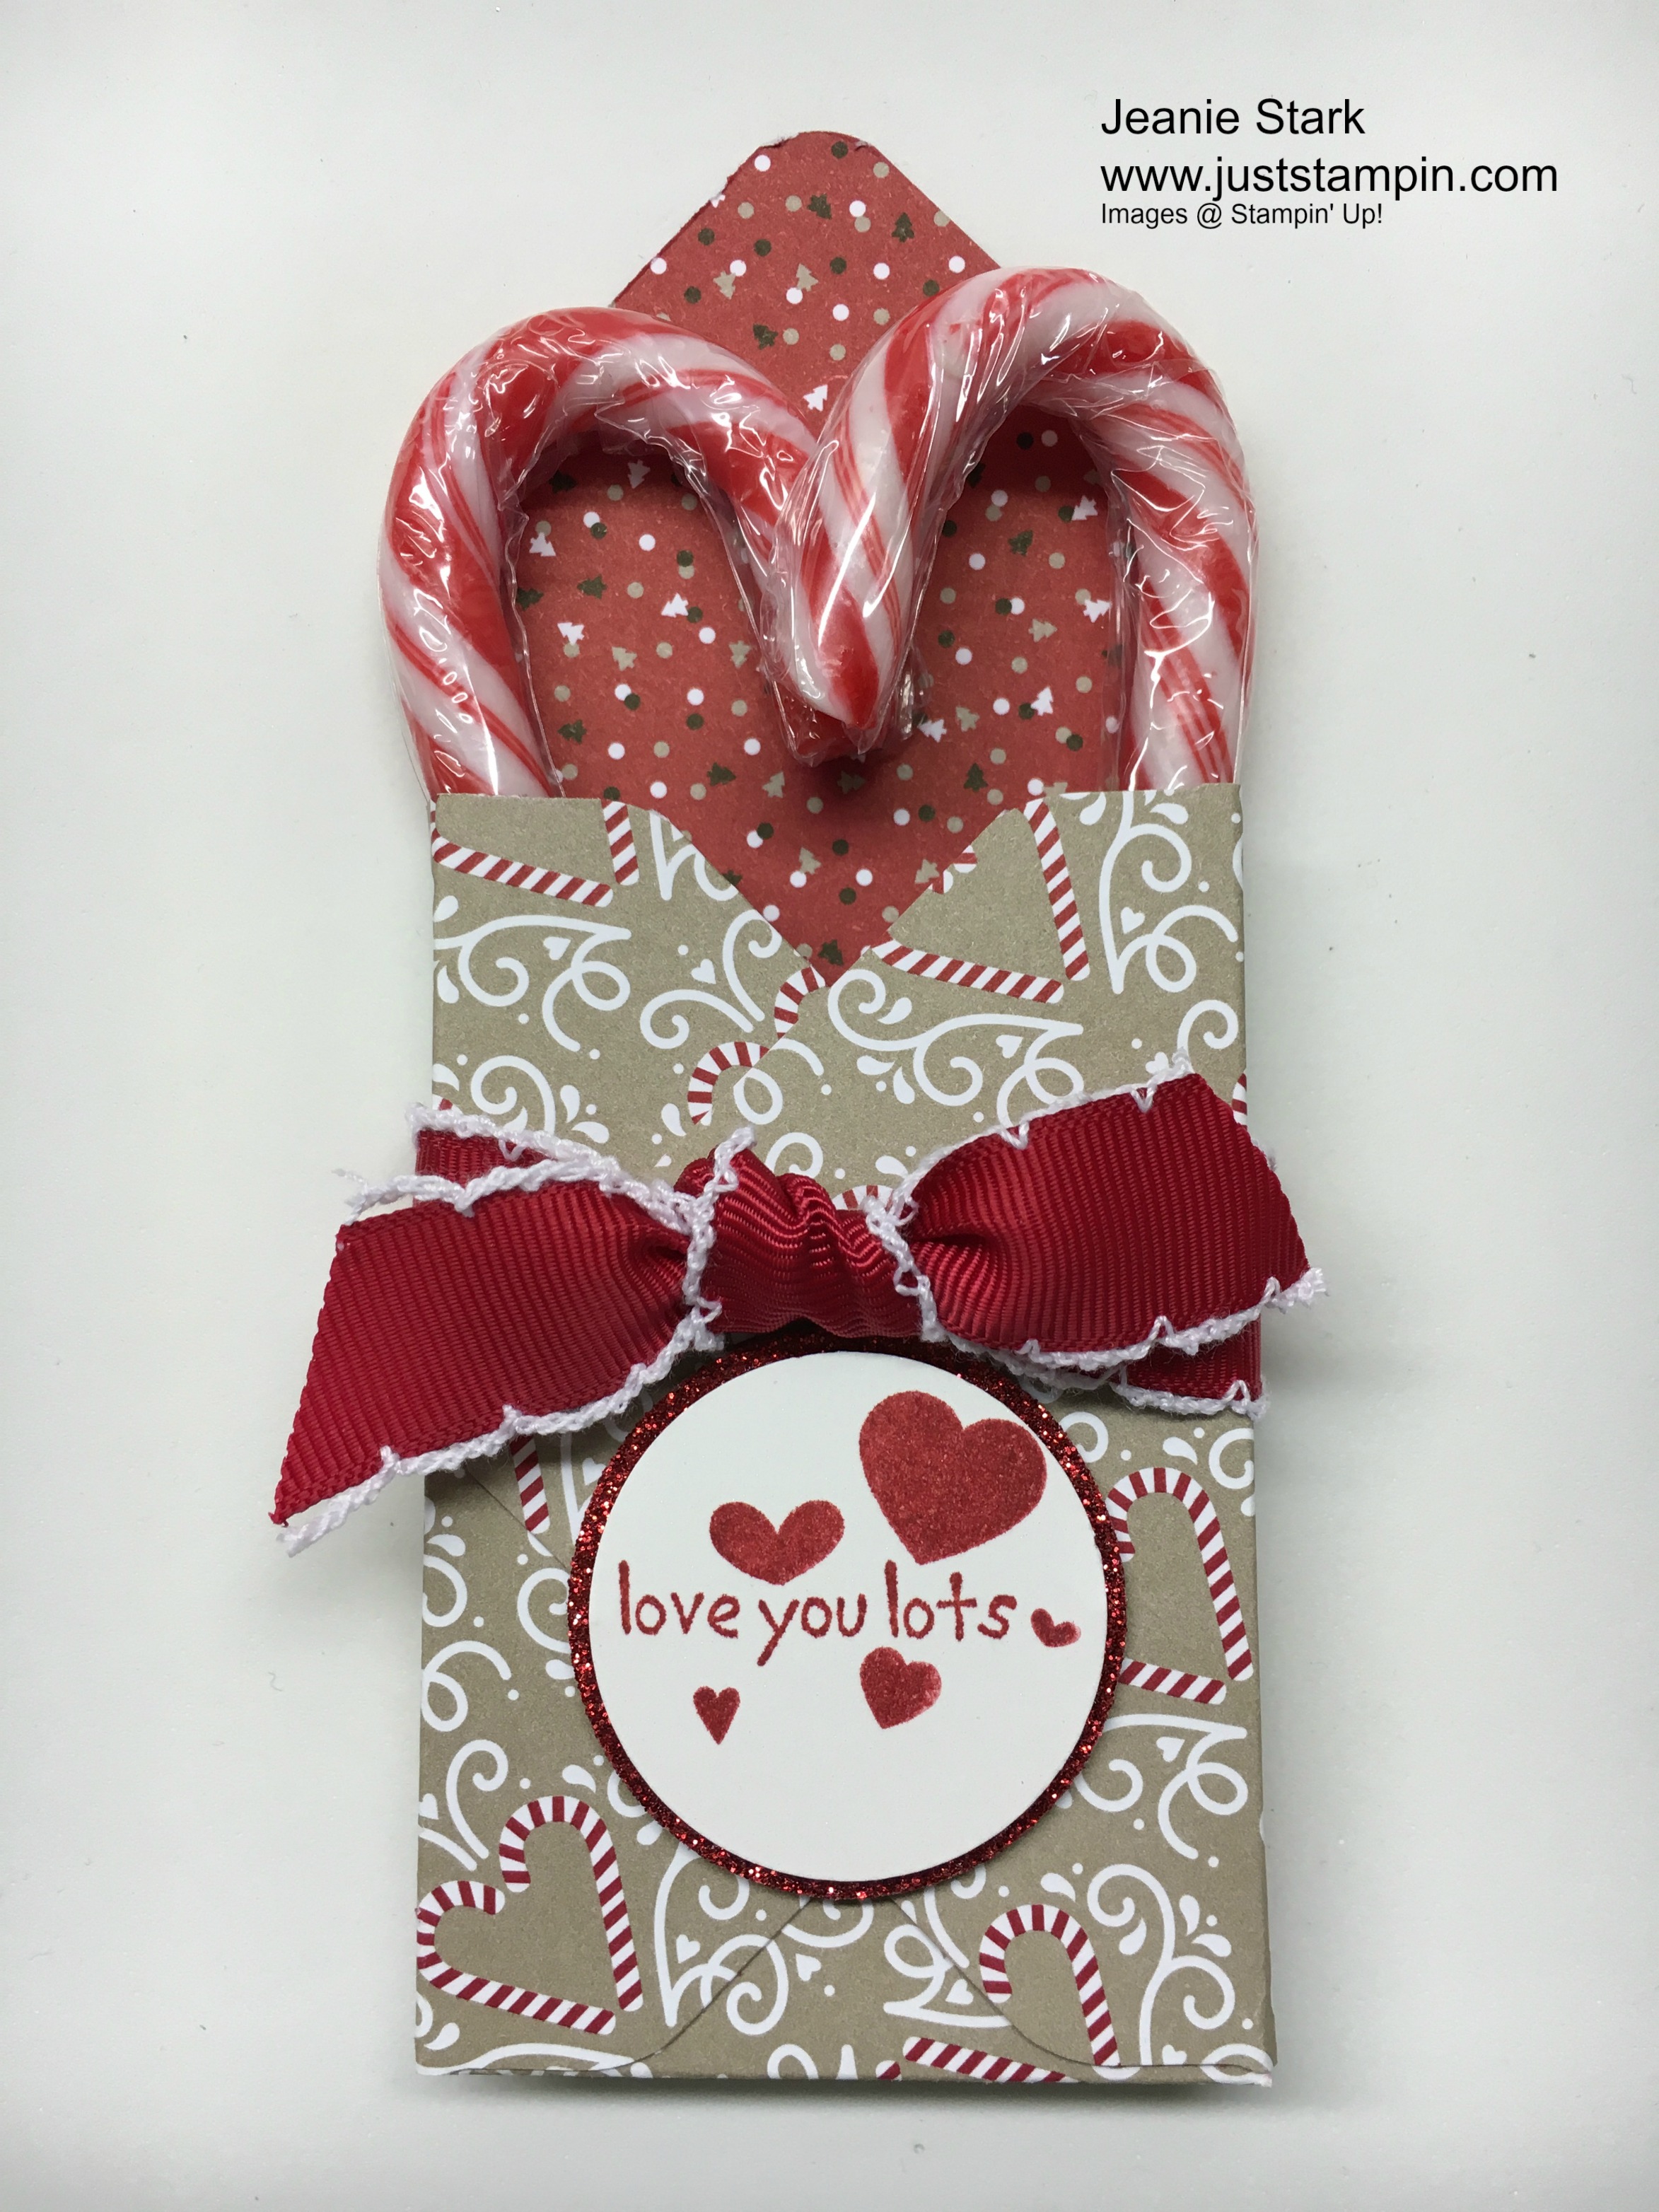
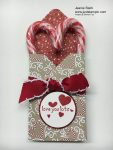
I wrapped ribbon around my box and stamped the sentiment from Love You Lots (Exclusive Hostess Stamp Set) and then used the hearts from Perpetual Birthday Calendar to stamp around the sentiment. I punched this out with the 1 3/8 circle punch and layered it on a 1 1/2 circle punched from Red Glimmer Paper. I attached this with Stampin’ Dimensionals. I added two candy canes and arranged them to make a heart like the DSP.
img_5036
img_5037
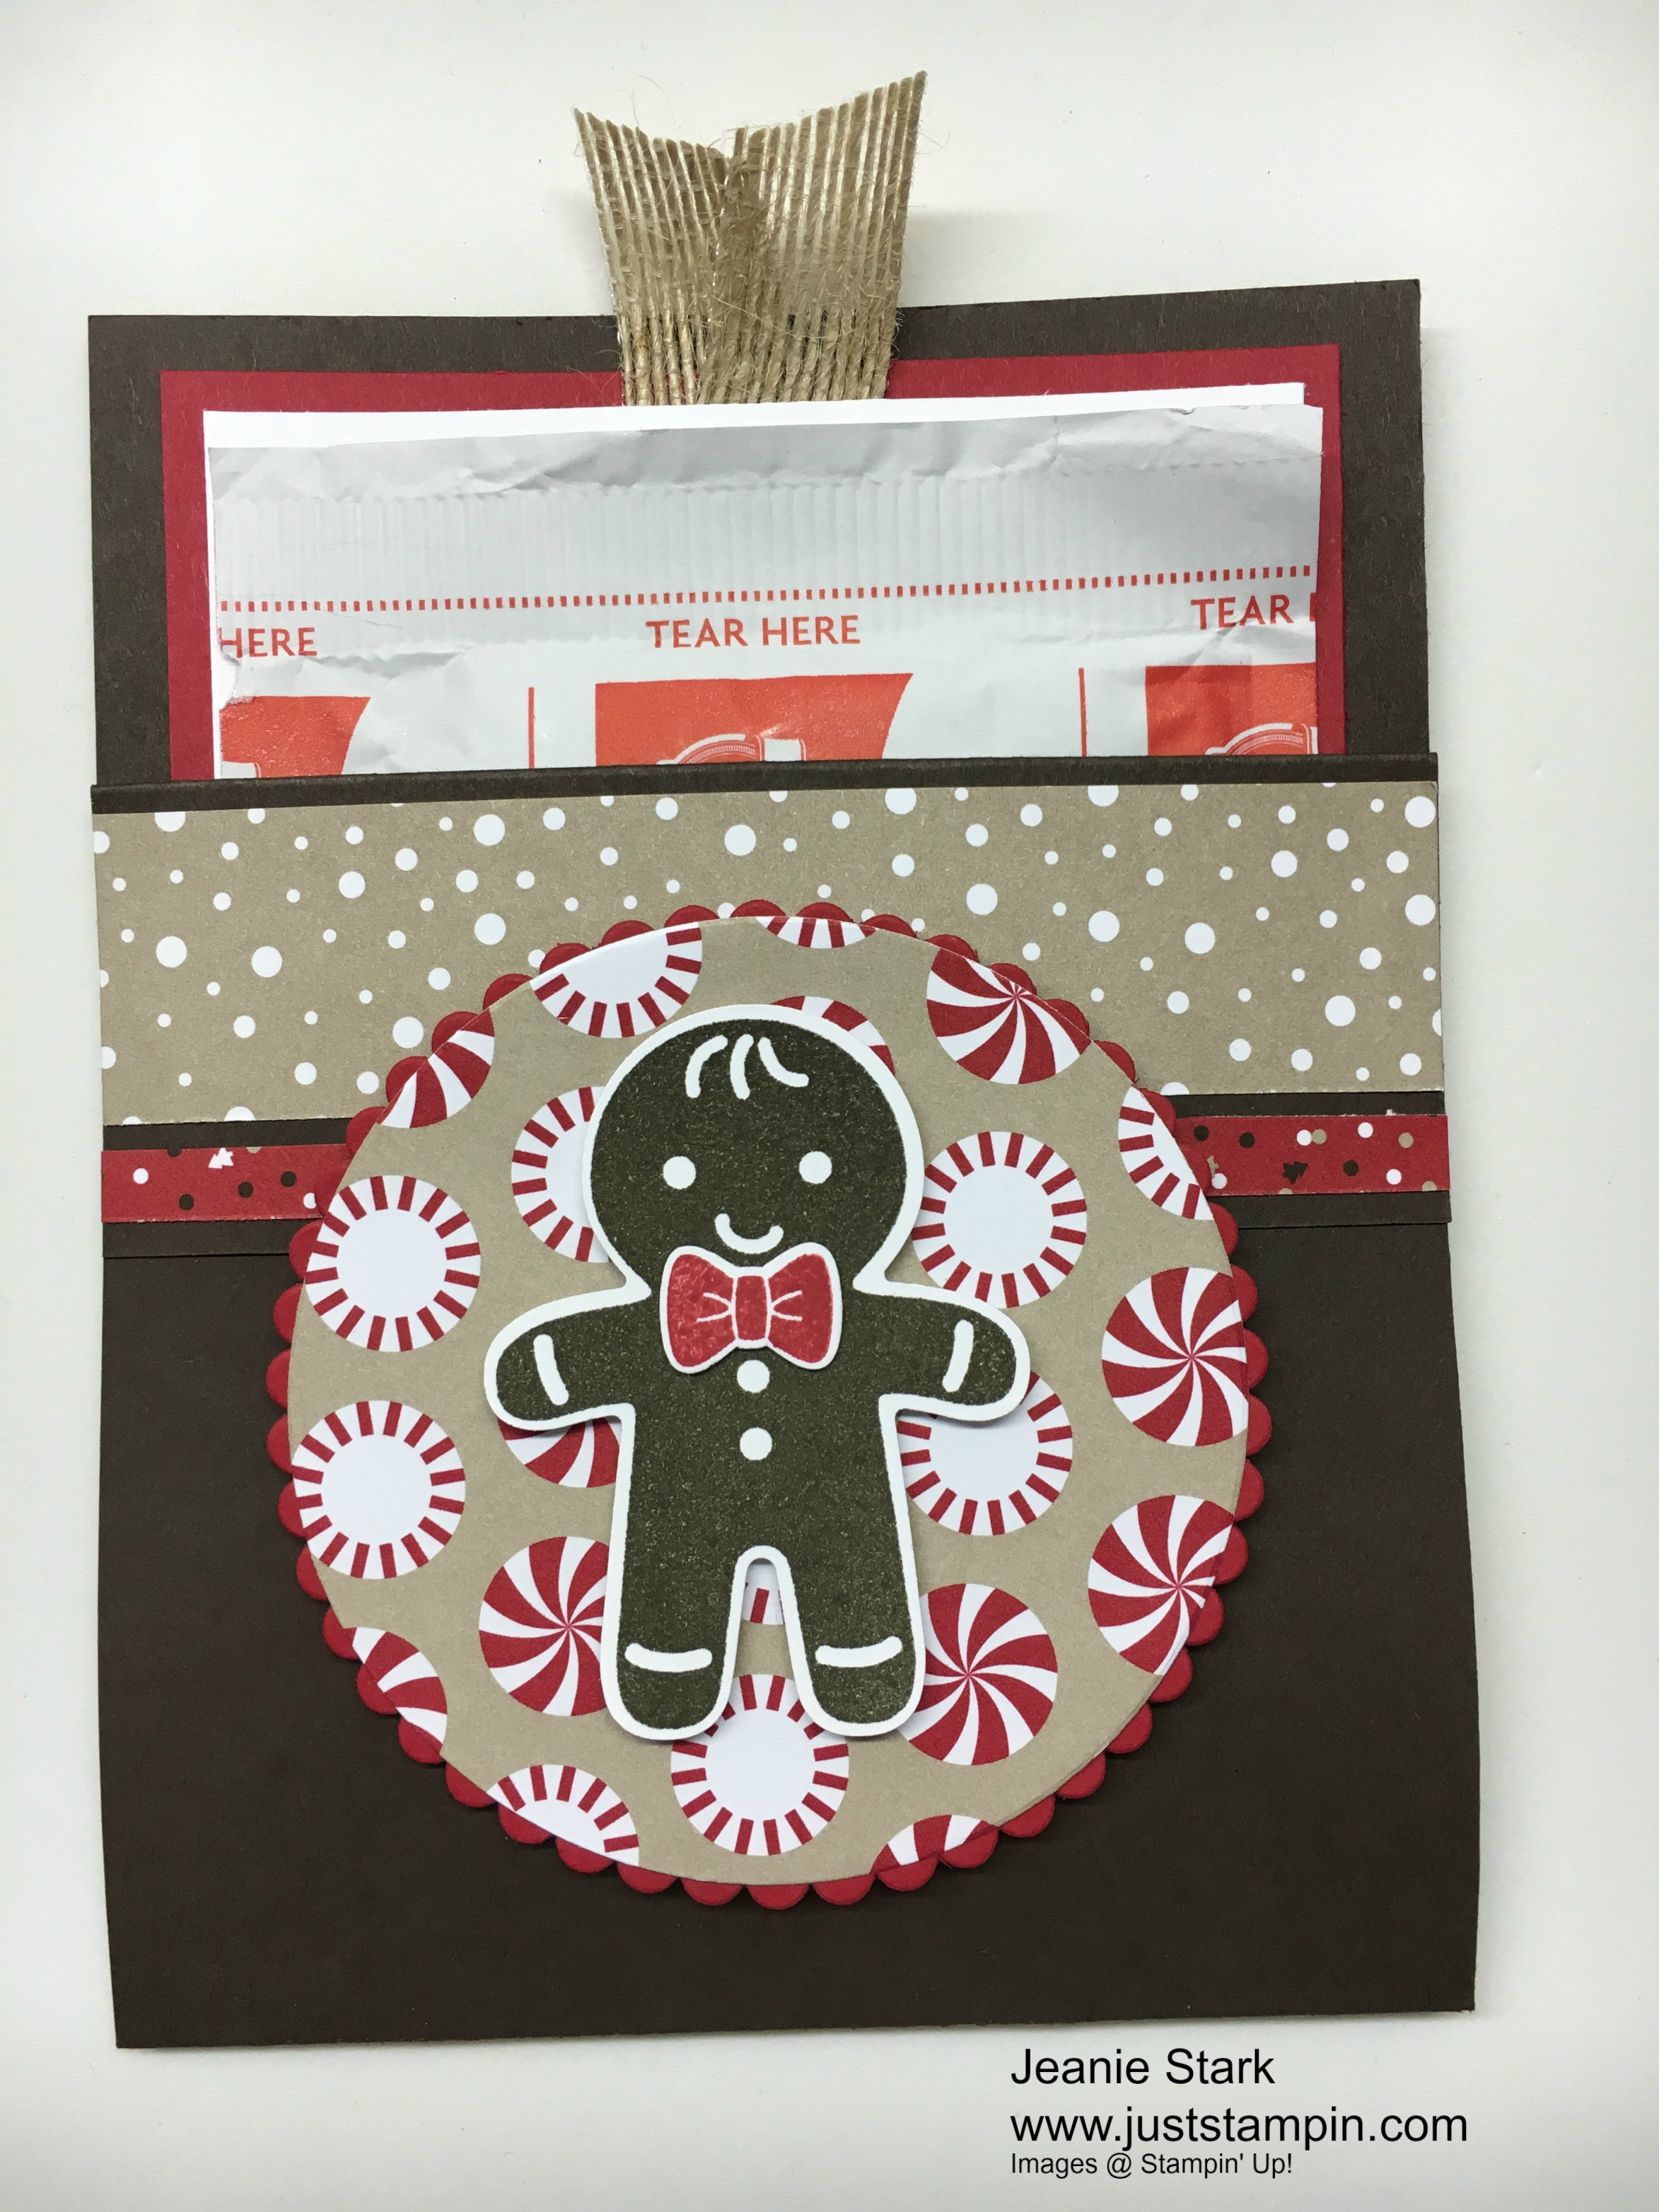
My last project was inspired by a pocket card from Linda Heller. I decided to make mine to send some cocoa.
Cocoa Pocket Card using Stampin’ Up! Candy Cane Lane Designer Series Paper
This is a quick card to make using punches and framelits. Score a piece of 4 1/4 x 11 Early Espresso cardstock at 1 1/2 and 5 1/2. This is a bottom fold card with a fold down front flap. I stapled the flap down to make the pocket. This gets hidden with the 1 x 4 1/4 piece of DSP that is adhered on top along with a 1/4 x 4 1/4 strip of coordinating DSP. I cut the circles from Candy Cane Lane DSP and Real Red cardstock and glued them together before adhering them to the card with Stampin’ Dimensionals. I stamped the adorable gingerbread man from Cookie Cutter Christmas in early espresso ink and punched him out with the matching Cookie Cutter Builder Punch. (You can purchase these together as a bundle and save 10%.) I attached him to the card with Dimensionals. The pull out card in Real Red measures 5 1/4 x 3 3/4. I stamped the sentiment from Watercolor Wings in Early Espresso on a piece of 5 x 3 1/2 Whisper White. I stapled a 3 inch piece of burlap ribbon between the layers and placed it in the pocket with some cocoa. It’s ready to send with a handwritten message. This would be a cute little gift to give with the candy cane box.
img_5039
img_5040
img_5042
img_5044
Today’s projects were all about cookies, candy, and cocoa. And I made them all using the Candy Cane Lane Designer Series Paper. Here’s another look at each of the individual projects. Do you have a favorite?
I want to remind you that today, October 5th, is the LAST DAY to take advantage of Stampin’ Up!’s World Card Making Day Specials. Get up to 25% off these essential card making supplies. Don’t forget to place your order today!
This is a great deal on Fast Fuse Adhesive!! It is my adhesive of choice! I also love the In Colors. And the Designer Tin of Cards are gorgeous! You make 16 cards for just over $20. WOW! I posted a video previously showcasing the Tin of Cards. If you missed it, you can CLICK HERE.
Some of our wonderful designer series paper is also on sale (including Candy Cane Lane)!
Click HERE to shop my online store and take advantage of the Stampin’ Up! Designer Series Paper Sale Oct. 1-31. Please use the Hostess Code 7DB3CBKS when you check out. I’ve added a visual below to show where to enter the code. I always send a thank you gift each month when you order from me. I appreciate each and every order!


 Ribbon")


 Today’s projects were all about cookies, candy, and cocoa. And I made them all using the Candy Cane Lane Designer Series Paper. Here’s another look at each of the individual projects. Do you have a favorite?