New Monthly Tutorials…FREE with Purchase!

Happy October! This month I am featuring not one, but two stamp sets in my monthly tutorials… Tidings All Around and Seasonal Wreaths. Why two stamp sets? Because both of these stamp sets coordinate with the All-Around Wreath Dies! How cool is that?! You get a bigger bang for your buck and you can use these year round! I change the wreath on my door for each season & holiday…now we can do the same with our cards! I offer 3 exclusive tutorials each month with a minimum $40 or more online order. The Tidings All Around Bundle includes the All-Around Wreath Dies and is available for $45.75 (10% off). That’s more than the minimum to get those FREE tutorials! I have been playing with these the past week and trust me…You are going to want them! Every time I create one card, I think of another way to use it! The wreath has a permanent spot on my Stamparatus!  I can’t wait to share these projects with you!

Here’s a look at the stamp sets and dies.

Stampinn' Up! Tidings All Around Bundle - For inspiration, FREE tutorials, and more visit juststampin.com - Jeanie Stark StampinUp
Tidings All Around Stamp Set and All-Around Wreath Dies Bundle Item # 152371 $45.75
Stampin' Up! Seasonal Wreaths Stamp Set - for inspiration, FREE Tutorials, and more visit juststampin.com - Jeanie Stark StampinUp
Seasonal Wreaths Stamp Set Item # 150522 $18

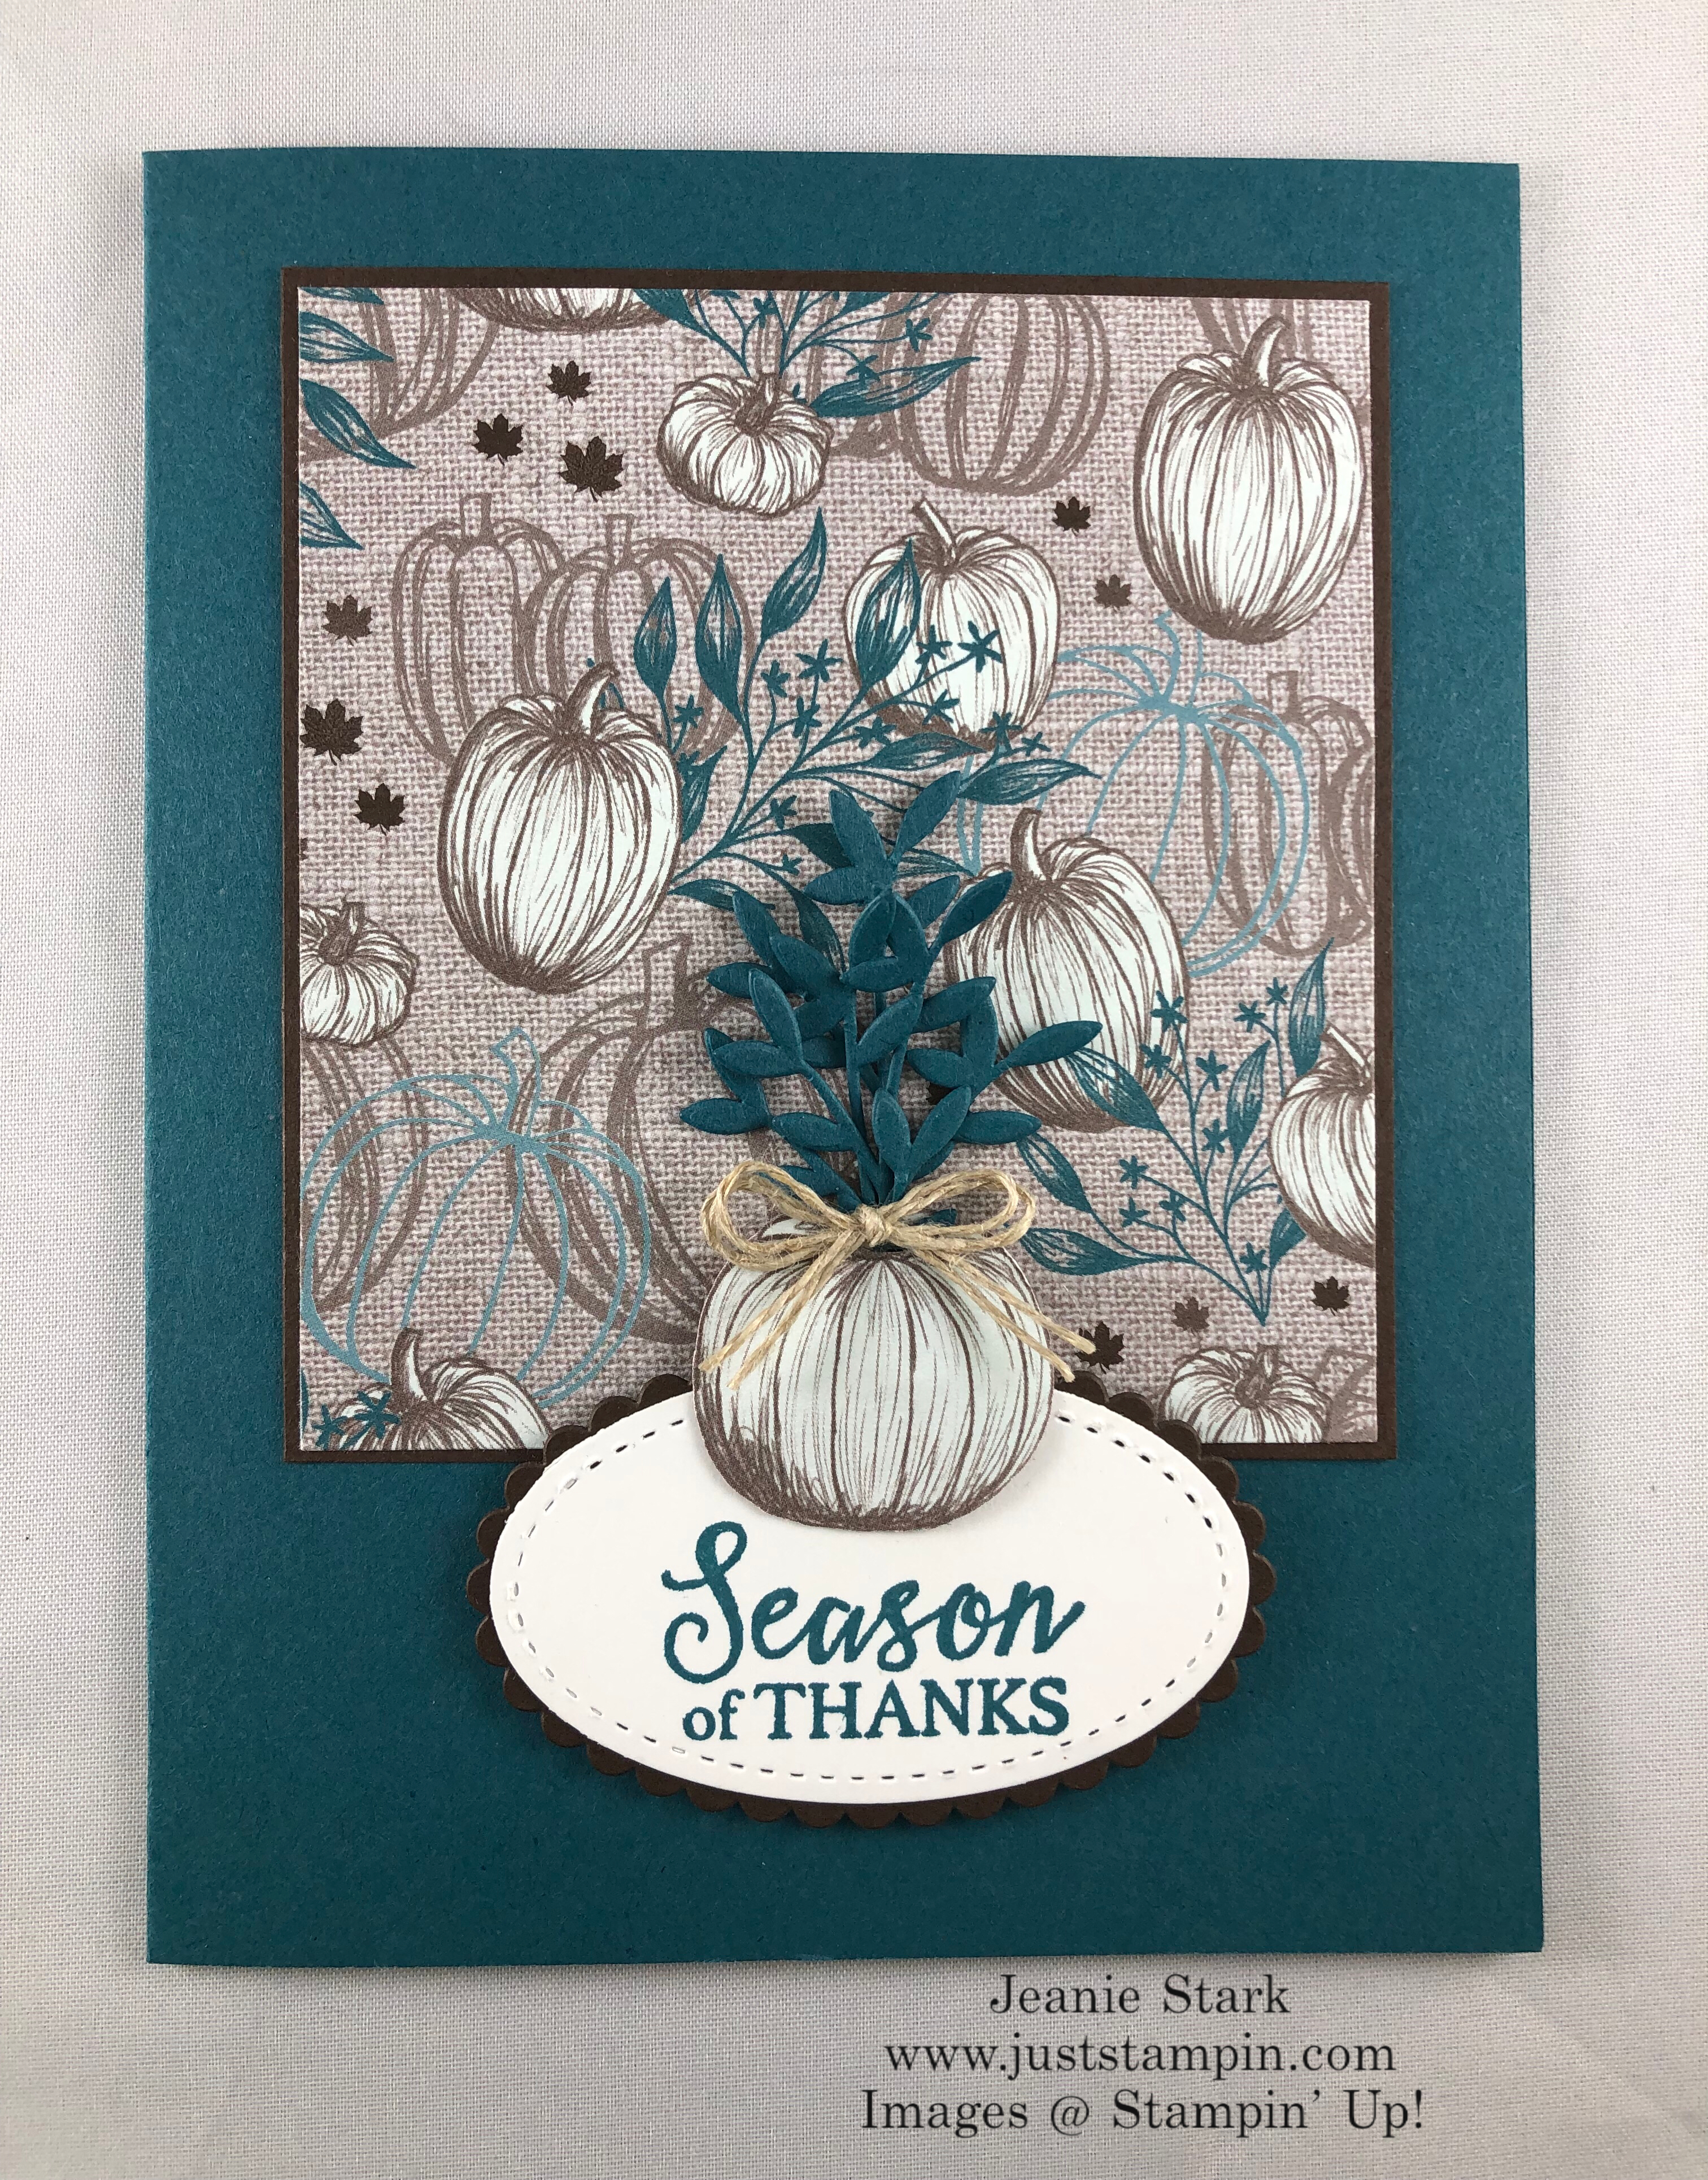
These are so versatile! I used both stamp sets and some of the dies to create today’s fun fold card.

Stampin' Up Gathered Leaves Dies and Tidings All Around Wreath for a fun fold fall birthday card idea - Jeanie Stark StampinUp

I have many fall birthdays coming up including my husband, daughter, brother, sister, and several friends. This card could be used for a masculine or feminine birthday. The leaves are from Gathered Leaves Dies. These dies (and coordinating stamp set) were featured in last month’s tutorials.  I have used them so much already and keep coming up with fun new ways. If you missed out on these tutorials last month you can still get them for FREE by ordering the Gather Together Bundle from my online store.  You’ll get 3 exclusive designs with step by step directions to start creating with your new stamps and dies right away! Plus there’s other ideas on my blog and more to come! There will be no reason to have those stamps sitting on a shelf! I try to buy stamp sets that are versatile so I can get the most use out of my purchases. The ones I feature in my monthly tutorials are among my favorites!

Here’s the details for today’s card:

Materials & Measurements

  • Mint Macaron card base:  5 1/2″ x 4 1/4″ , scraps to cut 2 leaves and 3 sticks
  • Pretty Peacock: 4 1/4 x 8 1/2, scored at 4 1/4  Scraps to cut leaf and 3 sprigs
  • Very Vanilla: 2 cut at 4″ x 4″ scrap to stamp sentiment banner
  • Come To Gather DSP: 2 1/4 x 6 for envelope flap, 3/4 x 4 for inside card
  • Grapefruit Grove: scraps to cut 2 leaves
  • Pretty Peacock Scalloped Linen Ribbon: 2 pieces cut ~3 1/2″
  • Crumb Cake twine: enough to make a bow

Directions

  • Fold and burnish Pretty Peacock cardstock. Center and adhere to the Mint Macaron card base.
  • Center and stamp wreath from Tidings All Around on Very Vanilla. Stamp first in Pretty Peacock then again in Mint Macaron off centered a little so images are not right on top of each other. Adhere to Pretty Peacock.
  • Cut and trim (at an angle) two 3 1/2″ pieces of Scalloped Linen Ribbon and adhere to the wreath with Glue Dots.
  • Stamp sentiment in Pretty Peacock on 1/2″ strip on Very Vanilla. Banner the ends and adhere with Stampin’ Dimensionals.
  • To get the two tone effect on the leaves, lay the dies on the stamp pad and tap lightly. Remove and cut with die cutting machine.  (These dies cut and emboss at the same time! Just another reason to love them!!!) *The Grapefruit Grove leaves were set in Cajun Craze Ink, Mint Macaron in Mint Macaron, and Pretty Peacock in Pretty Peacock.
  • Cut a few sprigs and twigs in Mint Macaron and Pretty Peacock.  Layer leaves and sprigs with Glue Dots and Stampin’ Dimensionals. Add a leaf trinket and a Crumb Cake bow (from Natures Twine) with Glue Dots. Stampin' Up Gathered Leaves Dies and Tidings All Around Wreath for a fun fold fall birthday card idea - Jeanie Stark StampinUp
  • Stamp inside sentiment.  I used the Stamparatus to first stamp the large bold sentiment in Pretty Peacock.  Then I lined up and stamped the words in Mint Macaron. (*The Stamparatus makes it so easy to make multiple cards and being able to switch and turn the plates makes it quick & easy without having to remove stamps from the blocks each time! I love mine!!) Stampin' Up Amazing Life fun fold masculine birthday card idea for fall - Jeanie Stark StampinUp
  • Add the thin strip of DSP to the bottom of the sentiment and adhere the long strip to the envelope flap for a coordinating look. Stampin' Up Gathered Leaves Dies and Tidings All Around Wreath fun fold fall birthday card idea for fall - Jeanie Stark StampinUp

I have made this wreath in many different colors and styles already! You can order your set by clicking on the product links below.

Check back tomorrow for the next project in my ABC Holiday 2019 Series. I’ll be featuring a different project with the Tidings All Around Bundle.  Can you guess what it is? I is for……???

Have a great day!

Just Stampin’

Jeanie

Order my Decorative Mask Technique Class Kit to Go! Click HERE for details and sample.

Are you celebrating your birthday this month?  I offer FREE shipping (and a birthday card) on any Stampin’ Up! product purchase of $50 or more placed through my online store during your birthday month (in addition to my monthly thank you gift!) Please use the current host code.

You can purchase any of the products I used to create today’s card from my online store.  Click HERE or on the images below to shop! For orders under $150 please use the host code.  October Host Code:  FG7M24JM

Orders of $40 or more receive EXCLUSIVE monthly tutorials (via email) featuring the Tidings All Around Bundle and the Seasonal Wreaths Stamp Set (Oct.)
Product List

Amazing Life Photopolymer Stamp Set

Amazing Life Photopolymer Stamp Set
[148750]
$21.00
Stamparatus

$49.00

Did you miss out on the Exclusive monthly tutorials in September featuring the Gather Together Bundle? Order the bundle from my online store and I’ll send you the tutorials for FREE! Click on the bundle above to order! Click HERE to see another card I made with this bundle.

The Purple Posy Ink is available to order to complete your 2019 In Colors! Click on the image below to order.

H is for Harvest Hellos

Welcome to my ABC Holiday 2019 Series! Throughout this series I will be sharing all kinds of cards, gifts, and ideas to help make your holidays as easy as ABC! Today I have two fun projects using the Harvest Hellos stamp set and coordinating Apple Builder Punch. As you will see, the punch can make more than just apples!

Stampin Up! Harvest Hellos Stamp Set and Apple Builder Punch gift and treat ideas - Jeanie Stark StampinUp

My daughter is coming home next week for her Fall Break (I am so excited!!) This is her last year at Georgia Tech and she has been so busy! She’s taking a graduate course and working on research. I am just so proud of her! She loves and misses her cats and I found this adorable cat pillow when I was out shopping one day. I was going to send it to her but it looked so cute in her bedroom I decided to keep it for a surprise for when she comes home. I had fun using the Apple Builder Punch to make this sweet coordinating treat.

Stampin' Up Harvest Hellos Bundle makes cute Kit Kat treat boxes using the Apple Builder Punch - Jeanie Stark StampinUp

My daughter loves Kit Kats and this little treat box is the “purrfect” size.

Here’s the details to make the box to hold a mini candy treat.

Materials & Measurements

  • Highland Heather cardstock: 2 x 9 1/2, scored at 1/2, 1 1/2, 2 1/2, 3, 6. 6 1/2.
  • Basic Black cardstock : scrap to punch Apple builder Punch and 2 “ears” using Ornament Punch

Assembly

  • Fold and Burnish score lines with a bone folder. Use the die from Merry Christmas (or other die/punch you may have) to cut opening for candy.
  • Add Tear & Tape Adhesive as shown. Insert candy bar, remove adhesive, and make sure box bottom and top are flat before adhering.

    Stamp the sentiment inside using the Harvest Hellos Stamp set and Memento Black Ink.

  • Wrap the ribbon around and tie and bow in front to allow the cover to slide under to close.
  • Punch a scrap piece of black cardstock with the Apple Builder Punch and trim off the top.
  • Punch 2 ears using the Ornament Punch and a 3/4″ strip of cardstock. Color with the White Watercolor Pencil and adhere with Tear & Tape on the back. *Do not remove the adhesive back.
  • Add 3 strips of Silver Metallic Thread with a Glue Dot for whiskers. Cover in the middle with a nose cut from a scrap of Blushing Bride cardstock. Use Watercolor Pencil to draw mouth. Adhere with Stampin’ Dimensionals.

Stampin Up Harvest Hellos and Apple Builder Punch candy bar treat holder idea - Jeanie Stark StampinUp

I love to make little hostess gifts and I found the best smelling scented sachet for Fall ( I believe I got it at Cracker Barrel). I have been enjoying the aromas of ginger, nutmeg, and cinnamon. I should have bought more because this is going to be hard to part with! The package coordinates so well with the Come to Gather Designer Series Paper.

Stampin Up Come To Gather Designer Series Paper - visit juststampin.comm to see how to make great packaging ideas for gifts and more using the Envelope Punch Board - Jeanie Stark StampinUp

I don’t usually show you projects I’ve make with products that are retired (because I know how frustrating it can be to want to make something and can’t get what you need); however, one of my favorite retired tools is in the Clearance Rack and on sale! I thought the Envelope Punch Board was the best $20 I ever spent when I bought it (about 7 years ago).  You can SAVE 40% (on Clearance)! Price$20.00 $12.00  What a deal!!!!  It’s only available while supplies last so if you don’t already own one, BUY IT NOW! It is so easy to make all kinds of fun projects! The directions and measurements you need are right on the board so you don’t have to worry about losing them! I used the Envelope Punch Board to make this quick & easy packaging for this scented sachet. My package measured 4 1/2 x 6 1/2. I checked the measurements on the EPB and I needed a piece of 8 3/4 x 8 3/4 cardstock.  Well, that was a problem because our cardstock measures 8 1/2 x 11 (and I didn’t have a pack of the 12 x 12 for the color I needed) so I did what anyone would do…improvise.  I simply folded down the top of my package 1/2″ so now it would work with a 8 1/2 x 8 1/2 piece of cardstock. That I could work with! I followed the directions on the EPB and punched and scored my cardstock. It’s so quick & easy! The tool you need is built right in and it even has a corner rounder built in! (Trust me, you will love this tool!!!)  I placed the package in the middle and folded it on the score lines to close it up like an envelope.  I made a belly band using a piece of 3 x 12 DSP and just wrapped it around the and secured it on the back with adhesive. I adhered a piece of Crumb Cake cardstock to give it a border across the top and bottom on the front only. The best part was making the 3D pumpkin with the Harvest Hellos Stamp Set and Apple Builder Punch.  This set is available as a bundle for a 10% savings!

I stamped 3 pumpkins in Cajun Craze Ink on the same color cardstock and punched them out. I folded each in half and adhered together by just adhering one half to the next.  I stamped the stem with Soft Suede ink on the same color cardstock and punched it out then secured it to the back of the pumpkins with a glue dot. The leaves are stamped in Mossy Meadow on Mossy Meadow and fussy cut out. You could use the other leaf that goes with the punch but it is definitely an apple leaf and I wanted mine to go with the pumpkin. I adhered one behind the pumpkin and one in front with glue dots. Next, I cut a Crumb Cake Circle with the Layering Circles Dies and adhered the pumpkin. I looped a piece of Crumb Cake Ribbon from the Come To Gather Ribbon Combo Pack and secured to the back of the tag with glue dots Then popped it up on the belly band with Stampin’ Dimensionals. 

Stampin Up Come To Gather Designer Series Paper, Harvest Hellos Stamp Set and Apple Builder Punch make this 3D pumpkin tag and gift packaging with the Envelope Punch Board - Jeanie Stark StampinUp

Stampin Up Come To Gather Designer Series Paper, Harvest Hellos Stamp Set and Apple Builder Punch make this 3D pumpkin tag and gift packaging with the Envelope Punch Board - Jeanie Stark StampinUp

I love how it turned out! Here’s peek how it looks when you remove the belly band and  open it. You can stamp and/or write a message inside. Just add a piece of cardstock under the package.

Stampin Up Come To Gather Designer Series Paper, Harvest Hellos Stamp Set and Apple Builder Punch make this 3D pumpkin tag and gift packaging with the Envelope Punch Board - Jeanie Stark StampinUp

Check out more project ideas I’ve created using the envelope punch board HERE.

See my previous post with more ideas using the Apple Builder Punch HERE.

I got together with some friends this weekend and we made pumpkins.  We used many different fabrics, socks, hats, (basically anything we could find). We grabbed sticks out of the backyard for stems and burnt our fingers with the glue gun!  It was tons of fun with lots of laughs!  Here’s some photos.

img_0071-1

img_0073

img_0076img_0083

Here’s one I made to go in my kitchen. I have leftover fabric from curtains all over my house  (I knew I was saving it for a reason! LOL). I can’t wait to make more!

fabric pumpkin making

Have a great week!

Just Stampin’

Jeanie

Order my Decorative Mask Technique Class Kit to Go! Click HERE for details and sample.

You can purchase any of the products I used to create today’s projects from my online store.  Click HERE or on the images below to shop!  September Host Code:  NDE26TXR

Orders of $40 or more receive EXCLUSIVE monthly tutorials (via email) featuring the Stamp of the Month, Gather Together (Sept.). Click HERE for more details.

Product List

Envelope Punch Board

Envelope Punch Board
[133774]
$20.00

Paper Snips

$10.00

If you’ve been waiting for the Purple Posy Ink to complete your 2019 In Colors I have great news….It is now available to order!

 Today is the last day to take advantage of the DSP Sale…BUY 3, GET 1 FREE!

DSP Sale BUY 3, Get 1 FREE

Here’s the list of the select papers included in the sale! (Click on any image to view in my online store.)

Click HERE to print FREE Designer Series Paper Color Coordinating Chart

Click HERE to shop Clearance Rack.  New updates up to 60% off!

NEW Holiday Catalog & Stamp of the Month Tutorials!

Today’s the day!!!  The holiday catalog is live!!! Woo Hoo!  Or should I say Ho! Ho! Ho! Doesn’t that fun video get you in the holiday spirit?! You can view the Holiday Catalog online by clicking on the catalog image or from the drop down menu under catalogs.  If you aren’t currently working with another demonstrator and would like a hard copy of the catalog I would love to send you one. It’s filled with awesome new products, fun ideas and some cool tips.

20190904_hol19_en-us

I have so many ideas to share with you this holiday season! And for those of you that love my ABC Series, I have good news…..I will be starting a new alphabet series this week, ABC Holiday 2019.  I’ll be sharing ideas to make your holiday season fun and easy from A to Z!

I am also offering something new this holiday season, Stamp of The Month tutorials each month (September – December).  When you purchase through me you will receive a handmade card (using the featured stamp set) and a card kit to make one on your own. (Pretty much like I have done in the past without the “official” stamp of the month.)  In addition, for any online order of $40 or more you will receive 3 exclusive tutorials using the Stamp of the Month. The tutorials will be sent to you via email after you place your online order. The 3 cards in the tutorials will not be shown on my blog.  Here’s a look at  this month’s featured stamp set, Gather Together.

Stampin' Up! Gather Together Stamp Set - For inspiration and ordering information visit juststampin.com - Jeanie Stark StampinUp


Gather Together is a beautiful and versatile fall stamp set.  Great for thank you cards, get well, Thanksgiving, or just letting a friend or family member know you are thinking of them. Here’s a card I made using the stamp set.

Stampin' Up! Gather Together Clean & Simple Thanksgiving or Thank You card idea - Jeanie Stark StampinUp

I love the nontraditional colors in some of the prints from the Come To Gather Designer Series Paper. Check out all the prints in this 30 second video.

Inspiration for my card came from my friend Paula. She always does a beautiful job arranging flowers. For Fall, she carves out a pumpkin to use as a base for her arrangement.  I love the new In Color, Pretty Peacock, and white pumpkins are my favorite so this paper just makes me smile! I cut one of the pumpkins out of the DSP and popped it up with a Stampin’ Dimensional.  I used a die from Animal Friends to cut the leaves for my pumpkin arrangement and adhered them with glue dots. I finished it off with a bow made from Linen Thread and coordinated my envelope with the same DSP.

Stampin' Up! Gather Together Clean & Simple Thanksgiving or Thank You card idea - Jeanie Stark StampinUp

Stampin' Up! Gather Together Clean & Simple Thanksgiving or Thank You card idea - Jeanie Stark StampinUp

Here’s the card details.

  • Pretty Peacock cardstock – 5 1/2 x 8 1/2, scored at 4 1/4, scraps to cut leafy die. 1/4 x 6 strip for envelope
  • Come To Gather DSP – 3 1/4 x 3 1/2, 2 x 6 to decorate envelope flap, 7/8 x 4 for inside card, scrap to fussy cut pumpkin
  • Early Espresso cardstock – 3 3/8 x 3 5/8, 2 x 3 to cut Scallop Oval Die, 4 in. strip for inside card
  • Whisper White cardstock – 2 x 3 to cut Stitched Oval Die, 4 x 5 1/4 for inside card

Stampin' Up! Gather Together Clean & Simple Thanksgiving or Thank You card idea - Jeanie Stark StampinUp

This stamp set has coordinating dies. You can purchase the stamp set and dies as a bundle and save 10%!  What are you waiting for???  Click HERE to shop!  Not only will you receive a card from me (in appreciation for your order), you’ll also get a card kit to make one on your own. And if your order is $40 or more, you will qualify for the 3 exclusive tutorials!!! Let’s get this holiday season started!!!

I hope you’re planning to participate in my card swap.  Read all about it HERE.

Don’t forget today starts the DSP Special, Buy 3, Get 1 FREE! (See below)
Be sure to check back tomorrow for some “Holiday” fun (and blog candy)!

Have a great day!!! Do something creative!

Just Stampin’

Jeanie

Host Code Exclusive Offer! All orders placed through my online store are eligible for my FREE monthly gifts (card kits and more!). Please use the current host code.  *If your order is $150 or more, do not use this code as You become the hostess and get the Rewards! (Orders of $40 or more receive EXCLUSIVE monthly tutorials via email!)

Click HERE to shop. 
September Host Code:  NDE26TXR

Product List

Paper Pumpkin September 2019

Halloween is nearly here! Paper Pumpkin has been busy and thought you might like “a hand” with your frightful festivities, so they designed September’s kit, Bone Appétit, with you in mind.

This kit includes 20 food-safe treat boxes, a unique and exclusive Halloween stamp set, and a spooky, special-edition box. September’s kit also gives new meaning to the word “handmade.”

Click HERE to subscribe by September 10 to get in on the fun.

Starting today, September 4th!  Designer Series Paper SALE….BUY 3, Get 1 FREE!

DSP Sale 2019

Here’s the list of the select papers included in the sale! 2019 Designer Series Paper Sale

Click HERE to view and print the_DSP_FLYER