Did you play along with my Mystery Monday Stampin’? If you followed the clues you would have created a Double Front Flap Fun Fold Card similar to these.
Mystery Solved!
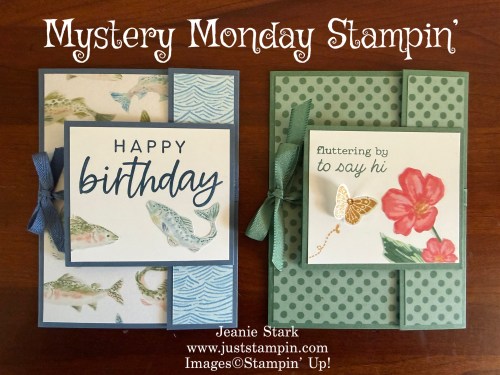
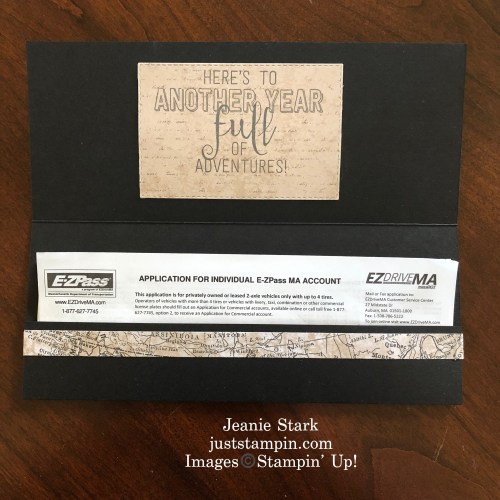
The Double Front Flap Fun Fold Card (try saying that fast 3 times!!! LOL) is two cards in one…a smaller card on front and a full card inside. Let’s take a closer look at each of today’s cards.
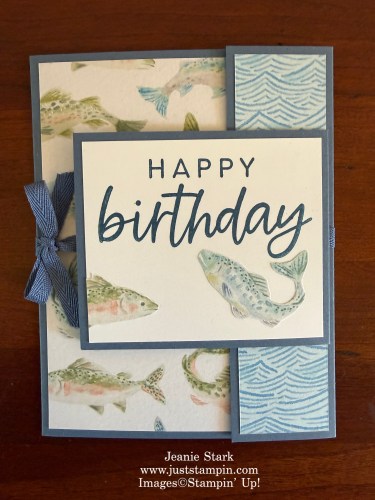
My first card features the Waterside Retreat Designer Series Paper.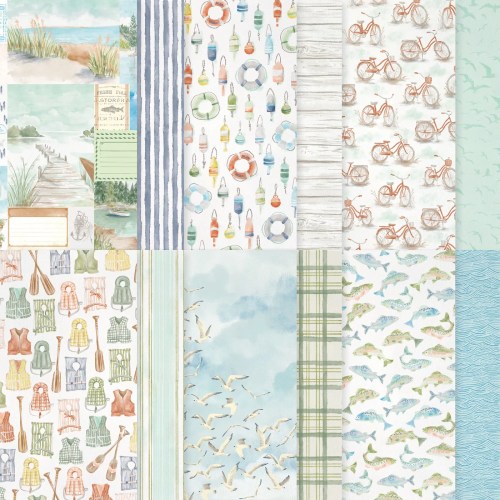
From life vests and oars to buoys and bicycles, each sheet of this beautifully designed paper captures a beloved element of lake life. The two cut-apart sheets offer the perfect opportunity to add scenic touches to your handmade cards, scrapbook pages, and more! This paper makes great masculine cards. It was easy to fussy cut the fish and water (on the inside of the card) from the DSP. Here’s what you see when you first open the mini card on front.
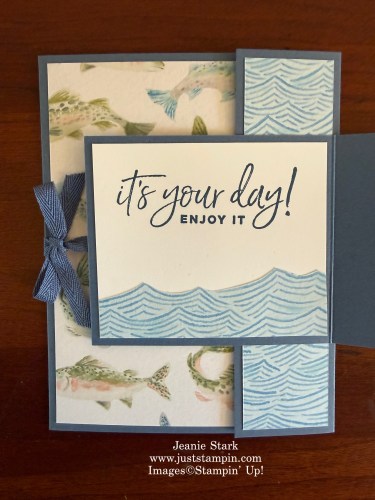
Then you untie the bow to reveal the rest of the card.
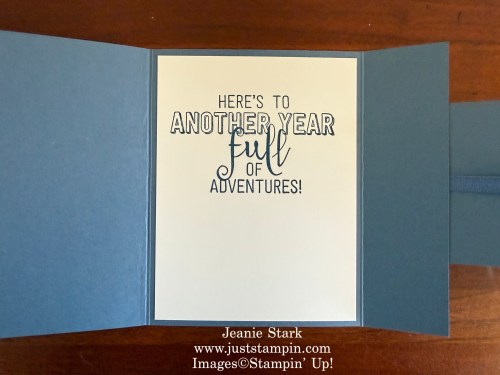
You can easily add another piece of 4 x 5 1/4 white cardstock on the left side if you wish to add a personal note. I really like this fun fold! The best part….it’s really easy and uses just 1 sheet of cardstock for the fun fold and mini card!!!
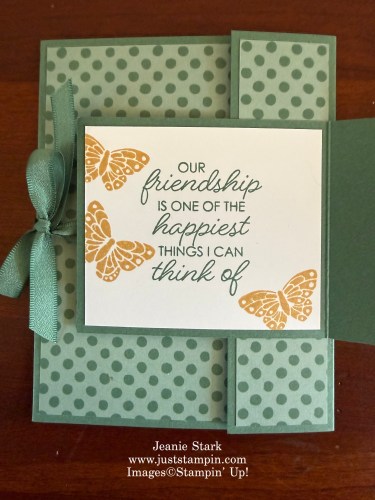
My first card featured two different patterns of DSP on the front. For my second card, I used just one pattern.
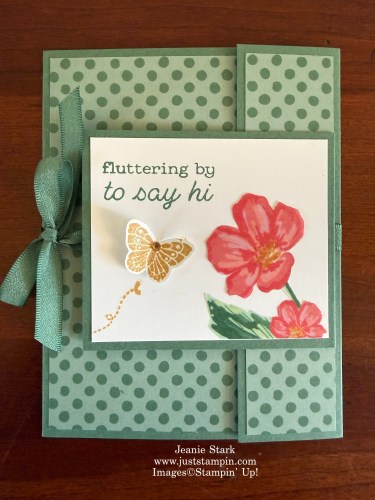
I love polka dots!!! The Painted Patterns Designer Series Paper come in all the different color families. WOO HOO!!!! It features stripes and two different polka dot patterns. The All Aflutter Punch Bundle makes it quick & easy to add butterflies for any occasion. 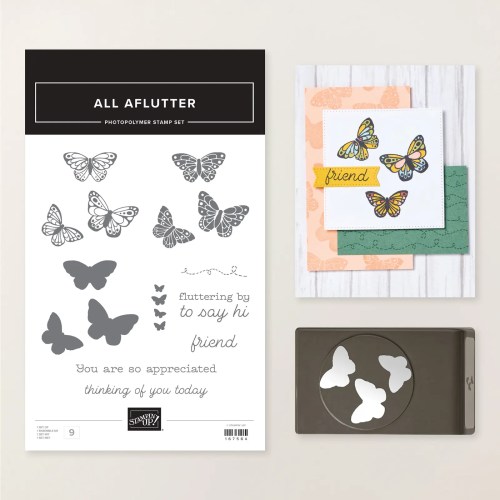
Meet your new favorite stamp and punch duo—the All Aflutter Bundle! From sweet, delicate butterflies to bold beauties, this bundle makes layering fun and easy. Plus, the punch cuts shapes that stand out beautifully on your projects, giving your cards and crafts a fresh pop.
I added a sentiment from the Framed All Around Stamp Set on the inside of the mini card.
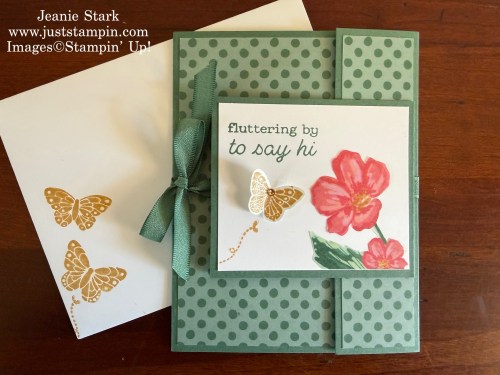
I added more butterflies, another sentiment from All Aflutter, and the Berry Botanical Vellum (from May Product of the Month) on the inside.

There’s still plenty of room to add a personal message. Lastly, I stamped my envelope to coordinate.
What do you think of this fun fold? Are you ready to give it a try? Click on the link below and follow the clues. Use what you have and create this Double Front Flap fun fold card. Then take a photo of your card and send an attachment to my email (j.stark@goeaston.net). I’ll share your works of art on my Sunday Showcase!
*Everyone who shares their card with me receives a Free PDF!!!!
Feel free to contact me if you have any questions.
Click HERE for the Mystery Monday Clues
Have a great day! Thanks for stopping by!
Just Stampin’
Jeanie
You can view/shop the products I used below by clicking on the image!
Product List
|
|
|
|
|
|
||
|
|
|
|
|
|
||
|
|
|
|
![All Aflutter Bundle (English) [ 167570 ]](https://assets1.tamsnetwork.com/images/EC042017NF/167570s.jpg "All Aflutter Bundle (English) [ 167570 ]")
![All Aflutter Photopolymer Stamp Set (English) [ 167564 ]](https://assets1.tamsnetwork.com/images/EC042017NF/167564s.jpg "All Aflutter Photopolymer Stamp Set (English) [ 167564 ]")
![All Aflutter Punch [ 167569 ]](https://assets1.tamsnetwork.com/images/EC042017NF/167569s.jpg "All Aflutter Punch [ 167569 ]")
![2026–2028 In Color™ Painted Patterns 12" X 12" (30.5 X 30.5 Cm) Designer Series Paper [ 167755 ]](https://assets1.tamsnetwork.com/images/EC042017NF/167755s.jpg "2026–2028 In Color™ Painted Patterns 12\" X 12\" (30.5 X 30.5 Cm) Designer Series Paper [ 167755 ]")
![Waterside Retreat 12" X 12" (30.5 X 30.5 Cm) Designer Series Paper [ 167920 ]](https://assets1.tamsnetwork.com/images/EC042017NF/167920s.jpg "Waterside Retreat 12\" X 12\" (30.5 X 30.5 Cm) Designer Series Paper [ 167920 ]")
![Berry Botanical Vellum 12" X 12" (30.5 X 30.5 Cm) Specialty Designer Series Paper [ 167985 ]](https://assets1.tamsnetwork.com/images/EC042017NF/167985s.jpg "Berry Botanical Vellum 12\" X 12\" (30.5 X 30.5 Cm) Specialty Designer Series Paper [ 167985 ]")
![Misty Moonlight 8-1/2" X 11" Cardstock [ 153081 ]](https://assets1.tamsnetwork.com/images/EC042017NF/153081s.jpg "Misty Moonlight 8-1/2\" X 11\" Cardstock [ 153081 ]")
![Peaceful Pine 8 1/2" X 11" Cardstock [ 167691 ]](https://assets1.tamsnetwork.com/images/EC042017NF/167691s.jpg "Peaceful Pine 8 1/2\" X 11\" Cardstock [ 167691 ]")
![Basic White 8 1/2" X 11" Cardstock [ 166780 ]](https://assets1.tamsnetwork.com/images/EC042017NF/166780s.jpg "Basic White 8 1/2\" X 11\" Cardstock [ 166780 ]")
![Misty Moonlight Classic Stampin' Pad [ 153118 ]](https://assets1.tamsnetwork.com/images/EC042017NF/153118s.jpg "Misty Moonlight Classic Stampin' Pad [ 153118 ]")
![Peaceful Pine Classic Stampin Pad [ 167679 ]](https://assets1.tamsnetwork.com/images/EC042017NF/167679s.jpg "Peaceful Pine Classic Stampin Pad [ 167679 ]")
![Golden Glow Classic Stampin' Pad [ 167676 ]](https://assets1.tamsnetwork.com/images/EC042017NF/167676s.jpg "Golden Glow Classic Stampin' Pad [ 167676 ]")
![Peaceful Pine 3/8" (1 Cm) Bordered Ribbon [ 167551 ]](https://assets1.tamsnetwork.com/images/EC042017NF/167551s.jpg "Peaceful Pine 3/8\" (1 Cm) Bordered Ribbon [ 167551 ]")
![Misty Moonlight & White 1/4" (6.4 Mm) Starter Ribbon Pack [ 165276 ]](https://assets1.tamsnetwork.com/images/EC042017NF/165276s.jpg "Misty Moonlight & White 1/4\" (6.4 Mm) Starter Ribbon Pack [ 165276 ]")
![Basic White Medium Envelopes [ 159236 ]](https://assets1.tamsnetwork.com/images/EC042017NF/159236s.jpg "Basic White Medium Envelopes [ 159236 ]")
![Stampin' Seal [ 152813 ]](https://assets1.tamsnetwork.com/images/EC042017NF/152813s.jpg "Stampin' Seal [ 152813 ]")
![Mini Glue Dots [ 103683 ]](https://assets1.tamsnetwork.com/images/EC042017NF/103683s.jpg "Mini Glue Dots [ 103683 ]")
![Paper Trimmer [ 152392 ]](https://assets1.tamsnetwork.com/images/EC042017NF/152392s.jpg "Paper Trimmer [ 152392 ]")
CLICK HERE TO SHOP STAMPIN’ UP!
CLICK HERE TO SHOP NEW ONLINE EXCLUSIVES
CLICK HERE FOR PRODUCT OF THE MONTH
Click HERE TO SHOP KITS COLLECTION New Kits Added!
CLICK HERE to SHOP LAST CHANCE PRODUCTS *UPDATED June 2nd!

My Just Stampin’ Rewards:
I appreciate each and every order! Here are the things you can expect when you place an online order with me:
- Shop and earn 10% back in Stampin’ Rewards on orders of $20 or more. Use them on your next order or save them up to 1 year for something special!
- All orders will receive a handmade thank you card from me.
(*You can choose to remove the sticky note inside and reuse the card.) - With a $50 order you will receive the Fun Fold PDF’s from my Mystery Stampin’ cards. *You will receive that month’s PDF’s on the first of the following month.
- With an order of $75 (or more) I will send you the PDF’s and thank you card as well as a card kit or Stampin’ Up Product of my choosing – this varies monthly.
- Orders of $75 (or more) qualify for the Product of the Month! For just $5 you can add-on the New June Product of the Month or any of the previous Products of the Month. AWSL


")
")