D is for Deck the Halls with Designer Series Paper

Welcome to my ABC Holiday 2019 Series! Throughout this series I will be sharing all kinds of cards, gifts, and ideas to help make your holidays as easy as ABC!  Today I am sharing a quick & easy card design that showcases both sides of the Designer Series Paper (aka DSP). The Brightly Gleaming Specialty Designer Series Paper is one of my favorites in the holiday catalog. One of the many things I love about Stampin’ Up! is their color coordination! It makes it quick & easy to choose the right colors for any project! Every pack of DSP has the coordinating colors on the package as well as in the catalog. (No thinking necessary! LOL) Here’s a look at the Brightly Gleaming Specialty Designer Series Paper and the coordinating cardstock (Mossy Meadow, Very Vanilla, Night of Navy, Pretty Peacock, and Copper Foil). Stampin' Up! Brightly Gleaming Specialty Designer Series Paper - For inspiration and ordering information visit juststampin.com - Jeanie Stark StampinUp

Here’s my first two Christmas cards for this year.

Stampin' Up! Christmas Gleaming Stamp Set and Brightly Gleaming Specialty Designer Series quick & easy Christmas card idea - Jeanie Stark StampinUp

The Copper Foil accents did not photograph well but I can assure you, they make the card pop!

Stampin' Up! Christmas Gleaming Stamp Set and Brightly Gleaming Specialty Designer Series quick & easy Christmas card idea - Jeanie Stark StampinUpStampin' Up! Christmas Gleaming Stamp Set and Brightly Gleaming Specialty Designer Series quick & easy Christmas card idea - Jeanie Stark StampinUp

I love how you see the other side of the DSP when you open the card. *You can make horizontal or vertical cards using this design.

Here’s the details to make this fun card design showcasing both sides of the DSP.
Materials & Measurements

Stampin' Up! Brightly Gleaming Specialty DSP - Learn how to cut your DSP for card designs - Jeanie Stark StampinUp

  • Mossy Meadow card base: 5 1/2″ x 5 1/4″, scored at 4 1/4
  • Brightly Gleaming DSP: 6″ x 6″ cut to 2″ x 6″ for envelope, 4″x 5 1/2″, 4″ x 1/2″
  • Very Vanilla card stock:  3 1/2″ x 6″ to stamp and 5 1/4″ X 4 for the inside
  • Copper Foil to punch Pretty Label Punch

Assembly

Stampin' Up! Christmas Gleaming Stamp Set and Brightly Gleaming Specialty Designer Series quick & easy Christmas card idea - Jeanie Stark StampinUp

  • Layer the Brightly Gleaming DSP on top of the card base so it is flush with the right side. Add adhesive as shown on the edge of the card base and DSP. (I used Tear & Tape; however, you can use Snail adhesive if you prefer.) Close card to adhere.
  •  Wrap ribbon around the cardstock and tie a simple knot.
  • Stamp the sentiment (with VersaMark) from Christmtas Gleaming and heat emboss with Copper Embossing Powder.  Cut with Layering Circles Dies or Circle Punch.
  • Punch out a Pretty Label in Copper Foil and adhere to the card. Attach the circle sentiment with Stampin’ Dimensionals.
  • Stamp the holly in Memento Black Ink onto Very Vanilla Cardstock and color in with Stampin’ Blends (Old Olive and Real Red). Fussy cut it out and attach to the card with Stampin’ Dimensionals.

Stampin' Up! Christmas Gleaming Stamp Set and Brightly Gleaming Specialty Designer Series quick & easy Christmas card idea - Jeanie Stark StampinUp

  • Stamp inside sentiment on Very Vanilla Cardstock with Old Olive Ink and adhere to card. Add leftover strip of DSP on the side.
  • Stamp holly on the front of the envelope and color as above. (*Insert a scrap piece of paper inside the envelope when coloring in case the Blends bleed through.)
  • Adhere 1/4 strip of Mossy Meadow Cardstock and 2 x 6 DSP to the envelope flap.

Stampin' Up! Christmas Gleaming Stamp Set and Brightly Gleaming Specialty Designer Series quick & easy Christmas card idea - Jeanie Stark StampinUp

Here’s my second card using the same design only vertical.

Stampin' Up! Christmas Gleaming Stamp Set and Brightly Gleaming Specialty Designer Series quick & easy Christmas card idea - Jeanie Stark StampinUp

Do you prefer horizontal or vertical cards? Go grab some DSP and give this design a try!

Only 10 days left to take advantage of the DSP Sale, BUY 3, GET 1 FREE!

DSP Sale BUY 3, Get 1 FREE

Click HERE to view and print the DSP FLYER

Click HERE to print FREE Designer Series Paper Color Coordinating Chart

For more quick & easy card designs using DSP, Click HERE.

Have a great day!

Just Stampin’

Jeanie

Host Code Exclusive Offer! All orders placed through my online store are eligible for my FREE monthly gifts (card kits and more!). Please use the current host code.  *If your order is $150 or more, do not use this code as You become the hostess and get the Rewards!  Click HERE to shop.  September Host Code:  NDE26TXR

Click HERE to shop Clearance Rack.  New updates up to 60% off!

Orders of $40 or more receive EXCLUSIVE monthly tutorials (via email) featuring the Stamp of the Month, Gather Together (Sept.). Click HERE for more details.

Order my “Just Stampin’ Card Kit and 3D Project Buffet To Go”. Click HERE for more information and all the details. Last chance to get in on the September kit!

Product List (Click on image to shop my online store.)  

C is for Coffin Treat Box

Welcome to my ABC Holiday 2019 Series! Throughout this series I will be sharing all kinds of cards, gifts, and ideas to help make your holidays as easy as ABC! What better Halloween gift box than a coffin box? The Coffin Treat Boxes are just right for Halloween treat giving.

Stampin' Up! Coffin Treat Boxes and Wonderfully Wicked Stamp Set and Dies Halloween treat ideas - Jeanie Stark StampinUp

You get 12 coffin boxes and lids for $7. And they’re food safe! Perfect for your favorite trick-or treaters! These are quick & easy to put together with just a few Glue Dots or liquid adhesive. I love the way the sample project (on page 53 in the Holiday Catalog) embossed the lid with the Stylish Scroll Embossing Folder so I tried it on one of mine! So cool!

Stampin' Up! Coffin Treat Boxes and Word Wishes Dies Halloween treat idea - Jeanie Stark StampinUp

These can be filled with just about anything from small gifts (jewelry, make up, perfume, nail polish, essential oils), gift certificates, practical needs (travel toothpaste, soap, floss, chapstick, etc.) to candy for your favorite college student, friend, family member, Stampin’ Up! Demonstrator (LOL), or trick-or-treat visitors! You can even line the inside with the Real Red Ruched Ribbon and/or stamp a sentiment on the bottom for the recipient to find under all the treats.

Stampin' Up! Coffin Treat Boxes and Word Wishes Dies Halloween treat ideas - Jeanie Stark StampinUp

I thought bones & skulls were the perfect candy treats to go inside a coffin. LOL  My daughter loves Kit Kits so these Halloween ones with skeleton wrappers were just what I was looking for! I found other fun treats for my son.

Stampin' Up! Coffin Treat Boxes and Wonderfully Wicked Stamp Set and Dies Halloween treat ideas - Jeanie Stark StampinUp

The ribbon slides off like a belly band to open it. I might even hide a little money in the bottom of these for a fun surprise!

Stampin' Up! Coffin Treat Boxes and Wonderfully Wicked Stamp Set and Dies Halloween treat ideas - Jeanie Stark StampinUp

I love these little boxes and had so much fun making them! I stamped the one above using the web from the Wonderfully Wicked stamp set with Versamark Ink then heat embossed it with White Embossing Powder. I used the coordinating die to cut the little spider and popped him up with the new mini black Stampin’ Dimensionals. The sentiment is from the same stamp set and cut with a die from the Merry Christmas Dies and tied to the ribbon with some black & white twine. The little bats are from the Every Season Punch Pack which has a set of 4 mini punches.

I used the Word Wishes Dies to cut the Happy Halloween in purple (my daughter’s favorite color). I cut the spider in Smokey Slate and dangled him from the words with some silver thread.  I added the googly eyes for a spooky fun touch!

Stampin' Up! Coffin Treat Boxes and Word Wishes Dies Halloween treat idea - Jeanie Stark StampinUp

I can’t wait to make more! What would you put in these treat boxes? If you’d like to make one of these just sign up for my “Just Stampin’ Card Kit and 3D Project Buffet TO GO”!  One of these treat boxes will be included in my kit this month! Click HERE for more information and all the details how to order!

Have a great day!

Just Stampin’

Jeanie

Host Code Exclusive Offer! All orders placed through my online store are eligible for my FREE monthly gifts (card kits and more!). Please use the current host code.  *If your order is $150 or more, do not use this code as You become the hostess and get the Rewards!  September Host Code:  NDE26TXR

Orders of $40 or more receive EXCLUSIVE monthly tutorials (via email) featuring the Stamp of the Month, Gather Together (Sept.). Click HERE for more details.

New Items added to the Clearance Rack! Click HERE to shop.

Order my “Just Stampin’ Card Kit and 3D Project Buffet To Go”. Click HERE for more information and all the details. There’s just a few spots left to get in on the September kit!

Product List (Click on image to shop my online store.)

Wicked Dies

$15.00


September Special on Select Designer Series Paper! BUY 3, GET 1 FREE!

DSP Sale BUY 3, Get 1 FREE

Here’s the list of the select papers included in the sale! (Click on any image to view in my online store.)

Paper Pumpkin October 2019

Paper Pumpkin has just what you need this holiday season: In October and November, we are offering two back-to-back coordinating kits, one with 10 Christmas cards, the other with 24 Christmas tags. And the projects are easy and fun.  These kits make it easy for you to add a handmade, personal touch to your holiday giving—without a lot of fuss. It’s Christmas made easy with Paper Pumpkin! Click HERE to subscribe.

October Kit *Subscribe by October 10th

Kit details: Makes 10 cards and envelopes

Card size: 4 1/4″ x 5-1/2″ (10.8 x 14 cm)

Envelope size: 4-1/2″ x 5-3/4″ (11.4 x 14.6 cm)

Coordinating colors: Early Espresso, Pool Party, Poppy Parade, and Shaded Spruce


November Kit *Subscribe by November 10th

Kit details: Makes 24 holiday-themed gift tags of 4 various sizes and designs.

Coordinating colors: Early Espresso, Pool Party, Poppy Parade, and Shaded Spruce


The October and November kits coordinate; however, each kit is all-inclusive and can stand alone.

A is for Apple Builder Punch

Welcome to my ABC Holiday 2019 Series! Throughout this series I will be sharing all kinds of cards, gifts, and ideas to help make your holidays (or back to school) as easy as ABC! Today’s projects use the Apple Builder Punch found on page 49 in the Holiday Catalog.  September is back to school month and this post it note holder would make a great little gift for a teacher, student, coworker, or yourself. I know I’d be lost without my sticky notes!  This little holder makes it easy to carry in a purse or stand out on a desk!

Stampin' Up! Harvest Hellos and Apple Builder Punch Post It Note Holder - Jeanie Stark StampinUp

This project is as easy as ABC! Here’s the details…

Measurements:

  • Cardstock: 3 1/8 x 8 1/4, scored on long side at 3 1/8, 3 3/8, 6 ½, 6 ¾
  • DSP: 3 x 3

Directions:

  1. Fold and burnish score lines using a bone folder.
  2. Adhere sticky note pad inside using strong adhesive.
  3. Adhere gingham DSP to front panel.
  4. Stamp apple and leaf using Harvest Hellos stamp set.  Punch using Apple Builder Punch.
  5. Use glue dot to adhere leaf and stem to apple. Adhere to DSP with Stampin’ Dimensionals.
  6. Wrap Braided Linen Trim around inside flap and tie a bow. *I attached a glue dot behind the inside flap to hold the trim. Slide cover under ribbon to close.

I love to make little gifts and 3D projects. Each month I include a 3D project in my “Just Stampin’ Card Kit and 3D Project Buffet To Go”.  This post it note holder was the 3D project included in my kit last month. Would you like to receive my kit in the mail? My “Kit Buffet TO GO!” is intended to make it easy for you to be able to see and try out different products while being able to substitute different stamps you already have. You don’t have to worry about having coordinating designer series paper to go with the cardstock, the right color ribbon to match, or other embellishments…everything is in the kit!  You just need to stamp and adhere. There’s just a few spots left to get in on the September kit! (Click HERE for more information and all the details.)

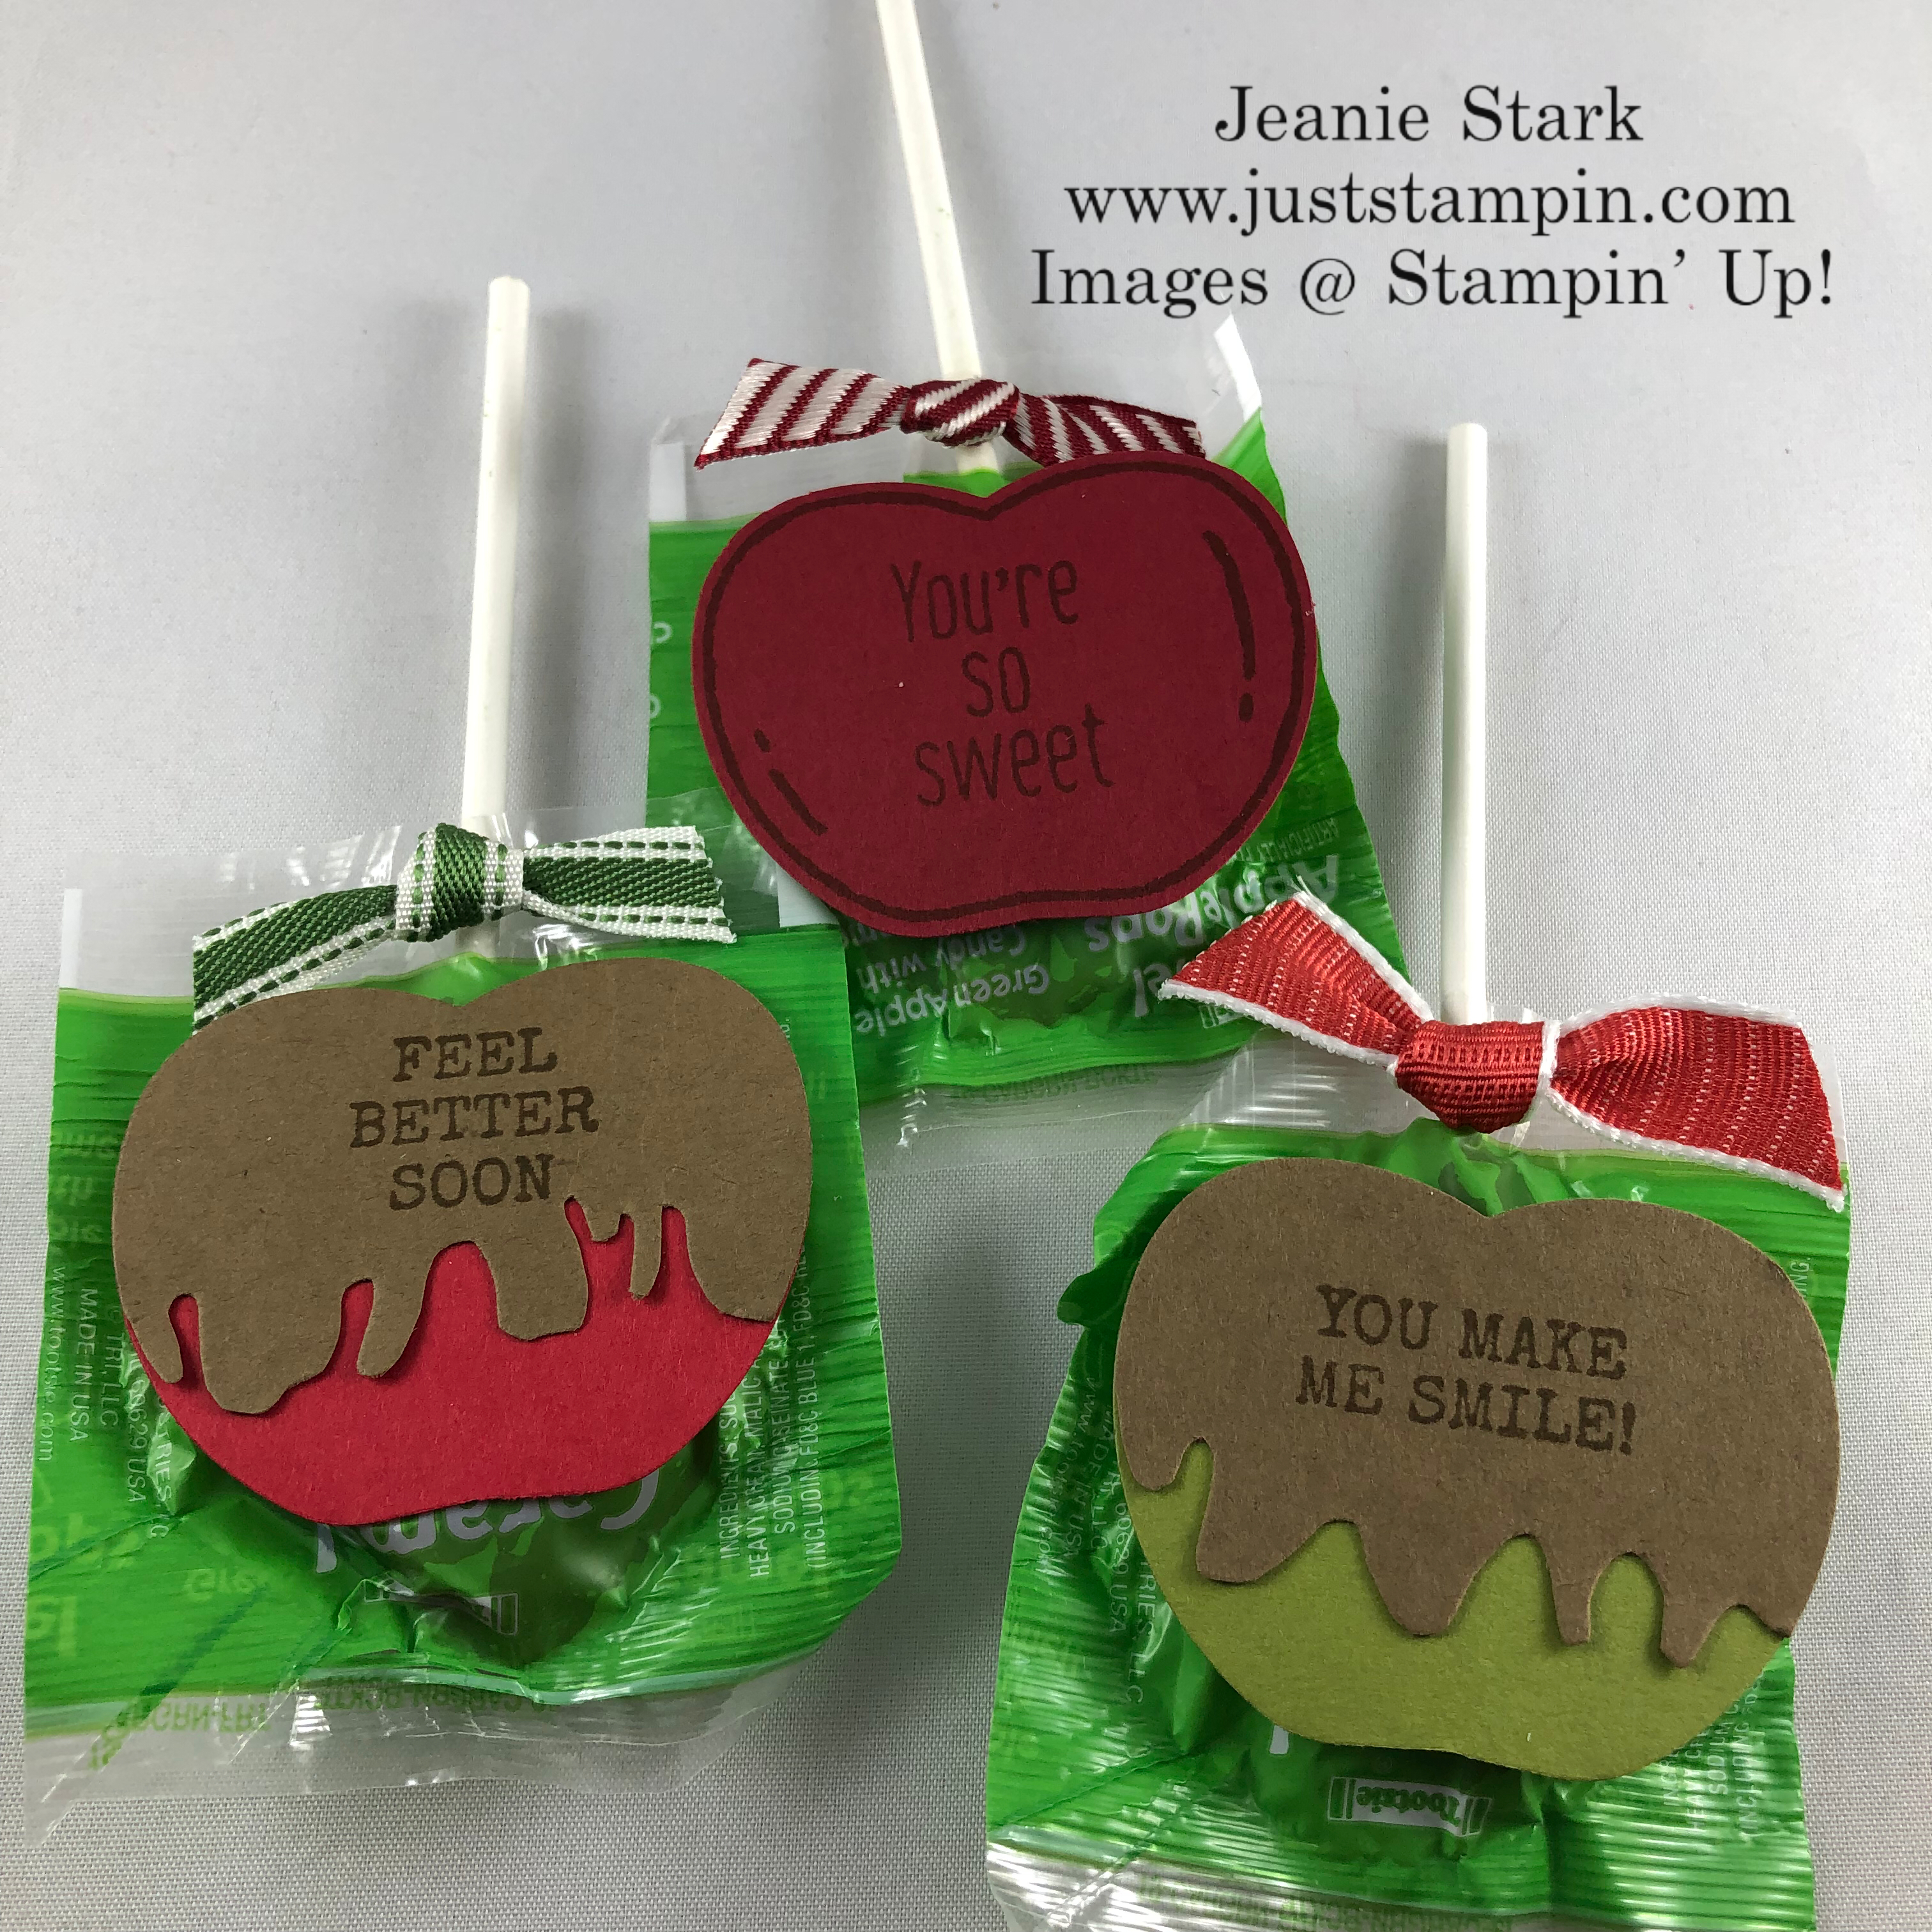
What are your favorite apples?  My favorite are Honeycrisp! Oh Yum!  One of my favorite fall activities is apple picking! Do you like caramel apples and/or candied apples? I found some caramel apple pops at Walmart and used the Apple Builder Punch to make some quick treats to give to the kids. These were so much fun!

Stampin' Up! Harvest Hellos and Apple Builder Punch candy treats - Jeanie Stark StampinUp

What do you think…do these look like caramel apples? I punched the apple in soft suede then fussy cut it to look like caramel dripping down and layered it on top of the red or green apple. I stamped the candied apple in Cherry Cobbler so it would be a little darker. You could stamp anything on the apples such as Happy Halloween to give out for Trick-or Treat! The apples would make fun notes to put in a child’s lunch box or tags to put on homemade baked goods (apple pie, apple bread, etc.), and so much more! This bundle is so versatile which made it a top choice on my list of must haves! Click on the image below to add it to your collection!

Creativity is Calling! Are you making a card to participate in my card swap?  Read all about it HERE

Have a great day!

Just Stampin’

Jeanie

Host Code Exclusive Offer! All orders placed through my online store are eligible for my FREE monthly gifts (card kits and more!). Please use the current host code.  *If your order is $150 or more, do not use this code as You become the hostess and get the Rewards! Click HERE to shop. 

Orders of $40 or more receive EXCLUSIVE monthly tutorials (via email) featuring the Stamp of the Month, Gather Together (Sept.). Click HERE for more details.

September Host Code:  NDE26TXR

Product List (Click on any image to shop on-line!)

Paper Snips

$10.00

September Special on Select Designer Series Paper! BUY 3, GET 1 FREE!

DSP Sale BUY 3, Get 1 FREE

Here’s the list of the select papers included in the sale! (Click on any image to view in my online store.)

Click HERE to view and print the DSP FLYER

Paper Pumpkin October 2019

Paper Pumpkin has just what you need this holiday season: In October and November, we are offering two back-to-back coordinating kits, one with 10 Christmas cards, the other with 24 Christmas tags. And the projects are easy and fun.  These kits make it easy for you to add a handmade, personal touch to your holiday giving—without a lot of fuss. It’s Christmas made easy with Paper Pumpkin! Click HERE to subscribe.

October Kit *Subscribe by October 10th

Kit details: Makes 10 cards and envelopes

Card size: 4 1/4″ x 5-1/2″ (10.8 x 14 cm)

Envelope size: 4-1/2″ x 5-3/4″ (11.4 x 14.6 cm)

Coordinating colors: Early Espresso, Pool Party, Poppy Parade, and Shaded Spruce


November Kit *Subscribe by November 10th

Kit details: Makes 24 holiday-themed gift tags of 4 various sizes and designs.

Coordinating colors: Early Espresso, Pool Party, Poppy Parade, and Shaded Spruce


The October and November kits coordinate; however, each kit is all-inclusive and can stand alone.