
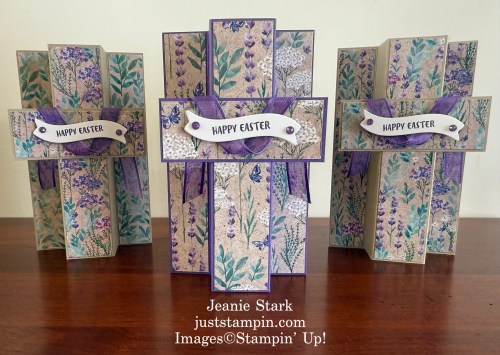
I love this time of year! Easter is a time of renewal, reflection, and celebration, making it the perfect occasion to create a heartfelt handmade card. Today’s card is ideal for sending Easter blessings to loved ones.
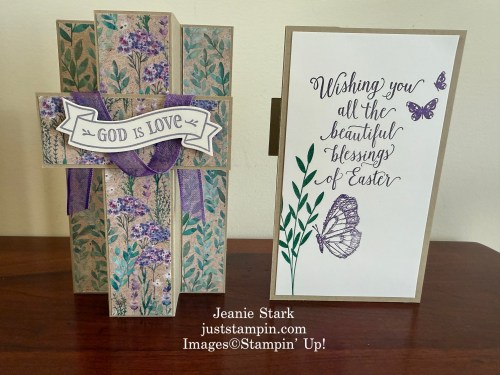
I pulled out several stamp sets (some retired) for sentiments on the back. Here’s a look at a few:


Do you have a preference? Purple or Crumb Cake?
Which banner do you like better?
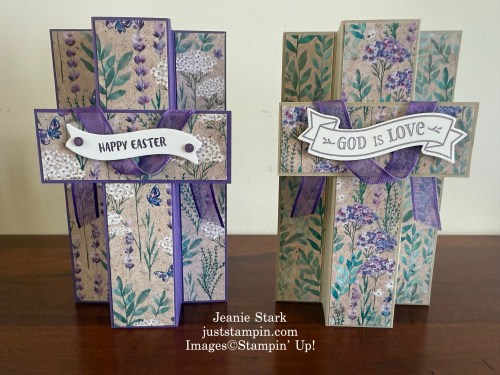
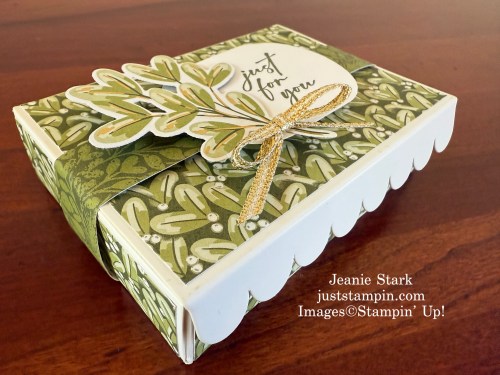
The Happy Easter sentiment is from the March 2017 Paper Pumpkin Bunny Buddies Kit. The other banner sentiment is from the Hold on to Hope Stamp Set and Cross of Hope Dies (retired). There are several current stamp sets and dies that would work on this card (Faith Collection, Mixed labels, Storybook Friends). I will put the link for the current products below.
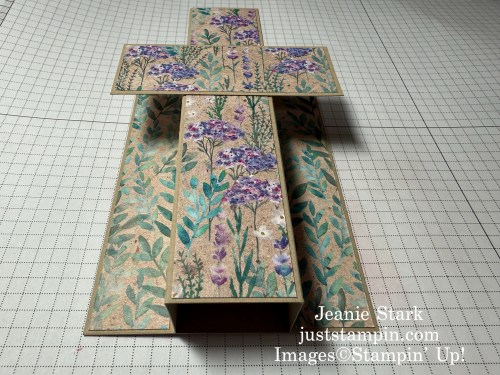
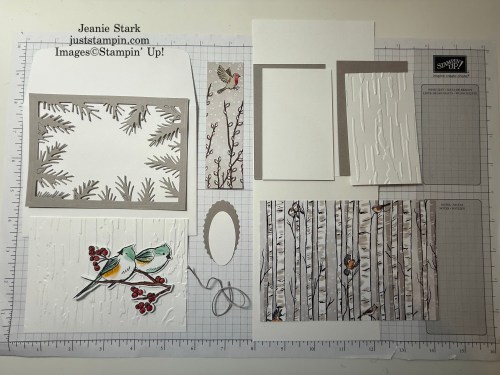
I’ve seen several versions of this cross on Pinterest; however, they did not stand alone. Here are the details for my version:
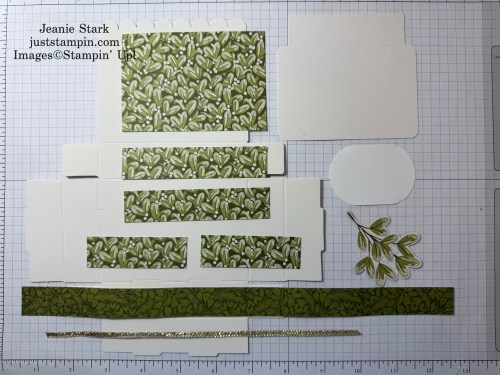
Materials & Measurements
- Card Base (Gorgeous Grape or Crumb Cake): 3 1/4 x 5 1/2
- Cross: 1 1/4 x 3 1/4, 5 x 5 1/2 score on 5″ side @ 1, 1 7/8, 3 1/8, 4
- DSP (Perennial Lavender): 2 @ 7/8 x 5 3/8, 1 1/8 x 5 3/8, 1 1/8 x 3 1/8 (cross)
*Cross piece needs to be cut going horizontal, other strips are vertical cuts. - Basic White: 3 x 5 1/4 for stamped panel on the back of the card, scrap to stamp sentiment and die cut with banner die.
- Embellishments: ~ 8 inches 3/8″ ribbon, Purple Fine Shimmer Gems
Directions
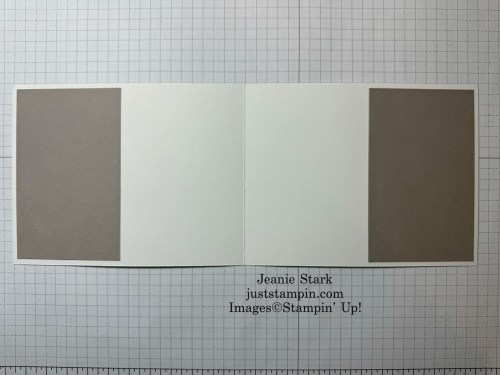
- Fold and burnish cross piece along the score lines. Adhere DSP strips to the middle and both ends.

- Adhere DSP to the cross piece and adhere to card ~1 1/2 inches from the top.
- Apply liquid glue to the ends on the backside and adhere to each side on the card base.

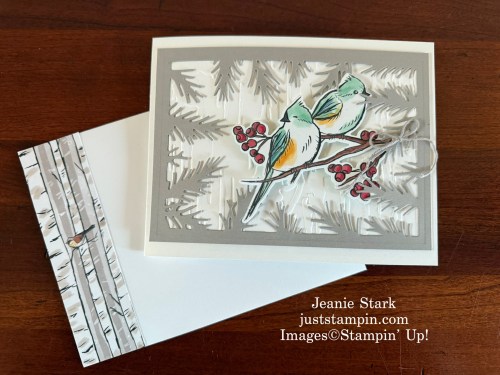
- Drape ribbon around cross and adhere with Mini Glue Dots. Trim ends.
- Stamp sentiment on white and die cut with banner die. Adhere with Stampin’ Dimensionals. Add purple gems (optional).
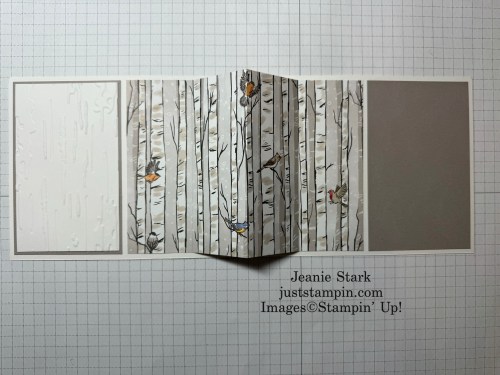
- Stamp images and/or sentiment on white layer and adhere on back.
- Card folds flat to the side to fit in standard envelope.
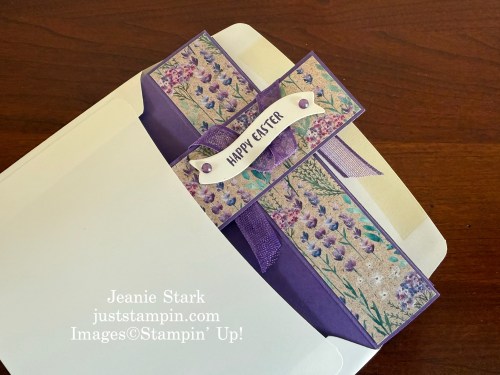
This Easter Cross Card isn’t just for Easter! It would be a thoughtful sympathy card, an encouragement card to remind someone of faith and hope, or for celebrating spiritual milestones like baptism or confirmation. I made one for myself to display with my Easter decor.
Have a Blessed Day! Thanks for stopping by!
Just Stampin’
Jeanie

Host Codes are going away. Please continue to use Monthly Host Code through April 14th. Current Host Code: VPSHNYSG
Click HERE for details on the new Stampin” Rewards Program.
Product List
|
|
|
|
|
|
|
|
|
|
|
|
|
|
|
|
|
|
|
|
|
|
![Unbounded Love Photopolymer Stamp Set (English) [ 163378 ]](https://assets1.tamsnetwork.com/images/EC042017NF/163378s.jpg "Unbounded Love Photopolymer Stamp Set (English) [ 163378 ]")
![Sketched Butterflies Cling Stamp Set (English) [ 163490 ]](https://assets1.tamsnetwork.com/images/EC042017NF/163490s.jpg "Sketched Butterflies Cling Stamp Set (English) [ 163490 ]")
![Perennial Lavender 12" X 12" (30.5 X 30.5 Cm) Designer Series Paper [ 162593 ]](https://assets1.tamsnetwork.com/images/EC042017NF/162593s.jpg "Perennial Lavender 12\" X 12\" (30.5 X 30.5 Cm) Designer Series Paper [ 162593 ]")
![Gorgeous Grape 8-1/2" X 11" Cardstock [ 146987 ]](https://assets1.tamsnetwork.com/images/EC042017NF/146987s.jpg "Gorgeous Grape 8-1/2\" X 11\" Cardstock [ 146987 ]")
![Crumb Cake 8-1/2" X 11" Cardstock [ 120953 ]](https://assets1.tamsnetwork.com/images/EC042017NF/120953s.jpg "Crumb Cake 8-1/2\" X 11\" Cardstock [ 120953 ]")
![Basic White 8 1/2" X 11" Cardstock [ 166780 ]](https://assets1.tamsnetwork.com/images/EC042017NF/166780s.jpg "Basic White 8 1/2\" X 11\" Cardstock [ 166780 ]")
![Gorgeous Grape Classic Stampin' Pad [ 147099 ]](https://assets1.tamsnetwork.com/images/EC042017NF/147099s.jpg "Gorgeous Grape Classic Stampin' Pad [ 147099 ]")
![Basic White Medium Envelopes [ 159236 ]](https://assets1.tamsnetwork.com/images/EC042017NF/159236s.jpg "Basic White Medium Envelopes [ 159236 ]")
![Stampin' Seal [ 152813 ]](https://assets1.tamsnetwork.com/images/EC042017NF/152813s.jpg "Stampin' Seal [ 152813 ]")
![Multipurpose Liquid Glue [ 110755 ]](https://assets1.tamsnetwork.com/images/EC042017NF/110755s.jpg "Multipurpose Liquid Glue [ 110755 ]")
![Mini Glue Dots [ 103683 ]](https://assets1.tamsnetwork.com/images/EC042017NF/103683s.jpg "Mini Glue Dots [ 103683 ]")
![Stampin' Dimensionals [ 104430 ]](https://assets1.tamsnetwork.com/images/EC042017NF/104430s.jpg "Stampin' Dimensionals [ 104430 ]")
![Paper Trimmer [ 152392 ]](https://assets1.tamsnetwork.com/images/EC042017NF/152392s.jpg "Paper Trimmer [ 152392 ]")
![Simply Scored [ 122334 ]](https://assets1.tamsnetwork.com/images/EC042017NF/122334s.jpg "Simply Scored [ 122334 ]")
![Mini Stampin' Cut & Emboss Machine [ 150673 ]](https://assets1.tamsnetwork.com/images/EC042017NF/150673s.jpg "Mini Stampin' Cut & Emboss Machine [ 150673 ]")
![Mixed Labels Bundle (English) [ 164653 ]](https://assets1.tamsnetwork.com/images/EC042017NF/164653s.jpg "Mixed Labels Bundle (English) [ 164653 ]")
![Mixed Labels Cling Stamp Set (English) [ 164643 ]](https://assets1.tamsnetwork.com/images/EC042017NF/164643s.jpg "Mixed Labels Cling Stamp Set (English) [ 164643 ]")
![Mixed Labels Dies [ 164652 ]](https://assets1.tamsnetwork.com/images/EC042017NF/164652s.jpg "Mixed Labels Dies [ 164652 ]")
![Faith Collection Bundle (English) [ 164796 ]](https://assets1.tamsnetwork.com/images/EC042017NF/164796s.jpg "Faith Collection Bundle (English) [ 164796 ]")
![Faith Collection Photopolymer Stamp Set (English) [ 164793 ]](https://assets1.tamsnetwork.com/images/EC042017NF/164793s.jpg "Faith Collection Photopolymer Stamp Set (English) [ 164793 ]")
![Storybook Friends Photopolymer Stamp Set (English) [ 164668 ]](https://assets1.tamsnetwork.com/images/EC042017NF/164668s.jpg "Storybook Friends Photopolymer Stamp Set (English) [ 164668 ]")

![Winterly Tree Tops Bundle (English) [ 164066 ]](https://assets1.tamsnetwork.com/images/EC042017NF/164066s.jpg "Winterly Tree Tops Bundle (English) [ 164066 ]")
![Winterly Tree Tops Dies [ 164065 ]](https://assets1.tamsnetwork.com/images/EC042017NF/164065s.jpg "Winterly Tree Tops Dies [ 164065 ]")
![Unbounded Love Bundle (English) [ 163384 ]](https://assets1.tamsnetwork.com/images/EC042017NF/163384s.jpg "Unbounded Love Bundle (English) [ 163384 ]")

![Birch Wood 3 D Embossing Folder [ 164069 ]](https://assets1.tamsnetwork.com/images/EC042017NF/164069s.jpg "Birch Wood 3 D Embossing Folder [ 164069 ]")


![Baker's Twine Essentials Pack [ 155475 ]](https://assets1.tamsnetwork.com/images/EC042017NF/155475s.jpg "Baker's Twine Essentials Pack [ 155475 ]")
![Stampin' Cut & Emboss Machine [ 149653 ]](https://assets1.tamsnetwork.com/images/EC042017NF/149653s.jpg "Stampin' Cut & Emboss Machine [ 149653 ]")


![Scalloped Gift Card Boxes [ 161751 ]](https://assets1.tamsnetwork.com/images/EC042017NF/161751s.jpg "Scalloped Gift Card Boxes [ 161751 ]")
![Season Of Green & Gold 12" X 12" (30.5 X 30.5 Cm) Specialty Designer Series Paper [ 164324 ]](https://assets1.tamsnetwork.com/images/EC042017NF/164324s.jpg "Season Of Green & Gold 12\" X 12\" (30.5 X 30.5 Cm) Specialty Designer Series Paper [ 164324 ]")
![Golden Greenery Dies [ 164116 ]](https://assets1.tamsnetwork.com/images/EC042017NF/164116s.jpg "Golden Greenery Dies [ 164116 ]")
![Mossy Meadow Classic Stampin' Pad [ 147111 ]](https://assets1.tamsnetwork.com/images/EC042017NF/147111s.jpg "Mossy Meadow Classic Stampin' Pad [ 147111 ]")
![Modern Oval Punch [ 162234 ]](https://assets1.tamsnetwork.com/images/EC042017NF/162234s.jpg "Modern Oval Punch [ 162234 ]")
![Gold & Silver 1/8" (3.2 Mm) Trim Combo Pack [ 161633 ]](https://assets1.tamsnetwork.com/images/EC042017NF/161633s.jpg "Gold & Silver 1/8\" (3.2 Mm) Trim Combo Pack [ 161633 ]")