H is for Hidden Message Fun Fold

Welcome to my ABC’s with Fun Folds series.  Today’s fun fold has a hidden message. I have been wanting to make one of these fun folds for a long time.  I like simple cards and did not think this style card would fit that bill.  I was wrong!  It really is quite easy once you break it down into steps.  Many thanks to fellow demonstrators, Patrice Halliday-Larsen, Natalie Lapakko, and Meg Loven who shared their inspiration and directions to get me started.  I changed it up a bit to simplify it! Here’s my card.img_2422

I have lots of photos and measurements for you.  You need to cut and score 3 pieces of paper for this card.

Front: 4 1/4 x 8 1/4 scored at 5 1/2

Back:  4 1/4 x 5 3/4 scored at 5 1/2

Inside:  4 1/4 x 8 1/2 scored at 4 1/4

img_2389

Punch a circle out of the front piece by sliding the 2″ Circle punch along the side as far as it will go.

img_2390

Line up the inside piece the same way and punch from both the front and back. (*You may prefer to line up the inside piece under the top piece and trace the circle with a pencil first then punch it out if you are not confident you will line it up exactly.)  The 3 circles should all line up.

Add sticky strip or use Fast Fuse Adhesive along the flap on the back piece.  Adhere this piece along the right side of the inside piece.

Close the inside piece and apply adhesive to the top piece only.  The front page of the middle layer is adhered completely to the inside of the front layer, with the right side edges lined up.

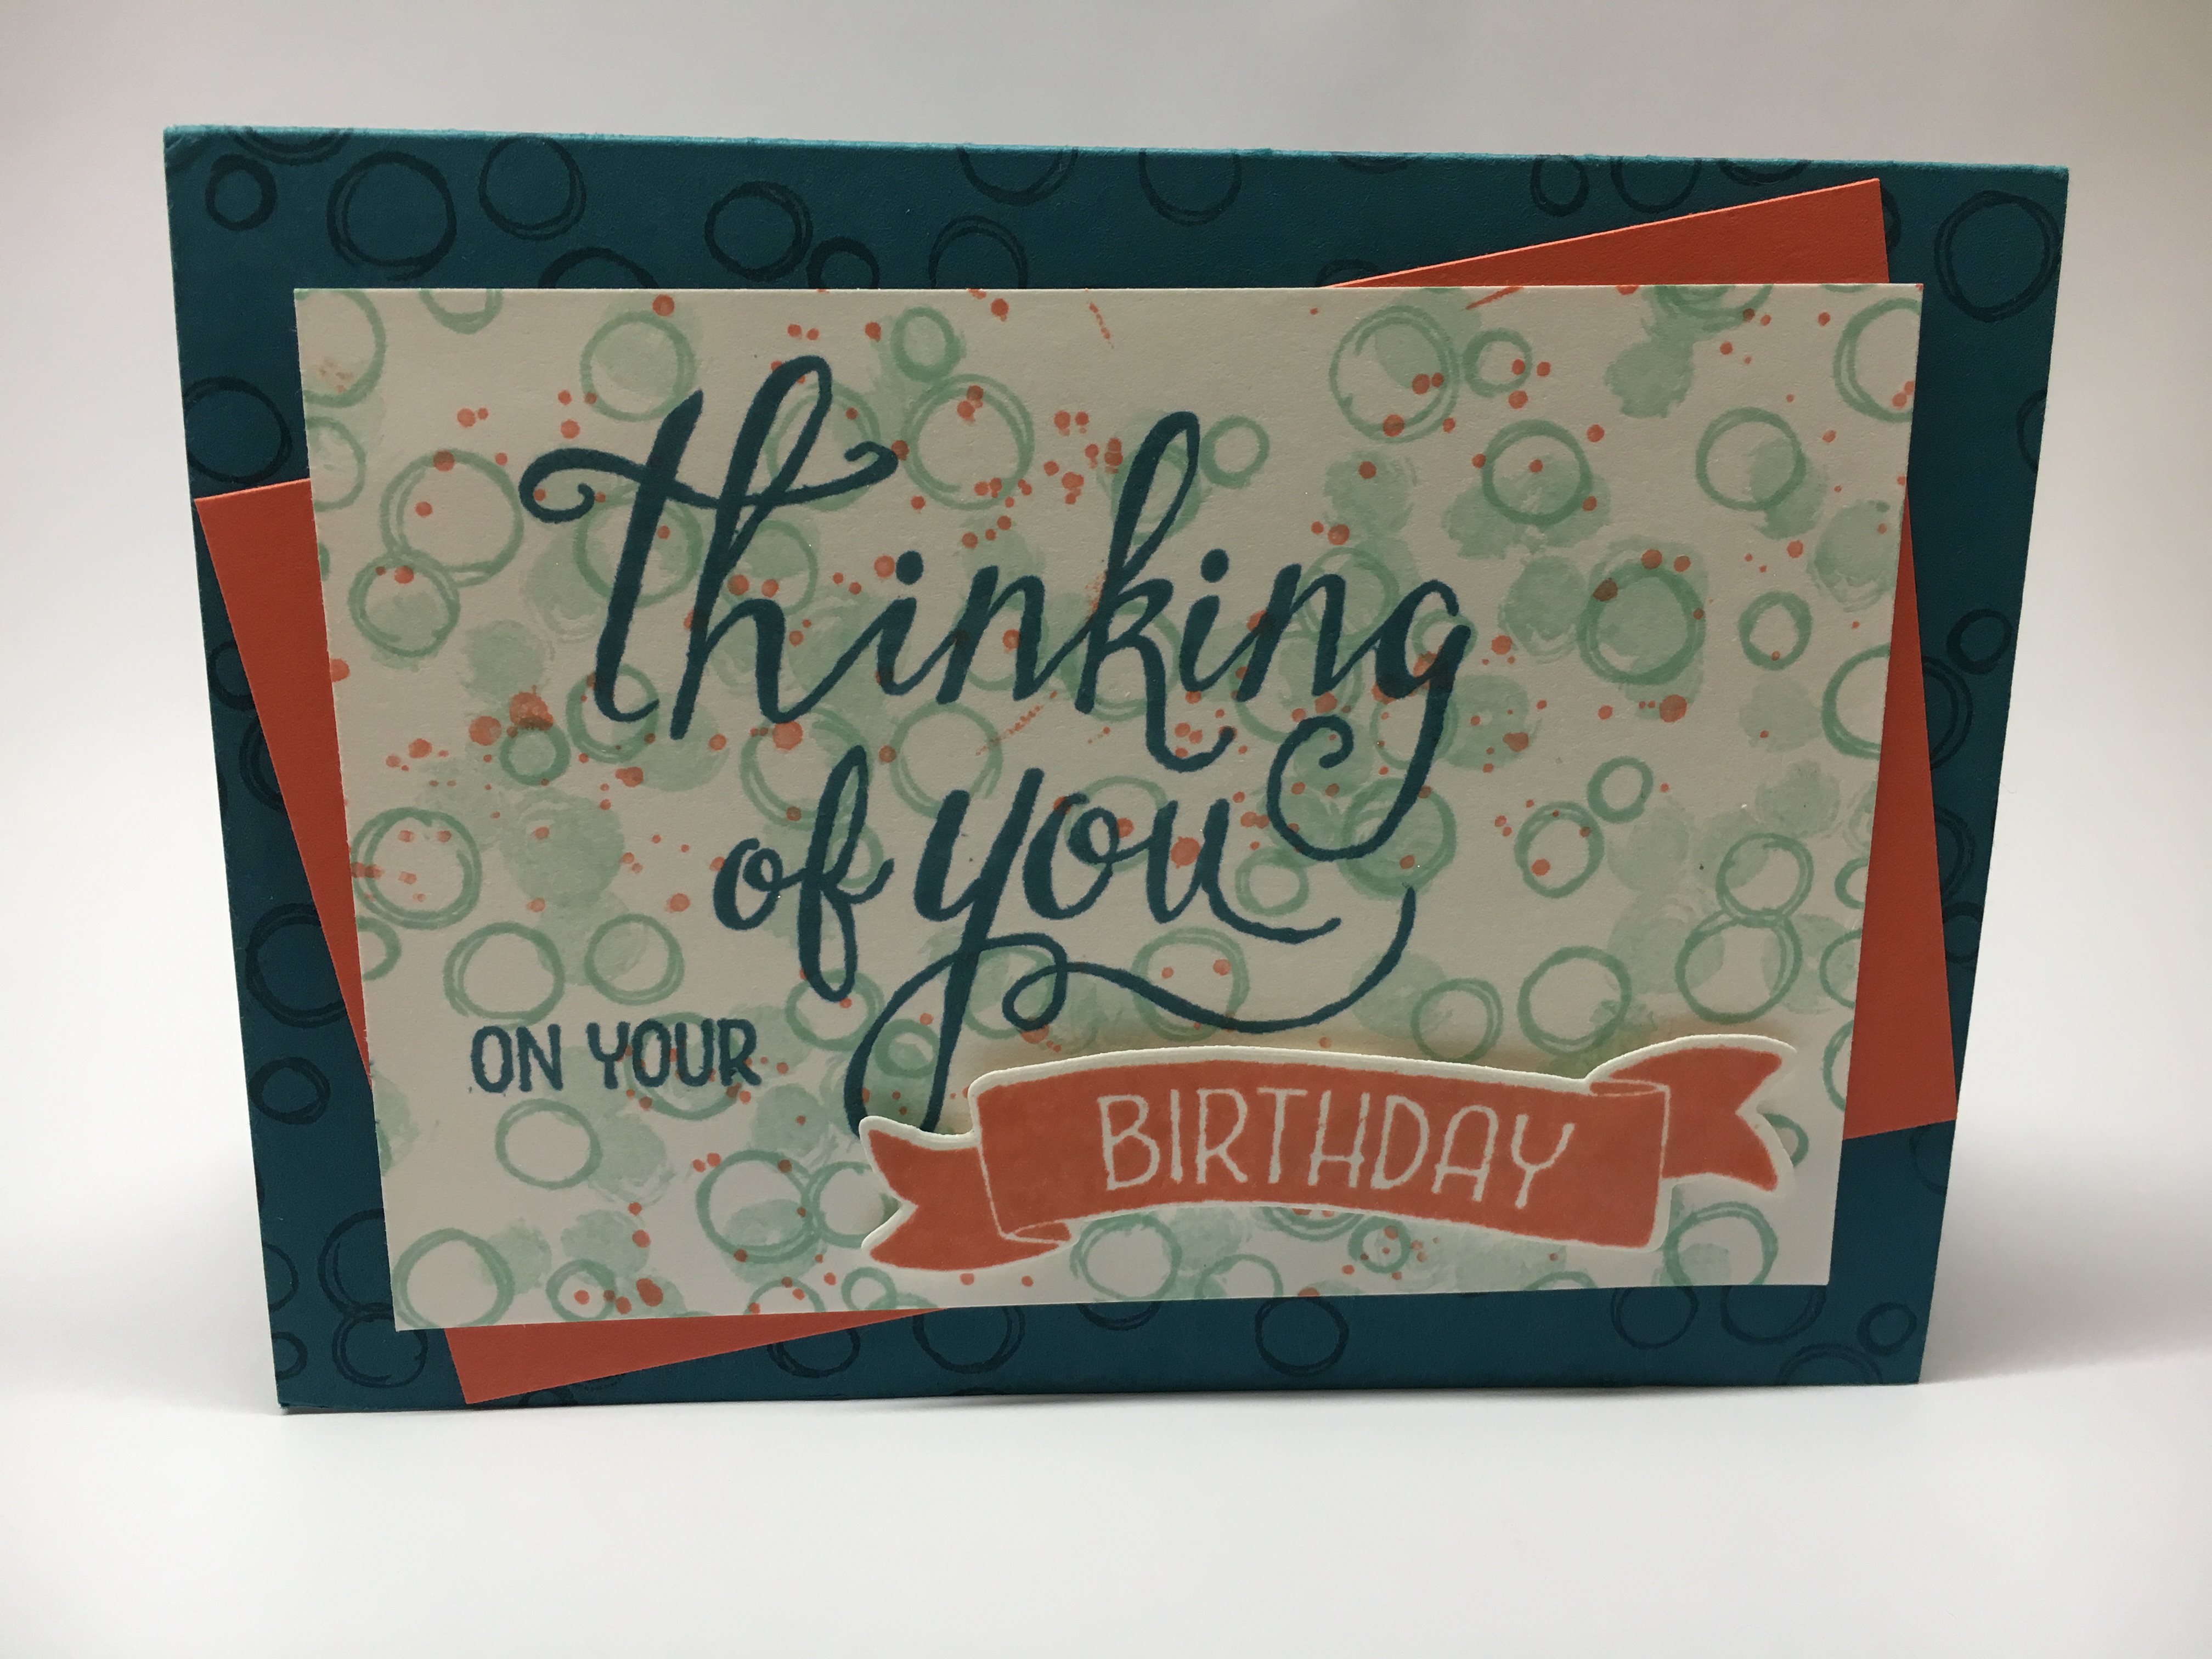
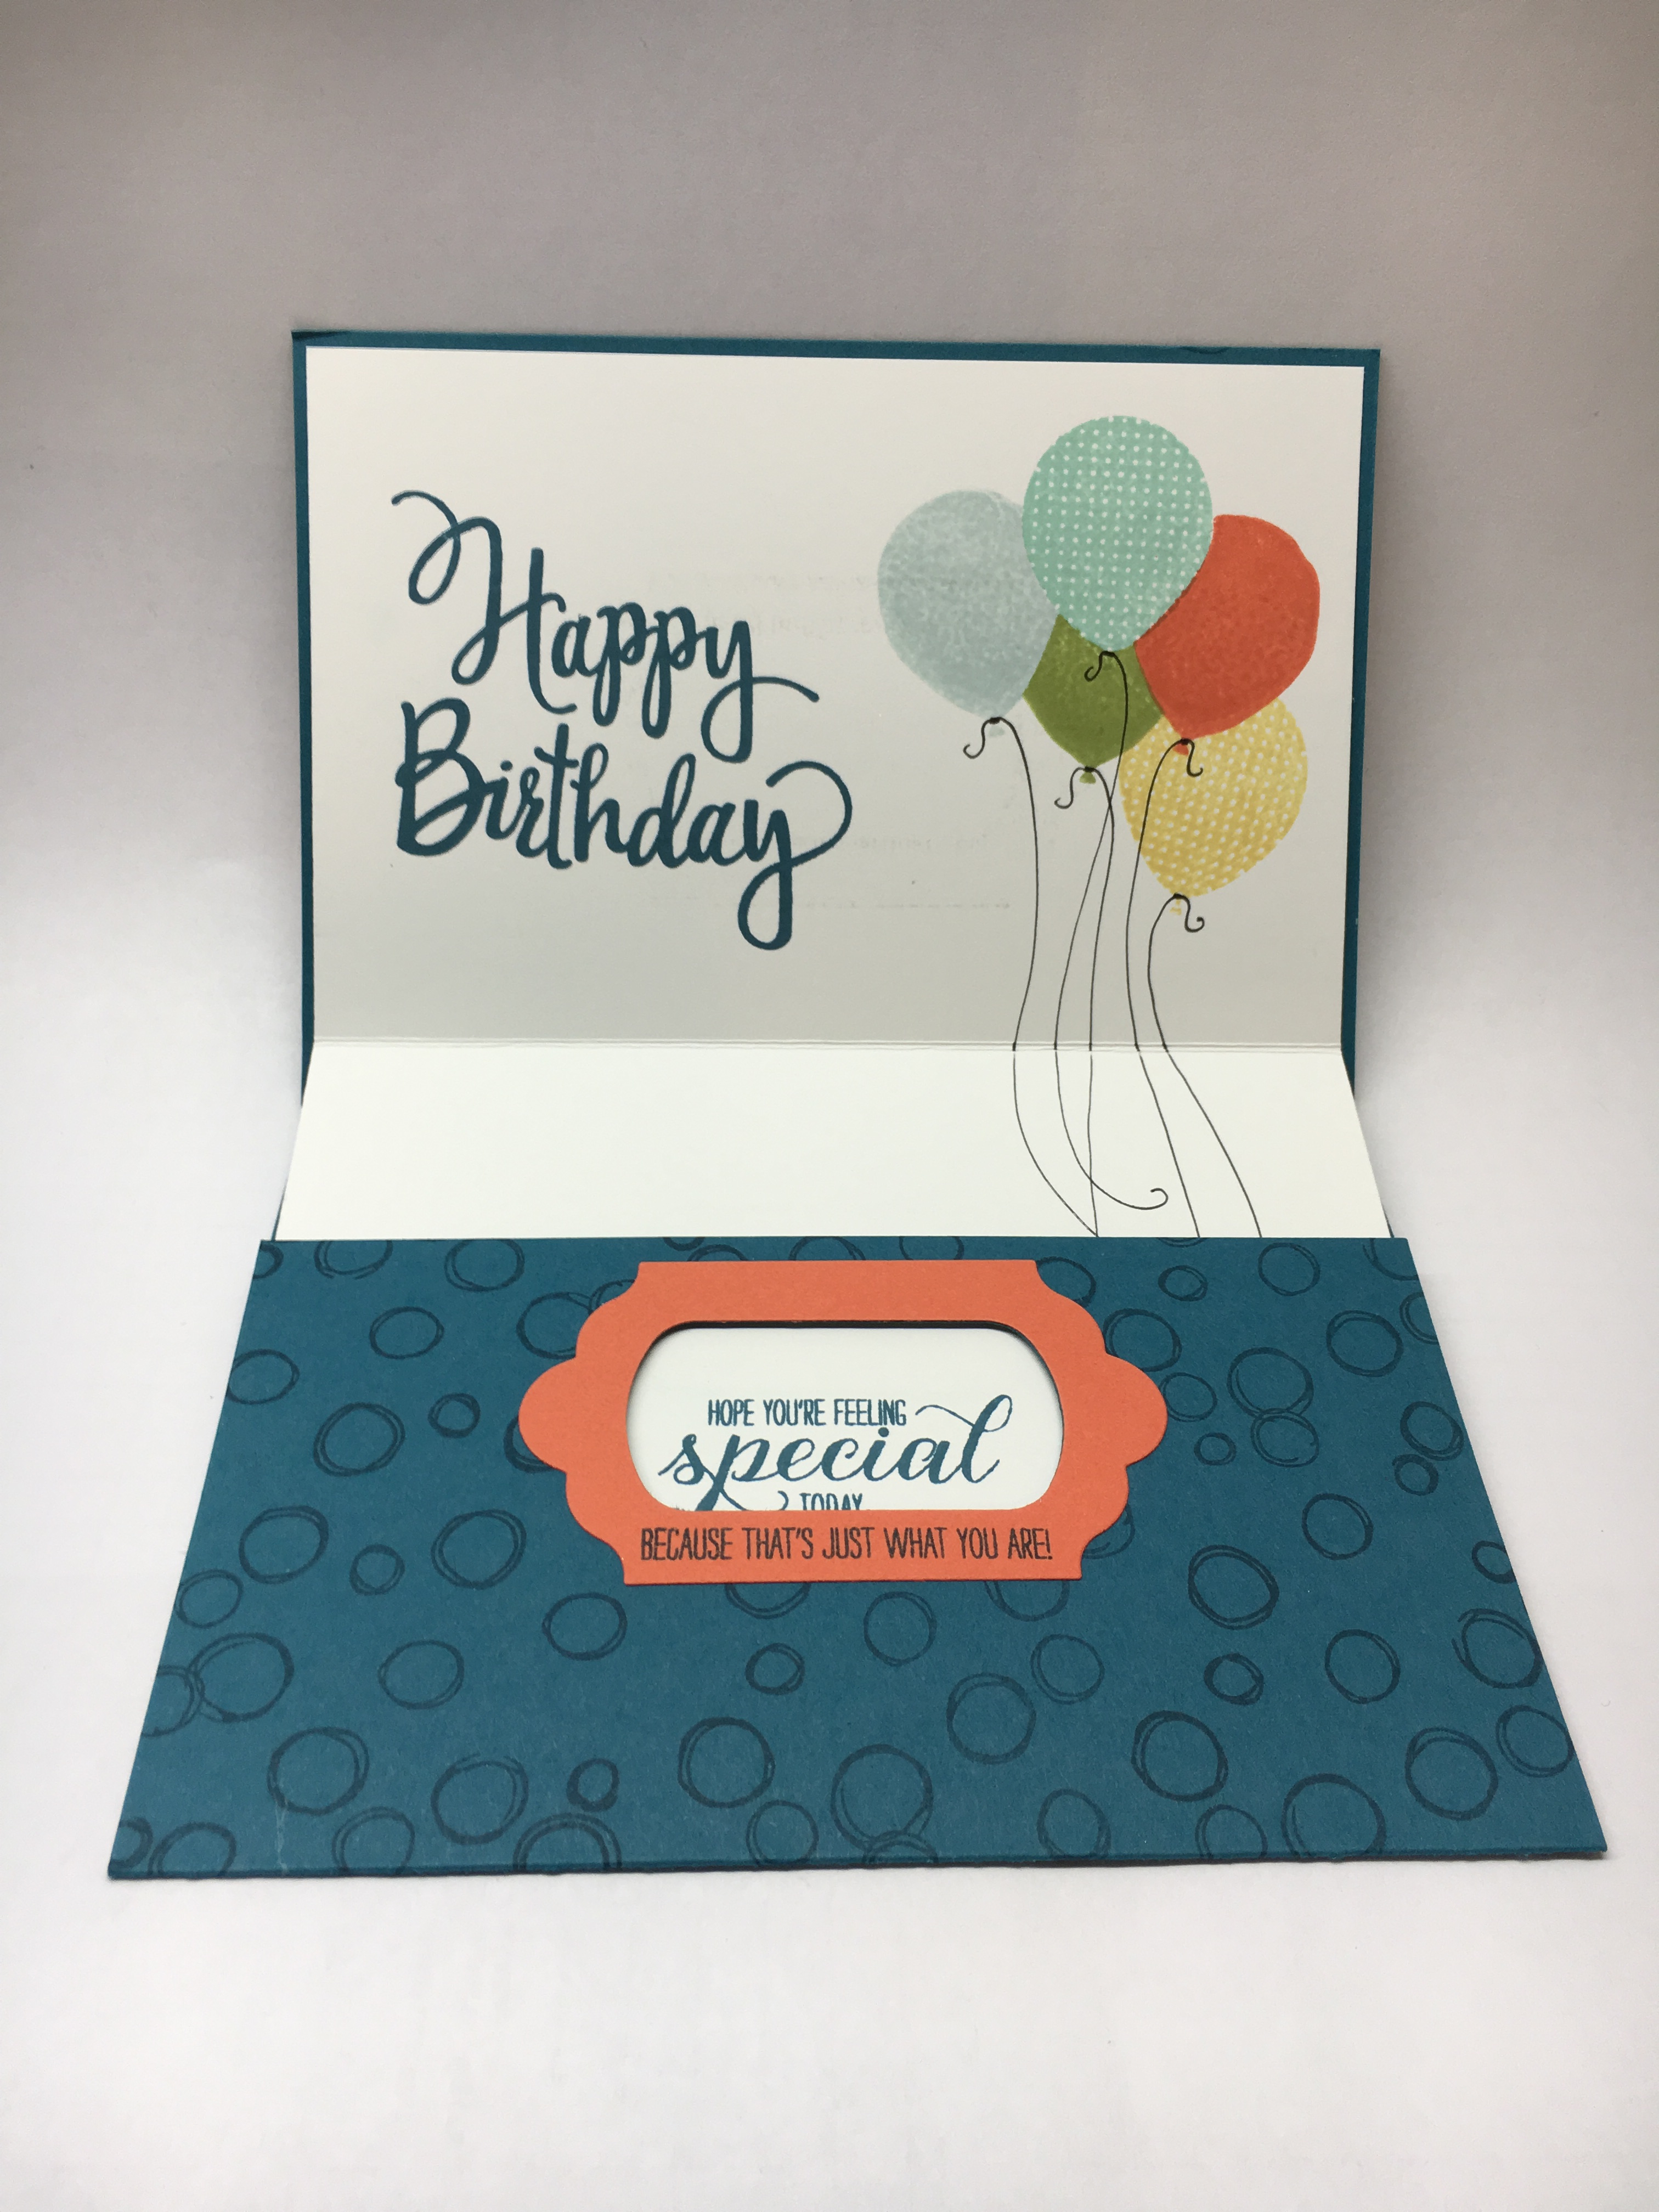
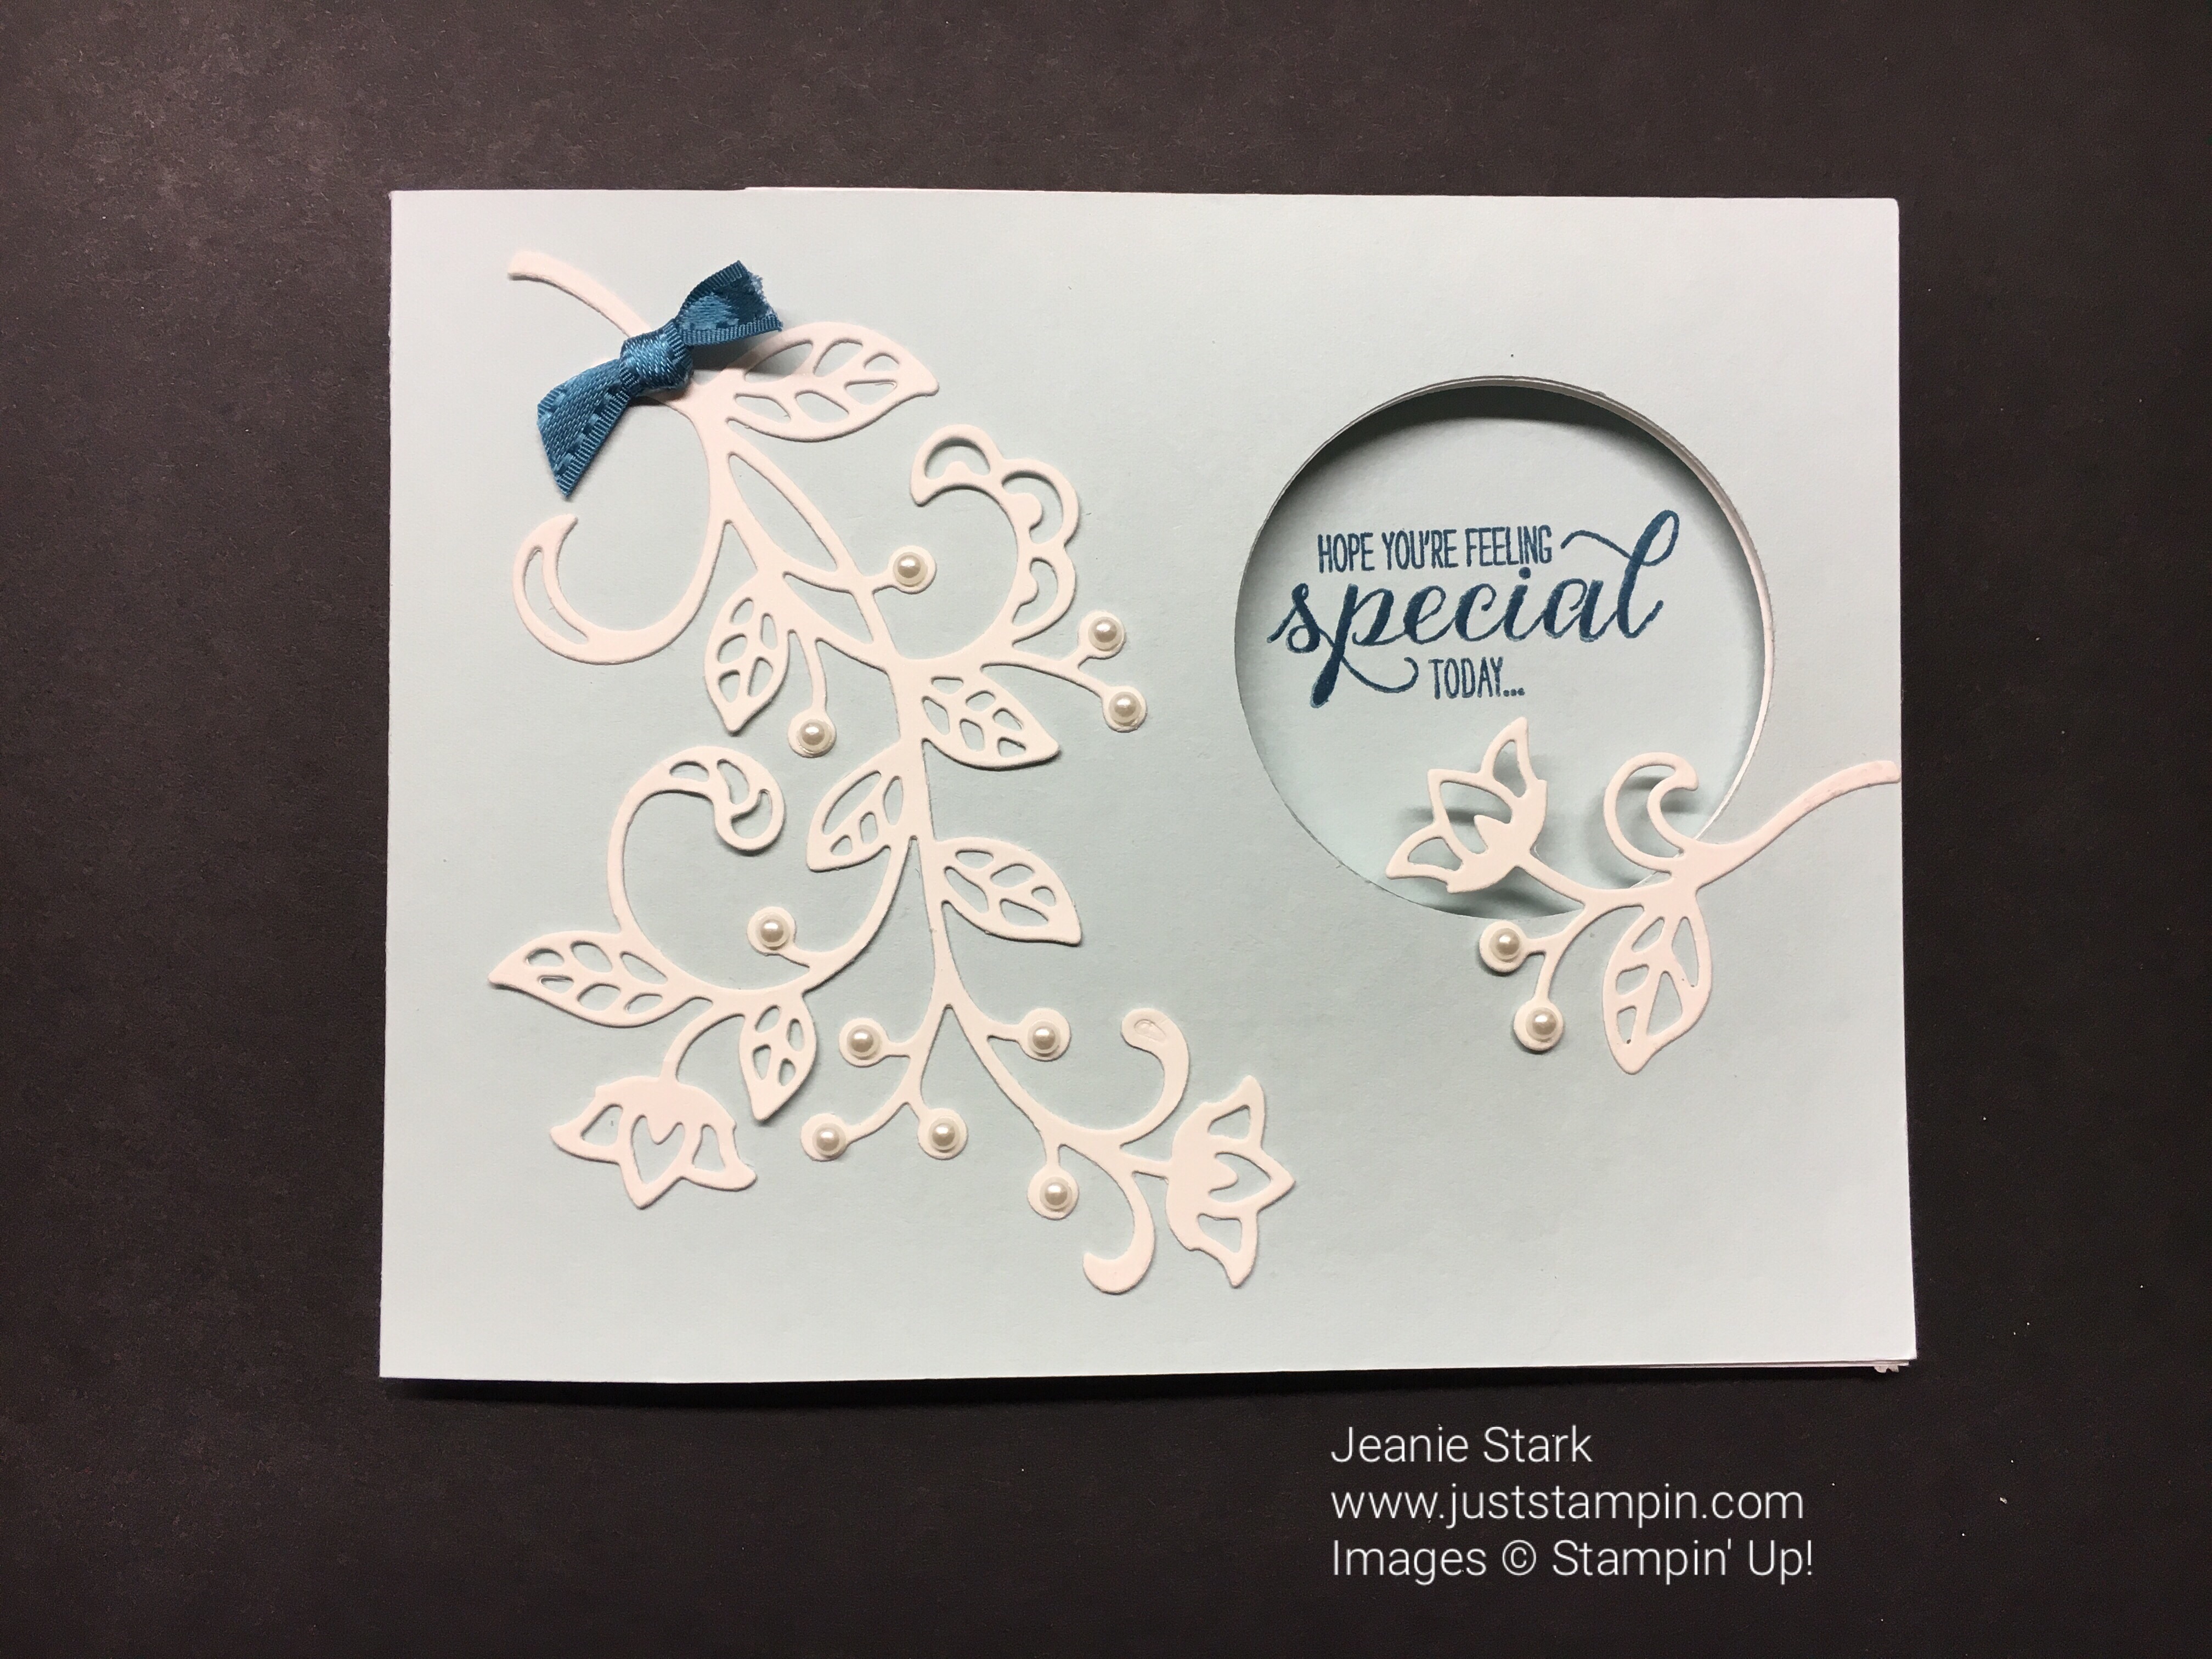
The photo below shows what the card should look like assembled.

img_2400

Stamp the sentiments through the hole to make sure they line up exactly. My sentiment is from Garden in Bloom which is a photopolymer stamp set so it was easy to see.  (*If you are using a clear mount or wood mount stamp you may want to trace the circle then open the card and stamp the sentiment inside the pencil line using the stamp a ma jig. Remember to erase your pencil marks afterwards.)  I opened my card to slide the hidden message part in view and stamped my inside sentiment through the hole.

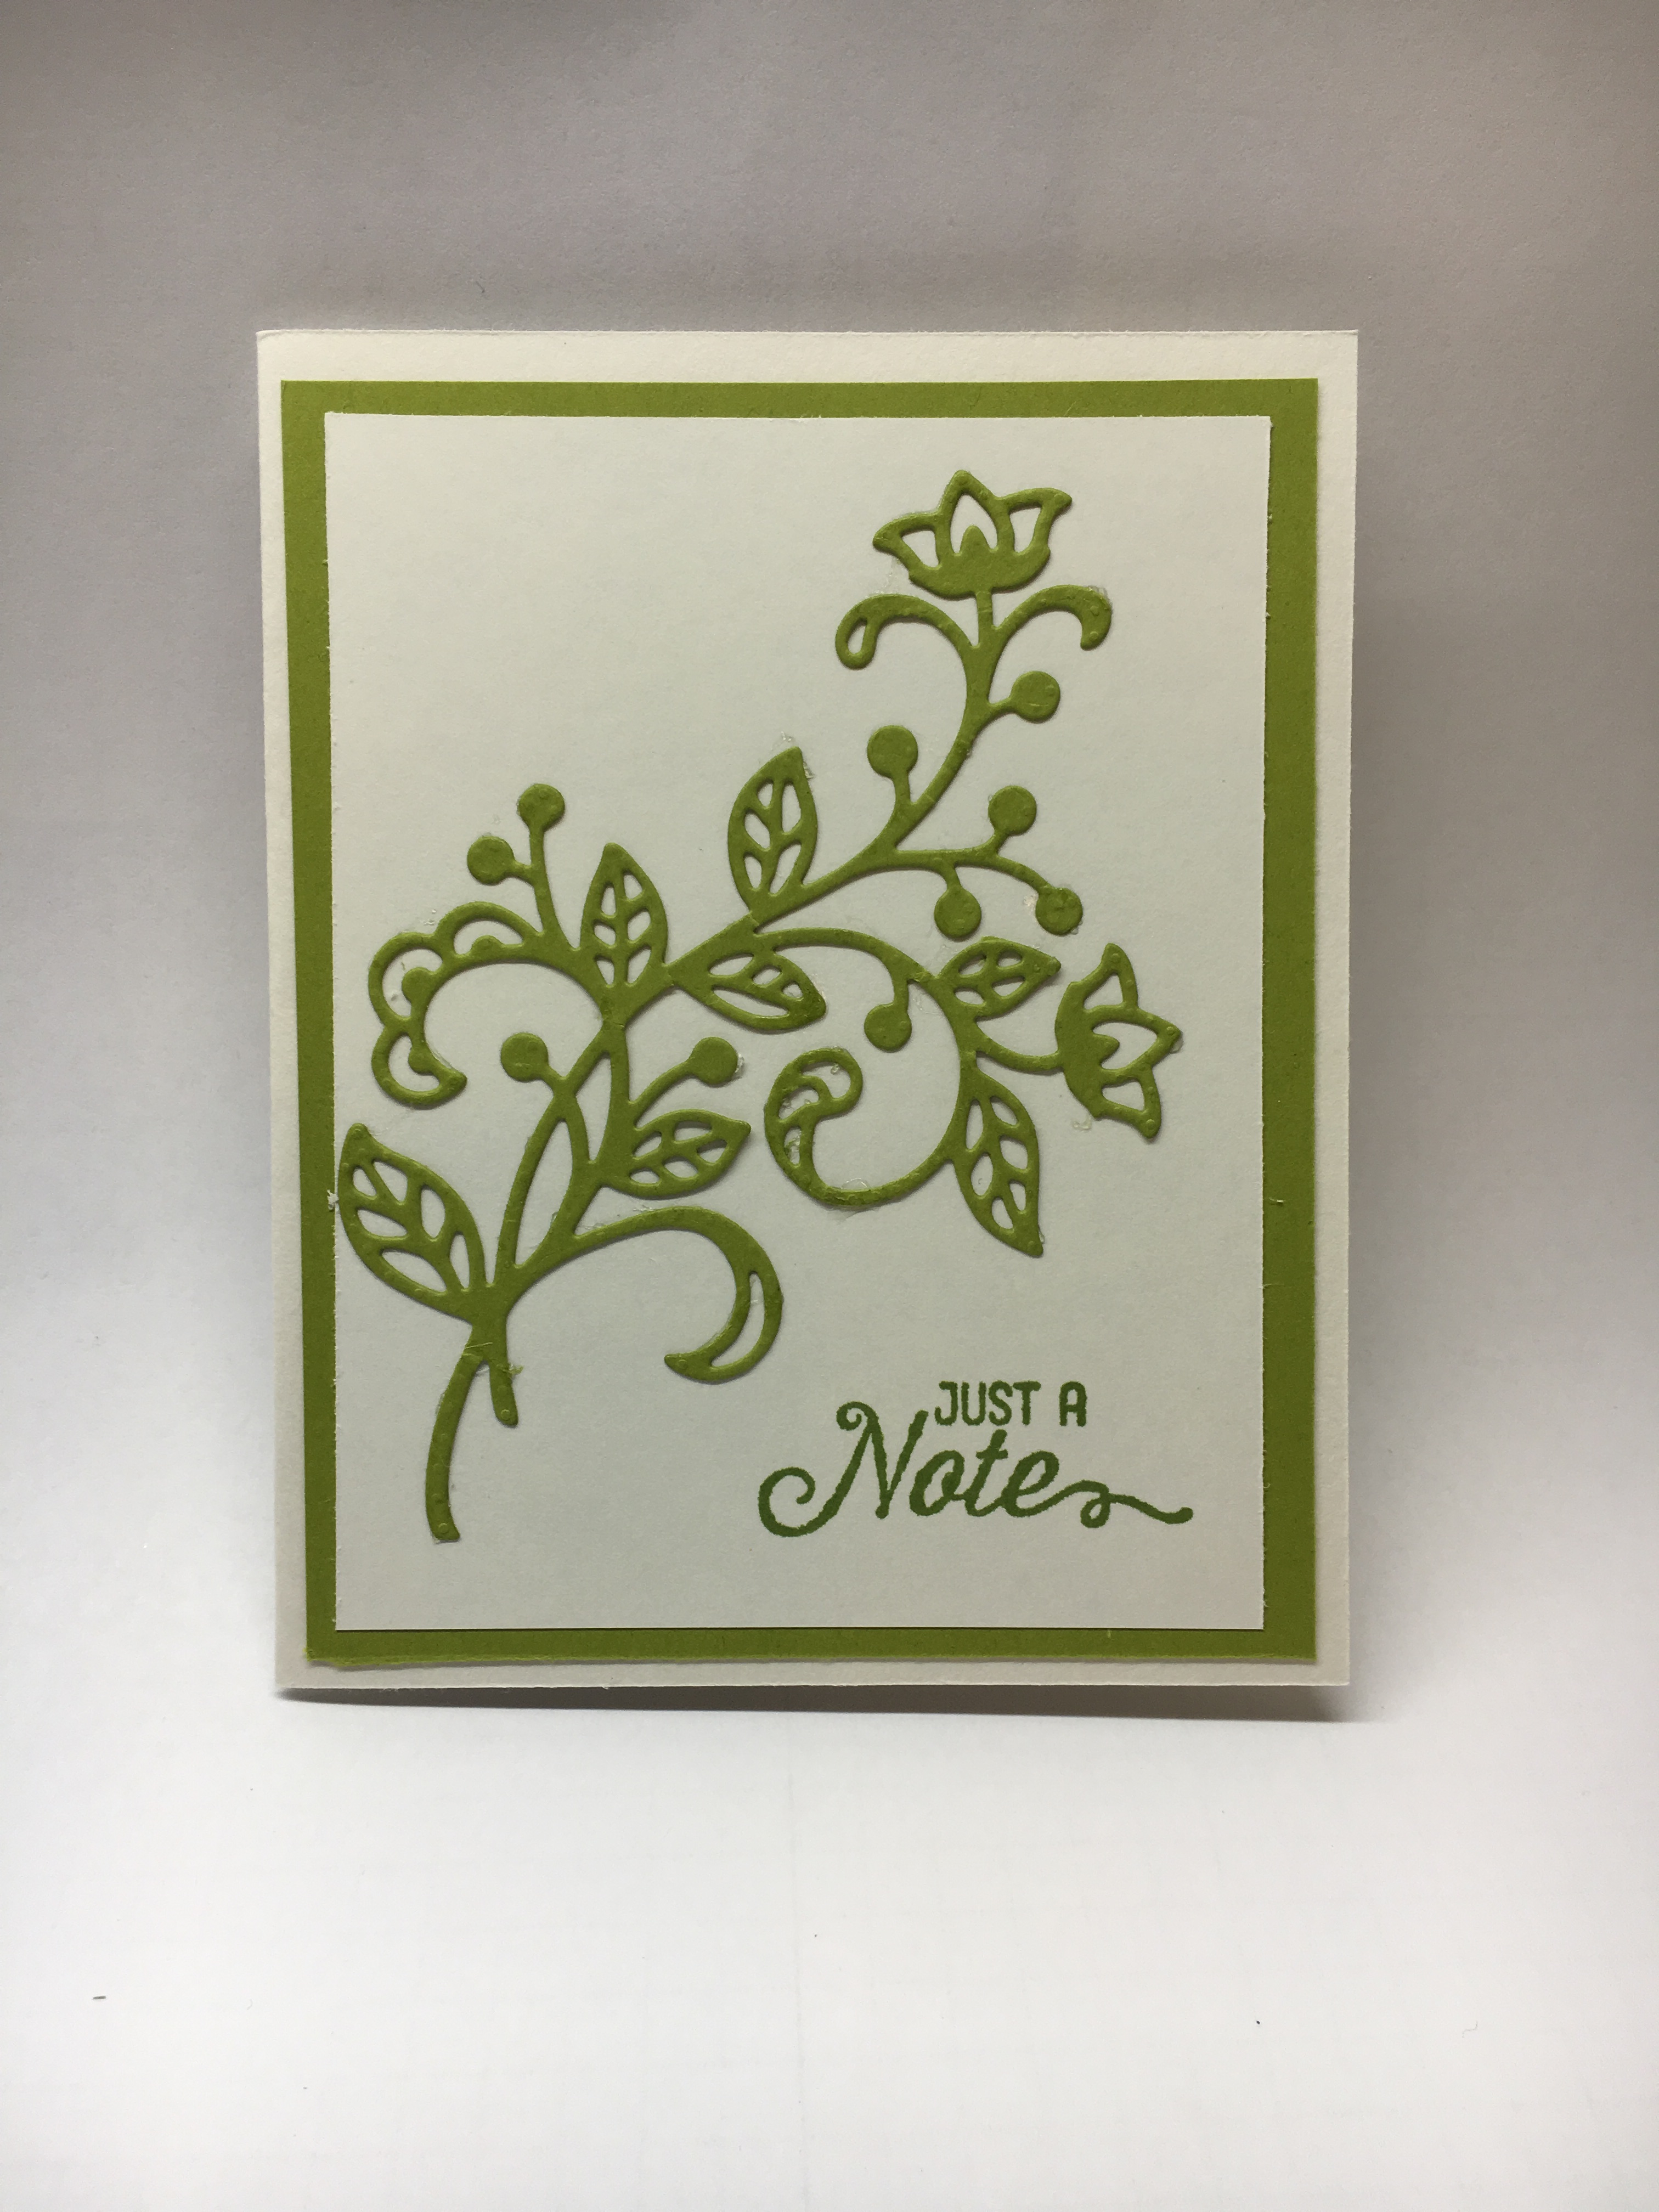
I decorated my card using the Flourish Thinlits.  I adhered the die cut pieces using the Fine-tip Glue Pen. I embellished with ribbon and Pearl Basic Jewels.  I stamped the envelope using the Flourishing Phrases Stamp Set and Soft Sky ink. This is such a fun card to make and open!  This fun fold would be great for kid birthdays as I’m sure they would enjoy the hidden message appearing when they open their card.

img_2417

img_2419

img_2418

Stamp Sets: Garden in Bloom, Flourishing Phrases, Balloon Adventures  Ink: Island Indigo, Soft Sky  Papers: Soft Sky, Whisper White  Tools & Accessories: Flourish Thinlits, 2″ Circle Punch, Island Indigo Ribbon, Pearl Basic Jewels

Have a Happy Day!

Just Stampin’

Jeanie

*All orders placed through my online store are eligible for my FREE monthly gifts (card kits and more!).  Click HERE to shop. Please use the current host code below.

 May Host Code:  K64KSNRE

SAVE!!! Get 25% off your first 3 months of Paper Pumpkin!

Paper Pumpkin Creativity promo

Stampin’ Up! has a new promotion for first time Paper Pumpkin subscribers…You can SAVE 25% on your first three months! What a great Mother’s Day gift for yourself or your mom.  Better yet, start a subscription for both of you and enjoy doing it together!!  It’s one of those gifts that’s great for all ages. (My subscribers range in age from 9 – 90!) Here’s the details…

Here are the details:

  • For first-time subscribers only.
  • Subscribers must join between Thursday May, 11 and Saturday, June 10, 2017; 11:50 PM (MT) .
  • Available for month-to-month subscriptions, not prepaid subscriptions.
  • Discount applied to one kit per month for the first three months of a new subscription. After that, the price for each month’s kit will return to the regular price of $19.95.
  • Enter the promo code, STARTHERE, at PaperPumpkin.com to subscribe.
  • Keep in mind that unless you cancel, your membership will continue at full price after the first three discounted months.


Sunday Showcase…Card Swap Part 1

I promised to share with you the cards I received from the card swap.  I have received about half of them so far and the rest should be arriving this week. This card swap is showcasing new stamp sets from the annual catalog.  Check these out…

img_3422
Card Created By Denise Weidele

I love the coral, white, and sand color combination Denise used along with a touch of yellow for the flowers.  This card showcases the Swirly Bird stamp set and matching Swirly Scribbles Thinlits. So pretty!!!


img_3423
Card Created By Susie Guenther

This card is over the top!  Susie used a bunch of different stamp sets to create this card: Gorgeous Grunge, Playful Backgrounds, Time of Year, Garden in Bloom, Stylized Birthday, Birthday Banners, and Balloon Celebration.  I’m afraid the photo does not do it justice as you can’t see the way it sparkles on the front.  Here’s another photo showing the inside…the sentiment appears like magic when you open it!

img_3424

I need to give this inside fold a try. So cool!


img_3429
Card Created By Mary Spurrier

Mary used the new exclusive hostess set, Baskets for You, with Stampin’ Up markers, Aqua painter, and colored pencils to color the flowers in the basket. The sentiment is from Best Birds stamp set. I like the way the basket looks like it is just sitting on the mantle.  How clever!


img_3425
Card Created By Carolyn Whitacre

Carolyn used one of my favorite new stamp sets and matching die cut, Flourishing Phrases.  This would make a beautiful set of notecards to give as a gift someone.


img_3426
Card Created By Beverly Heclo

The Hardwood stamp set used here is not new but the May Flowers Framelits are.  These framelits are on my wish list. I love the way Beverly layered the flowers to add dimension.

I will be sharing more swap cards when they arrive.  I hope you will check back again. Reminder…today is the last day to enter the Jar of Love contest.  If you missed that post you can click HERE to enter.

You can purchase any of the stamp sets or products shown here in my online store.  Click the SHOP STAMPIN’ UP button at the top and anything you order will be delivered directly to your door!  I appreciate your support. Feel free to contact me if you have any questions.

Have a wonderful day!

Just Stampin’

Jeanie

Tuesday Tip…Flourish Thinlits

img_3129

Sympathy cards are never ones you like to send. Unfortunately I have had to send a few lately.  I created this card using the Flourish Thinlits Dies and coordinating Flourish Phrases stamp set.  I purchased them as a bundle and saved 10%.

Check out this quick video for some great tips for cutting the Flourish Thinlits.

*Note- I use my die brush a little differently than she did in the video…I brush over the thinlit rather than directly on the cardstock as this keeps it from ripping the detailed pieces. It works like a charm.

img_3117

I cut the thinlit in both Sweet Sugarplum and Pear Pizzazz.  I attached the Pear Pizzazz negative piece to whisper white and laid the Sweet Sugarplum die cut inside. (I like puzzles and this reminds me of one.)  The cool part is you get to make another card in the opposite colors.

I embossed a piece of Sweet Sugarplum cardstock with the Petal Burst Embossing Folder. I used the debossed side because I preferred it with the look of the inlaid card.

I used Pear Pizzazz and Sweet Sugarplum ink to stamp the sentiments and front of my envelope. I attached the sentiment layer with Stampin’ Dimensionals and added some Sweet Sugarplum Ruched Ribbon.


img_3206

I love this bundle and there are so many great sentiments with this set to make many different cards.  If you would like to purchase this set, click the SHOP button in the menu bar at the top.  You can Shop 24/7 and have it delivered right to your home and start stamping!

Stamp Set: Flourishing Phrases  Inks: Sweet Sugarplum, Pear Pizzazz  Papers: Sweet Sugarplum, Pear Pizzazz, Whisper White  Tools and Accessories: Flourish Thinlits, Big Shot, Precision Base Plate, Die Brush, Petal Burst Embossing Folder, Sweet Sugarplum Ruched Ribbon, Dimensionals, Fine-Tip Glue Pen, Glue Dots, Fast Fuse Adhesive

Be sure to check back tomorrow for the PALS Blog Hop.  We will be featuring projects using thinlits, framelits, and punches.

Have a wonderful day!

Just Stampin’

Jeanie