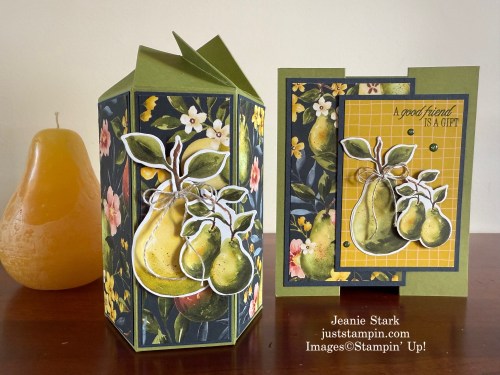
I absolutely love making boxes (and 3D items) to give as gifts. It’s been awhile since I’ve shared these. (I seem to be on a fun fold card kick lately!) Yesterday I revealed my Mystery Monday cards and while making the Perfectly Pears card it gave me an idea and as usual one thing led to another. I left you with a teaser yesterday showing the box I made. Today I will reveal what’s inside the box plus how to create it. It’s really quick & easy! (I don’t do complicated!!!)
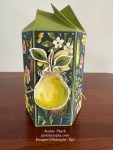
Did you guess what was in the box? Chris came very close in her comment as she thought it could be a pear “scented” candle. It is actually a pear “shaped” (unscented) candle!
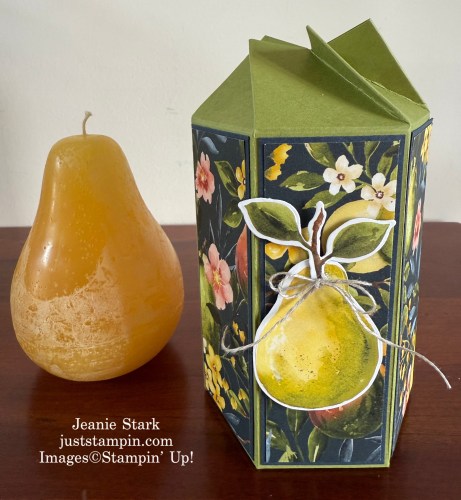
I bought several of these pear candles (in different colors) to have on hand for hostess gifts, a little something for a friend’s birthday, etc. I love them and have a few throughout my home as decor pieces. How perfect are they to gift with this DSP?!!! The Painterly Pears Designer Series Paper is my favorite from the New Online Exclusives released this month! The paper reminds me of the delicious pears from Harry & David!

I love it when I can make a card and gift to coordinate!
If you missed yesterday’s post with the details to make the card, CLICK HERE.
When I was young I loved Highlights Magazine. One of my favorite things was the page where you had to “Spot the Difference”. How good are your observation skills? Did you spot the difference in the photos of the box?
That was the “great debate” yesterday… I made a couple of samples and asked my daughter, my sister, and a friend which one they liked better. One person liked one version, one the other version, and one liked both versions. LOL And I go back and forth! I like the clean & simple version with just the single pear; however, I also like how the other version matches the card design with the same 3 pears. How about you? Which one do you prefer?
Leave a comment below!
Both versions open and close the same way. Here’s a photo looking at the top of the box. Such a cool design!
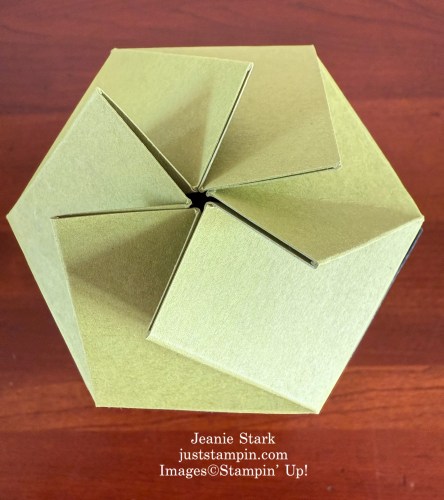
And here’s a look inside when you open it.

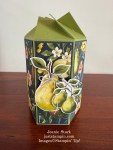
Of course I had to make more than one of these boxes. Here’s another version.

For this version I used Mossy Meadow cardstock for the box. Then I die cut the pear shape from Basic White cardstock and used my blending brushes to add color to match the pear candle and DSP. There are so many different ways to add color and I usually opt for Stampin’ Blend Markers; however, I thought the blending brushes gave a softer look for this project. What do you think?
Here’s a look at both boxes. Which one do you like better?

You can make these boxes in 10-15 minutes! Seriously! It is that easy! I can think of many different things that will fit in this box. I’m going to get a head start on the holiday season and make more of these! I followed Sam Donalds’s version except I added another layer to my strips to coordinate with my card! I have been following “Pootles” since I first started stamping. I love listening to her accent as well as how she makes what looks complicated so easy! The link to her blog post/video is below where she creates a beautiful birthday version using the Wildflower Birthday Specialty Designer Series Paper. This paper is great for birthdays, weddings, baby, etc. (I LOVE both of her boxes!!!!)
How To Make a Hexagonal Twist & Close Gift Box With Wildflower Birthday
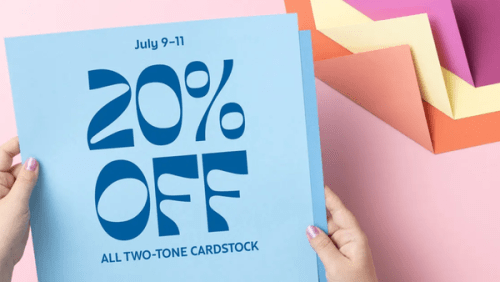
Two-Tone Cardstock SALE
All two-tone cardstock is 20% off from today, July 9th, through Friday, July 11th.
Stampin’ Up! now offers all their colors in the two-tone cardstock… 53 lighter and darker Stampin’ Up! colors on double-sided sheets. It’s available in single or mixed-color packs for harmonious colorful or monochromatic projects. Each piece of cardstock has a smooth texture for stamping and a white core that works great for techniques like tearing, sanding, crumpling, embossing, etc. Now’s a great time to stock up or try this really fun cardstock!!
CLICK HERE to view the video I shared yesterday showing some of the different techniques you can do with two-tone cardstock.
Have a great day! Thanks for stopping by!
Just Stampin’
Jeanie

My Just Stampin’ Rewards:
I appreciate each and every order! Here are the things you can expect when you place an online order with me:
- Shop and earn 10% back in Stampin’ Rewards on orders of $20 or more. Use them on your next order or save them up to 1 year for something special!
- All orders will receive a handmade thank you card from me.
(*You can choose to remove the sticky note inside and reuse the card.) - With a $50 order you will receive a PDF from my “Just Stampin’ Sketchbook” showcasing card designs that you can use with any stamp set. This is a great resource! (*You can collect new design tutorials each month!)
- With an order of $75 (or more) I will send you the PDF and thank you card as well as a card kit or Stampin’ Up Product of my choosing – this varies monthly.
Product List (Click on image to SHOP my online store.)
|
|
|
|
|
|
||
|
|
|
|
|
|
|
|
|
|
|
|
|
|
|
|
|
|
![Perfectly Pears Bundle (English) [ 166154 ]](https://assets1.tamsnetwork.com/images/EC042017NF/166154s.jpg "Perfectly Pears Bundle (English) [ 166154 ]")
![Perfectly Pears Photopolymer Stamp Set (English) [ 166147 ]](https://assets1.tamsnetwork.com/images/EC042017NF/166147s.jpg "Perfectly Pears Photopolymer Stamp Set (English) [ 166147 ]")
![Perfectly Pears Dies [ 166153 ]](https://assets1.tamsnetwork.com/images/EC042017NF/166153s.jpg "Perfectly Pears Dies [ 166153 ]")
![Painterly Pears 12" X 12" (30.5 X 30.5 Cm) Designer Series Paper [ 166146 ]](https://assets1.tamsnetwork.com/images/EC042017NF/166146s.jpg "Painterly Pears 12\" X 12\" (30.5 X 30.5 Cm) Designer Series Paper [ 166146 ]")
![Mossy Meadow 8-1/2" X 11" Cardstock [ 133676 ]](https://assets1.tamsnetwork.com/images/EC042017NF/133676s.jpg "Mossy Meadow 8-1/2\" X 11\" Cardstock [ 133676 ]")
![Old Olive 8-1/2" X 11" Cardstock [ 100702 ]](https://assets1.tamsnetwork.com/images/EC042017NF/100702s.jpg "Old Olive 8-1/2\" X 11\" Cardstock [ 100702 ]")
![Secret Sea 8 1/2" X 11" Cardstock [ 165624 ]](https://assets1.tamsnetwork.com/images/EC042017NF/165624s.jpg "Secret Sea 8 1/2\" X 11\" Cardstock [ 165624 ]")
![Basic White 8 1/2" X 11" Cardstock [ 166780 ]](https://assets1.tamsnetwork.com/images/EC042017NF/166780s.jpg "Basic White 8 1/2\" X 11\" Cardstock [ 166780 ]")
![Basic Beige 8 1/2" X 11" Cardstock [ 164511 ]](https://assets1.tamsnetwork.com/images/EC042017NF/164511s.jpg "Basic Beige 8 1/2\" X 11\" Cardstock [ 164511 ]")
![Mossy Meadow Classic Stampin' Pad [ 147111 ]](https://assets1.tamsnetwork.com/images/EC042017NF/147111s.jpg "Mossy Meadow Classic Stampin' Pad [ 147111 ]")
![Calypso Coral Classic Stampin' Pad [ 147101 ]](https://assets1.tamsnetwork.com/images/EC042017NF/147101s.jpg "Calypso Coral Classic Stampin' Pad [ 147101 ]")
![Lemon Lolly Classic Stampin' Pad [ 161666 ]](https://assets1.tamsnetwork.com/images/EC042017NF/161666s.jpg "Lemon Lolly Classic Stampin' Pad [ 161666 ]")
![Blending Brushes [ 153611 ]](https://assets1.tamsnetwork.com/images/EC042017NF/153611s.jpg "Blending Brushes [ 153611 ]")
![Linen Thread [ 104199 ]](https://assets1.tamsnetwork.com/images/EC042017NF/104199s.jpg "Linen Thread [ 104199 ]")
![Stampin' Seal [ 152813 ]](https://assets1.tamsnetwork.com/images/EC042017NF/152813s.jpg "Stampin' Seal [ 152813 ]")
![Tear & Tape Adhesive [ 154031 ]](https://assets1.tamsnetwork.com/images/EC042017NF/154031s.jpg "Tear & Tape Adhesive [ 154031 ]")
![Mini Glue Dots [ 103683 ]](https://assets1.tamsnetwork.com/images/EC042017NF/103683s.jpg "Mini Glue Dots [ 103683 ]")
![Stampin' Dimensionals [ 104430 ]](https://assets1.tamsnetwork.com/images/EC042017NF/104430s.jpg "Stampin' Dimensionals [ 104430 ]")
![Bone Folder [ 102300 ]](https://assets1.tamsnetwork.com/images/EC042017NF/102300s.jpg "Bone Folder [ 102300 ]")
![Paper Trimmer [ 152392 ]](https://assets1.tamsnetwork.com/images/EC042017NF/152392s.jpg "Paper Trimmer [ 152392 ]")
![Simply Scored [ 122334 ]](https://assets1.tamsnetwork.com/images/EC042017NF/122334s.jpg "Simply Scored [ 122334 ]")
![Stampin' Cut & Emboss Machine [ 149653 ]](https://assets1.tamsnetwork.com/images/EC042017NF/149653s.jpg "Stampin' Cut & Emboss Machine [ 149653 ]")
CLICK HERE TO SHOP STAMPIN’ UP!
CLICK HERE to SHOP LAST CHANCE PRODUCTS
Click HERE TO SHOP KITS COLLECTION
CLICK HERE TO VIEW CURRENT ONLINE EXCLUSIVES
CLICK HERE TO SUBSCRIBE TO PAPER PUMPKIN
CLICK HERE FOR INFORMATION ABOUT JOINING STAMPIN’ UP!
CLICK HERE TO JOIN MY STAMPIN’ UP! Team
CLICK HERE TO VIEW MY TUTORIALS


![Winterly Tree Tops Bundle (English) [ 164066 ]](https://assets1.tamsnetwork.com/images/EC042017NF/164066s.jpg "Winterly Tree Tops Bundle (English) [ 164066 ]")
![Winterly Tree Tops Cling Stamp Set (English) [ 164184 ]](https://assets1.tamsnetwork.com/images/EC042017NF/164184s.jpg "Winterly Tree Tops Cling Stamp Set (English) [ 164184 ]")
![Winterly Tree Tops Dies [ 164065 ]](https://assets1.tamsnetwork.com/images/EC042017NF/164065s.jpg "Winterly Tree Tops Dies [ 164065 ]")
![Hang An Ornament Dies [ 164089 ]](https://assets1.tamsnetwork.com/images/EC042017NF/164089s.jpg "Hang An Ornament Dies [ 164089 ]")
![Stylish Shapes Dies [ 159183 ]](https://assets1.tamsnetwork.com/images/EC042017NF/159183s.jpg "Stylish Shapes Dies [ 159183 ]")
![Snowflake Sky 3 D Embossing Folder [ 162026 ]](https://assets1.tamsnetwork.com/images/EC042017NF/162026s.jpg "Snowflake Sky 3 D Embossing Folder [ 162026 ]")
![Scalloped Gift Card Boxes [ 161751 ]](https://assets1.tamsnetwork.com/images/EC042017NF/161751s.jpg "Scalloped Gift Card Boxes [ 161751 ]")
![Clear Medium Envelopes [ 102619 ]](https://assets1.tamsnetwork.com/images/EC042017NF/102619s.jpg "Clear Medium Envelopes [ 102619 ]")
![Multipurpose Liquid Glue [ 110755 ]](https://assets1.tamsnetwork.com/images/EC042017NF/110755s.jpg "Multipurpose Liquid Glue [ 110755 ]")


![Nests Of Winter 12" X 12" (30.5 X 30.5 Cm) Designer Series Paper [ 164183 ]](https://assets1.tamsnetwork.com/images/EC042017NF/164183s.jpg "Nests Of Winter 12\" X 12\" (30.5 X 30.5 Cm) Designer Series Paper [ 164183 ]")
![Basic White 8 1/2" X 11" Cardstock [ 159276 ]](https://assets1.tamsnetwork.com/images/EC042017NF/159276s.jpg "Basic White 8 1/2\" X 11\" Cardstock [ 159276 ]")
![Gray Granite 8-1/2" X 11" Cardstock [ 146983 ]](https://assets1.tamsnetwork.com/images/EC042017NF/146983s.jpg "Gray Granite 8-1/2\" X 11\" Cardstock [ 146983 ]")
![Pebbled Path 8 1/2" X 11" Cardstock [ 161722 ]](https://assets1.tamsnetwork.com/images/EC042017NF/161722s.jpg "Pebbled Path 8 1/2\" X 11\" Cardstock [ 161722 ]")
![Pebbled Path Classic Stampin' Pad [ 161648 ]](https://assets1.tamsnetwork.com/images/EC042017NF/161648s.jpg "Pebbled Path Classic Stampin' Pad [ 161648 ]")
![Cherry Cobbler & Gold 1/4" (6.4 Mm) Satin Ribbon [ 164028 ]](https://assets1.tamsnetwork.com/images/EC042017NF/164028s.jpg "Cherry Cobbler & Gold 1/4\" (6.4 Mm) Satin Ribbon [ 164028 ]")